Android tips and tricks. What to do if ADB does not see your tablet or smartphone among the devices connected to the computer
Quite often a common problem in Android is the waiting for device error when working with ADB or Fastboot, in this article we will learn how to fix it!
What is this waiting for device?
This error is not quite an error, if you literally translate this phrase - waiting for the device to connect. That is, when you try to do something in ADB or FASTBOT and you get the message waiting for device on the command line, it means that your Android smartphone or tablet is not visible!
Message - adb or fastboot does not see the connected Android device!
To understand what this article is about and to understand what it is about, it is advisable to read the following articles:
- Otladka via USB
Although almost all causes of the message are solved in the same way, for convenience, the article will be divided into the solution "waiting for device in adb" and "waiting for device in fastboot".
Waiting for device solution in ADB
1. The first thing you should pay attention to is that do you have a driver installed?
You can download the driver from this page how to install learn on this link. If the driver is unsigned, then Windows must be restarted by disabling verification. Certain devices require a special ADB driver.
Have you installed the driver? Restart your computer!
2. Make sure the device is in bootloader mode, otherwise fastboot will not see your Android!
3. Please use the original and undamaged microUSB cable! Everything should be clear here, if the cable is damaged, hence the problem of visibility, perhaps you can transfer or receive files from this cable, but you won’t be able to work with Fastboot! Also, do not use a damaged USB port on your computer!
4.Use only USB 2.0 port! Despite the fact that the USB 3.0 standard has already existed for more than a year, it is still too early to talk about large-scale implementation. Fastboot operation with USB 3.0, although possible, is still not desirable!
5. Don't use USB hubs! Never and under no circumstances use USB hubs, working with Fastbot becomes like fortune - lucky or unlucky.
7. Try connecting your Android to a different USB port.
9. Open a command prompt as "administrator".
If you once had a similar “waiting for device” problem and decided in your own way, not from the listed methods, then feel free to write in the comments!
That's all! Read more articles and instructions in the section. Stay with the site, it will be even more interesting!
November 7, 2012 at 02:56 pmManual installation of ADB driver
- Android Development
- tutorial
And here an unpleasant surprise awaited me - either the native driver turned out to be crooked, or Windows, or a wire ... in general, the driver got up, the Windows device manager reported that the device was fully operational, but upon request adb devices in the console, I received an empty list and, of course, it was not possible to test the application on a tablet.
I wrote a request to TeXeT support, they even answered me with a link to the driver itself, which, as I already saw, did not work. I started looking for an answer on the Internet and found a bunch of different builds of this driver and manuals, but still none of them started up properly, and even the native driver from the SDK did not become at all, which plunged me into despondency ... but not despair.
Here I decided to try my hand at writing drivers the good old method of scientific poke and opened the inf file of the driver. Hope gave me the understanding that the software part of the adb interface from the side of the tablet should be identical for all devices, and USB worked anyway. And so, after several unsuccessful attempts to manually edit the inf-file, I found a recipe for curing the seasoning of the inf-file so that it is installed and, most importantly, it works.
So let's get started.
Step 1. Download the driver. If you haven't already, open the Android SDK Manager, find the Extras section, check the Google USB Driver box, and click Install Packages. Everything is simple. Wait for it to load.
Step 2. Find the driver and make a copy of it in a separate folder. Go to the %android-sdk%\extras\google\ folder and you will see the cherished usb_driver folder there. Copy it somewhere, and there we will carry out further manipulations. In principle, you can also edit the "original", but I preferred to keep the original untouched for every fireman.
Step 3. Edit the inf file. In daddy, open the android_winusb.inf file and look for lines like this:
;Google Nexus One %SingleAdbInterface% = USB_Install, USB\VID_18D1&PID_0D02 %CompositeAdbInterface% = USB_Install, USB\VID_18D1&PID_0D02&MI_01 %SingleAdbInterface% = USB_Install, USB\VID_18D1&PID_4E11 %CompositeAdbInterface% = USB_Install, USB\VID_18D1&PID_4E12&MI_01
Make a copy of these lines, replace Google Nexus One on the %your_device_name% for identification in the future and ... open the Windows Device Manager. We are looking for our device there ( Android, Android Composite ADB Interface or something like that). Open the properties of the device, the "Details" tab, select the item "Hardware ID" in the list and we see such a picture.
We copy the line that is most similar to the one shown in the figure (It is, in theory, just a little shorter), and paste it into our inf file.
;TEXET TM-7025 %SingleAdbInterface% = USB_Install, USB\VID_18D1&PID_0003 %CompositeAdbInterface% = USB_Install, USB\VID_18D1&PID_0003&MI_01 %SingleAdbInterface% = USB_Install, USB\VID_18D1&PID_0003 %CompositeAdbInterface% = USB_Install, USB\VID_18D1&PID_0003&MI_01
In %SingleAdbInterface% we delete the end of the line, as you can see, in %CompositeAdbInterface% we insert the whole thing. You probably don’t need to repeat everything twice, but I already have everything and I’m too lazy to experiment :)
We save (be careful - in some cases you need to run notepad with administrator rights, because in user mode you will not be allowed to overwrite the inf file).
Step 4. Installing the driver. Now that everything is ready, we return to the device manager and remove all previously installed adb drivers (if any). We update the list of devices and see our device without drivers. We open its properties and select "update drivers", select the installation from the folder, specify the folder with the corrected inf and start the installation - our driver is instantly located, but during installation it may swear about incompatibility with the question "should I continue, nasyalneka?". We continue. Everything, the driver is installed.
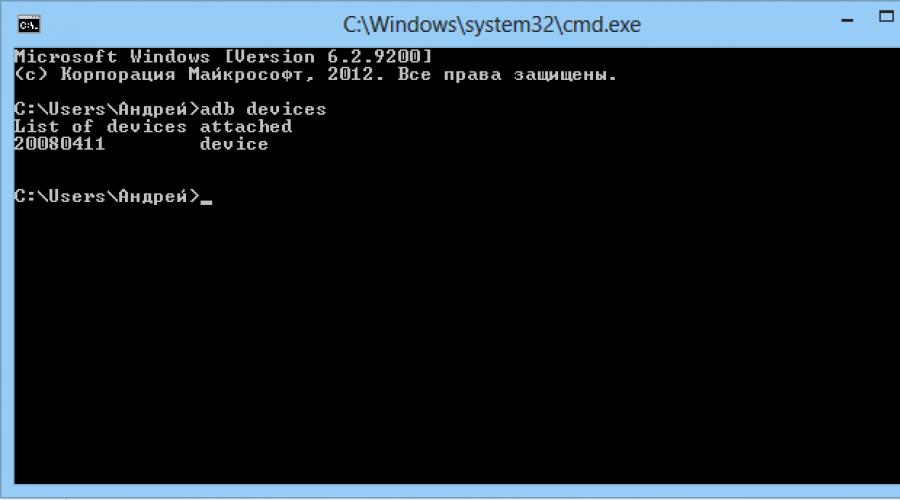
Step 5. Final. For accuracy, we do take out the USB port, wait until everything is detected, open the console (Win + R, enter cmd) and write adb devices. If everything went well, we see the coveted list item, indicating that adb now sees our device. 
From now on, you can safely run eclipse and build programs, enjoying convenient automatic assembly, installation and debugging right on our device.
If the adb command does not work for you at all. Computer -> Properties -> Environment Variables. We are looking for the Path variable and at the end we add(in no case do we overwrite) at the end with a semicolon, and after the address of the folder where adb lives (usually %android-sdk%\platform-tools\). After a reboot it should work.
Sometimes adb does not start automatically at system startup. Start manually.
What was it?
In fact, everything is simple. For some reason (Windows mastday / progers have crooked hands / the Google inf file was written only for native Google devices / Higgs bosons ruined everything in your computer), Windows does not want to eat the Google driver for non-Google devices that are not recorded in the inf file. Apparently, everything there is just tied to these ID equipment. But after all, the software part on the vast majority of Android devices is identical in terms of the debugger connector to the PC, so the driver should normally communicate with any Android device. Our task is to deceive Windows and make it accept the device as a "suitable driver", which we did by adding its ID to the driver's inf file.
I hope this manual will help someone to get their own Chinese or other device, for which they forgot to make a normal adb driver when assembling the system, or for those who need to download the official driver from the device manufacturer (this can be so hemorrhoid that it’s faster to do all of the above - it happened to me with the driver for the LG E510 phone).
P.S. I have not mass tested this method, so I cannot guarantee that it will work 100% in all cases. But it worked for me on Windows 7, and after that on Windows 8. The file had to be edited for each time separately, but I don’t think that this is such a problem.
Here we will figure out how to install adb. If DDMS does not see adb devices in Eclipse ( if our device does not see in DDMS in eclipse). I do not see the texet 9750hd device (android tablet).
From the site, I could not install the driver for the 9750HD. And adb did not see, but only showed "9750hd" with an exclamation point in the device manager.
You can also try to install drivers via Super One Click by running advanced -> check driver. If nothing comes out then continue.
Always showed only List of device attachments and that's it, without a list, showing that there is no adb device. How many did not try to follow other sites. Although it showed in the dispatcher that adb was installed, it still did not see the device in adb: 
Download the "google usb driver" through the "Android SDK manager" in the extras category (tick the box and click install packages): 
After downloading, open our daddy with installed drivers:
%android_sdk%\sdk\extras\google\usb_driver
Open and edit the file "android_winusb.inf", depending on the architecture, let's say you have x86 (add to the desired block), add our device, that's what happened:
;Google Nexus One
Now we will add our device, copy the desired line from the device manager: 
Now copy ;Google Nexus One and replace in CompositeAdbInterface USB\VID_18D1&PID_4E12&MI_01 and without the last parameter MI_01 in SingleAdbInterface:
;Google Nexus One
%SingleAdbInterface% = USB_Install, USB\VID_18D1&PID_0D02
%CompositeAdbInterface% = USB_Install, USB\VID_18D1&PID_0D02&MI_01
%SingleAdbInterface% = USB_Install, USB\VID_18D1&PID_4E11
%CompositeAdbInterface% = USB_Install, USB\VID_18D1&PID_4E12&MI_01
; texet 9750hd
%SingleAdbInterface% = USB_Install, USB\VID_2207&PID_0010
%CompositeAdbInterface% = USB_Install, USB\VID_2207&PID_0010&MI_01
Now one more file is edited C:\Users\%user%\.android\. Let's add our VID to it, which was copied above with the prefix 0x **** (hexadecimal), and save:

Now we update our driver pointing to our daddy with drivers: 


Click install from disk, click browse, and select the directory with our file android_winusb.inf:

When updating, it may ask whether to install, of course. After that, the system can see, and possibly our DDMS. In my case, this was also not enough, now we will replace and adb.exe:
\%android_sdk%\sdk\platform-tools\ adb.exe.
We download a normally working file, and replace it in our daddy, after which it is directly in the folder ( platform-tools) and run.
Quite a very common problem in Android is the waiting for device error when working with ADB or Fastboot, in this article we will learn how to fix it!
What is this waiting for device?
This error waiting for device not quite a mistake, if you literally translate this phrase - waiting for the device to connect. That is, when you try to do something in adb or fastboot and you get a message waiting for device on the command line, it means that your Android smartphone or tablet is not visible!
Message waiting for device - adb or fastboot do not see the connected Android device!
To continue reading this article and to understand what is at stake, it is advisable to read the following articles:
Although almost all causes of the message are solved in the same way, for convenience, the article will be divided into the solution of waiting for device in adb and waiting for device in fastboot.
Waiting for device solution in ADB
link page. Certain devices require a special ADB driver.
2. USB debugging not enabled! If you do not have USB debugging enabled, then working in ADB is not possible!
It is also worth noting that with Android 4.2 and higher, it is necessary to confirm trust in the connected computer on the device!

3. ADB only works when your Android is on!
4. Please use original and undamaged microUSB cable! Everything should be clear here, if the cable is damaged, hence the problem of visibility, perhaps you can transfer or receive files from this cable, but ADB will no longer work!
5. Do not use a damaged USB port on your computer! The reasons are the same as with the cable.
6. Use only USB 2.0 port! Despite the fact that the USB 3.0 standard has already existed for more than a year, it is still too early to talk about large-scale implementation. Although ADB is possible if the device is connected to a USB 3.0 port, it is still not desirable!
7. Don't use USB hubs! Never and under no circumstances use USB hubs, working with ADB becomes like fortune - lucky or unlucky.
8. Try connecting your Android to a different USB port.
9. If you have Windows 8.1 installed, then you need to make minor edits
Solution waiting for device in Fastboot
Not all Androids have Fastboot mode (99% of all Samsung and Lenovo), respectively, these models will not work in this mode and will always give a waiting for device!
1. The first thing you should pay attention to is that, but do you have a driver installed? You can download the driver on this page, find out how to install it on this link. Certain devices require a special Fatboot driver (eg Sony).
Have you installed the driver? Restart your computer!
2. Make sure the device is in bootloader mode, otherwise fastboot will not see your Android!
3. Use original and undamaged microUSB cable! Everything should be clear here, if the cable is damaged, hence the problem of visibility, perhaps you can transfer or receive files from this cable, but ADB will no longer work!
4. Do not use a damaged USB port on your computer! The reasons are the same as with the cable.
5. Use only USB 2.0 port! Despite the fact that the USB 3.0 standard has already existed for more than a year, it is still too early to talk about large-scale implementation. Work in Fastboot only with USB 2.0 ports!
6. Don't use USB hubs! Since Fastboot mode is required for Android firmware, it's good if Fastboot simply does not see your device, but if there is any failure in the USB hub, then it will cost you a lot.
7. Try connecting your Android to a different USB port.
8. If you have the Windows 8.1 operating system installed, then you need to make minor changes, after which everything should work.
- tutorial
And here an unpleasant surprise awaited me - either the native driver turned out to be crooked, or Windows, or a wire ... in general, the driver got up, the Windows device manager reported that the device was fully operational, but upon request adb devices in the console, I received an empty list and, of course, it was not possible to test the application on a tablet.
I wrote a request to TeXeT support, they even answered me with a link to the driver itself, which, as I already saw, did not work. I started looking for an answer on the Internet and found a bunch of different builds of this driver and manuals, but still none of them started up properly, and even the native driver from the SDK did not become at all, which plunged me into despondency ... but not despair.
Here I decided to try my hand at writing drivers the good old method of scientific poke and opened the inf file of the driver. Hope gave me the understanding that the software part of the adb interface from the side of the tablet should be identical for all devices, and USB worked anyway. And so, after several unsuccessful attempts to manually edit the inf-file, I found a recipe for curing the seasoning of the inf-file so that it is installed and, most importantly, it works.
So let's get started.
Step 1. Download the driver. If you haven't already, open the Android SDK Manager, find the Extras section, check the Google USB Driver box, and click Install Packages. Everything is simple. Wait for it to load.
Step 2. Find the driver and make a copy of it in a separate folder. Go to the %android-sdk%\extras\google\ folder and you will see the cherished usb_driver folder there. Copy it somewhere, and there we will carry out further manipulations. In principle, you can also edit the "original", but I preferred to keep the original untouched for every fireman.
Step 3. Edit the inf file. In daddy, open the android_winusb.inf file and look for lines like this:
;Google Nexus One %SingleAdbInterface% = USB_Install, USB\VID_18D1&PID_0D02 %CompositeAdbInterface% = USB_Install, USB\VID_18D1&PID_0D02&MI_01 %SingleAdbInterface% = USB_Install, USB\VID_18D1&PID_4E11 %CompositeAdbInterface% = USB_Install, USB\VID_18D1&PID_4E12&MI_01
Make a copy of these lines, replace Google Nexus One on the %your_device_name% for identification in the future and ... open the Windows Device Manager. We are looking for our device there ( Android, Android Composite ADB Interface or something like that). Open the properties of the device, the "Details" tab, select the item "Hardware ID" in the list and we see such a picture.
We copy the line that is most similar to the one shown in the figure (It is, in theory, just a little shorter), and paste it into our inf file.
;TEXET TM-7025 %SingleAdbInterface% = USB_Install, USB\VID_18D1&PID_0003 %CompositeAdbInterface% = USB_Install, USB\VID_18D1&PID_0003&MI_01 %SingleAdbInterface% = USB_Install, USB\VID_18D1&PID_0003 %CompositeAdbInterface% = USB_Install, USB\VID_18D1&PID_0003&MI_01
In %SingleAdbInterface% we delete the end of the line, as you can see, in %CompositeAdbInterface% we insert the whole thing. You probably don’t need to repeat everything twice, but I already have everything and I’m too lazy to experiment :)
We save (be careful - in some cases you need to run notepad with administrator rights, because in user mode you will not be allowed to overwrite the inf file).
Step 4. Installing the driver. Now that everything is ready, we return to the device manager and remove all previously installed adb drivers (if any). We update the list of devices and see our device without drivers. We open its properties and select "update drivers", select the installation from the folder, specify the folder with the corrected inf and start the installation - our driver is instantly located, but during installation it may swear about incompatibility with the question "should I continue, nasyalneka?". We continue. Everything, the driver is installed.
Step 5. Final. For accuracy, we do take out the USB port, wait until everything is detected, open the console (Win + R, enter cmd) and write adb devices. If everything went well, we see the coveted list item, indicating that adb now sees our device.
From now on, you can safely run eclipse and build programs, enjoying convenient automatic assembly, installation and debugging right on our device.
If the adb command does not work for you at all. Computer -> Properties -> Environment Variables. We are looking for the Path variable and at the end we add(in no case do we overwrite) at the end with a semicolon, and after the address of the folder where adb lives (usually %android-sdk%\platform-tools\). After a reboot it should work.
Sometimes adb does not start automatically at system startup. Start manually.
What was it?
In fact, everything is simple. For some reason (Windows mastday / progers have crooked hands / the Google inf file was written only for native Google devices / Higgs bosons ruined everything in your computer), Windows does not want to eat the Google driver for non-Google devices that are not recorded in the inf file. Apparently, everything there is just tied to these ID equipment. But after all, the software part on the vast majority of Android devices is identical in terms of the debugger connector to the PC, so the driver should normally communicate with any Android device. Our task is to deceive Windows and make it accept the device as a "suitable driver", which we did by adding its ID to the driver's inf file.
I hope this manual will help someone to get their own Chinese or other device, for which they forgot to make a normal adb driver when assembling the system, or for those who need to download the official driver from the device manufacturer (this can be so hemorrhoid that it’s faster to do all of the above - it happened to me with the driver for the LG E510 phone).
P.S. I have not mass tested this method, so I cannot guarantee that it will work 100% in all cases. But it worked for me on Windows 7, and after that on Windows 8. The file had to be edited for each time separately, but I don’t think that this is such a problem.