Making soap for beginners. How to make soap at home: an old recipe
It would seem that the need to make soap at home has disappeared thanks to the huge selection of this cosmetic product in stores. But soap making is gaining more and more popularity. Soap-makers show off their masterpieces to one another, invent new recipes, conduct master classes and even earn good money from their hobby. There are also special departments and shops for soap making, which once again proves the growing demand for soap making. Is it so easy to make your own soap?
Why is homemade soap better than a store-bought one?
Soap, which is sold in regular household chemical stores and supermarkets, does not contain natural ingredients. It is, in fact, difficult to call it soap, since soap is saponified vegetable fats, not refined petroleum products. A store product often dries the skin and can cause allergic reactions.
When making at home, you can only use natural ingredients that are suitable for your skin type. And if now it is just a hobby, then later it can become a profitable business.
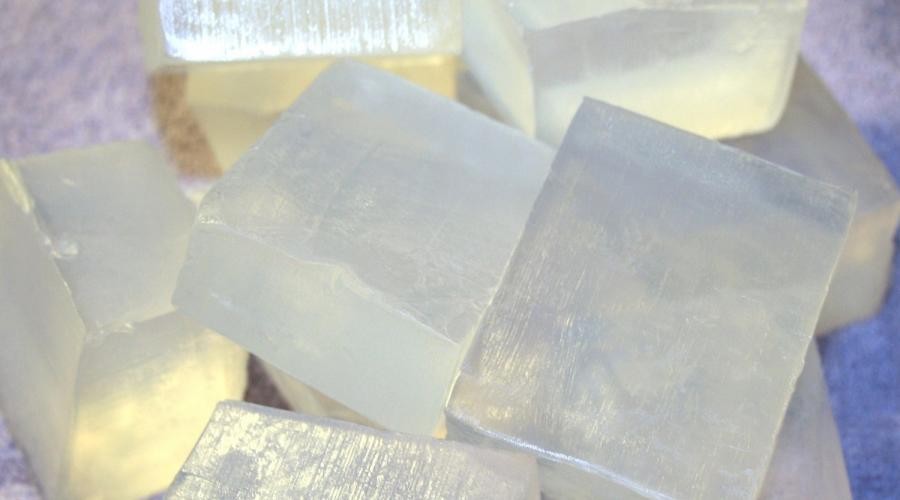
Handmade soap can be of different colors, with beautiful streaks and inclusions of scrubbing elements
What ingredients are used
You can prepare both soap "from scratch" and from a ready-made commercial base. As the latter, you can also use natural, fragrance-free baby soap. And for the thrifty, there are ways to digest remnants and turn "waste" into fragrant soap.
It is much easier to work with a ready-made framework. It comes in transparent and white. Organic bases for making natural soaps are also commercially available. You can buy them in soap shops. It is not difficult to work with the base, but it will still require some skills. As for making soap "from scratch", then in this case knowledge in the field of chemistry will also be required, since you will have to work with alkali. Before you start making soap, be sure to familiarize yourself with safety precautions when working with alkali.
The amount of ingredients will depend on how the soap is made and the recipe. Let's consider a list of required components for each case.
Ingredients for soap base
All the main ingredients can be bought in a specialty store, and additional ones can be found in your regular supermarket. Some will surely be found in your home. You will need:
- ready-made base;
- base vegetable oils;
- dyes;
- flavors;
- essential oils;
- herbs, petals, honey, ground coffee - optional;
- medical alcohol.
Bases from different manufacturers differ in price, hardness, solidification rate and other characteristics. There are organic bases that are used to make all-natural soaps.

A transparent soap is prepared from a transparent base.
Base oils are used to fortify soaps, giving them the benefits of moisturizing, nourishing and softening. Without them, the product dries the skin, and also quickly "dries out", cracks and exfoliates. For the same purpose, you can add body cream or milk, cream or pasteurized milk.
Important! Don't overdo it with moisturizers and oils. If you decide to add fatty milk, reduce the amount. Soap saturated with fats does not foam well.
Dyes are available in liquid and dry form. It is most convenient to use liquid drops, since it is very easy to measure out the required number of drops. Dry dyes are pre-mixed with oils or liquid and only then are added to the finished mass. Try not to overdo it with dyes, as this will cause the foam to be colored when lathering. To get started, it will be enough to purchase three basic colors: red, yellow and blue. By mixing them, you can achieve almost any shade.
In addition to purchased artificial colors, natural ones can also be used. It can be spices (turmeric, curry), the same base oils (sea buckthorn, pumpkin), different fillers (colored clays, ground coffee, cocoa, strong herbal decoctions). Of course, with their help it will not be possible to achieve bright, saturated colors, but the soap will be as environmentally friendly and natural as possible.
For decoration, you can also use pearlescent pigments, glitters and various decor.

With the help of special dyes, you can give the soap any shade
Flavors are responsible for a beautiful aroma. You can use confectionery fragrances, or you can look for special fragrances for home cosmetics. Instead of artificial aromas, they use essential oils, honey, chocolate, coffee, dried zest, herbs, flowers and petals. The disadvantage of essential oils is that they fade faster. They are usually given at the very end.
Alcohol is also used in soap making. It removes air bubbles from the surface of the soap and connects the layers in a multi-layer colored soap. To do this, alcohol is poured into a fine spray bottle and sprayed onto the surface of the product.

You can add a decoction of medicinal herbs, dried chamomile flowers and natural essential oils to homemade soap.
In order for the soap to acquire such properties as scrubbing, anti-cellulite effect, smoothing wrinkles, etc., various fillers are added to it. This is ground coffee, powder from nut shells, clay, oat flour, crushed sea salt and much more. All these are additional caring elements that will give the soap the desired beneficial properties.
Do not use fresh fruits, berries, cucumbers, ginger root, or similar ingredients. They will rot and quickly render your enriched soap unusable. Instead, use dried herbs and leaves, petals and small dried flowers, ginger powder, dried fruits.
Instruments and devices
You will also need:
- enameled or stainless steel pan;
- any other pot for a water bath;
- a plastic or glass microwave container;
- spoon;
- corolla;
- measuring cup;
- electronic kitchen scales;
- spray for alcohol;
- forms for soap.
Molds can be bought in the same specialized stores or you can use silicone pastry molds. Children's plastic molds for playing with sand, containers for yogurt or sour cream, and other small containers made of flexible plastic are also suitable. Purchased forms are made of plastic or silicone. For beginners, it is best to use the latter, as it is easiest to get ready-made soap from them.

Soap molds come in plastic and silicone
As for the dishes, you cannot use aluminum pots, cast iron dishes. For these purposes, stainless steel containers with an enamel coating, as well as heat-resistant glass and plastic containers for use in a microwave oven are suitable. For the exact amount of ingredients, you need a measuring cup and a scale.
What ingredients are used to make soap "from scratch"
The soap base is prepared independently using only three components:
- alkali;
- saponification oils;
- liquid - distilled water, herbal decoction, milk.
To make bar soap, you need caustic soda (NaOH). It is sold in the form of flakes or small crystals. Alkaline is needed for saponification of fats, namely base oils.

Caustic soda is also called caustic soda
In the preparation of soap "from scratch", the so-called overfilling is of great importance. Since fats cease to be useful after reacting with alkali, it is recommended to add more oils at the end of cooking. This will be overfat. As a rule, valuable and expensive oils are used for it.
Any vegetable oils can be used. Pork fat is added. The liquid is needed in order to pre-dissolve the alkali and prepare it to combine with fats. Using decoctions of medicinal herbs, you will give the soap useful properties, as well as a natural aroma and shade.
To improve the soap, its coloring and aromatization, the following components are used:
- plasticizers - sugar, sorbitol, fructose, honey;
- acids - lactic, succinic, stearic, citric;
- lanolin;
- glycerol;
- enrichment oils (overfat);
- dyes;
- flavors;
- various useful fillers.
Colorants, flavors and fillers are used the same. Plasticizers are needed to make the soap more pliable and also to improve foaming. The acids will harden the soap and give it bactericidal properties. Lanolin will soften dry and rough skin.

With the help of different base oils, you can give the soap caring, beneficial properties
Supporting tools
You will need:
- two pots (one can be made of heat-resistant glass);
- hand blender;
- measuring cup;
- a glass stirring rod or a regular spoon;
- capacity for working with alkali;
- forms.
Important! The tools that were used to prepare the soap cannot then be used for cooking!

When working with alkali, great attention is paid to safety measures
Ingredients for different types of soaps: for face, hands and body
To give the soap different qualities, you will need the appropriate ingredients. Some of them have emollient properties, others are moisturizing and nourishing, and still others are bactericidal and drying. It is worth noting that it is best to use the appropriate soap for each part of the body. It is not recommended to wash your face with body or hand soap. Also, not all ingredients are suitable for every skin type.
Table: Recommended ingredients for making soap according to its use
| Components | Hands | Face: skin types | Body | |||
| Normal | Dry | Bold | Problematic | |||
| Base oils | olive cocoa Palm jojoba shea (shi) walnut |
olive almond cocoa avocado |
castor evening primrose shea (shi) wheat germ rose hips almond avocado |
sweet almonds apricot kernels peach kernels hazelnut |
olive sea buckthorn |
olive cocoa coconut shi (karite) almond sesame and etc. |
| any | ylang-ylang lavender geranium jasmine chamomile |
lavender palmarosa neroli ylang-ylang jasmine mint |
lemon cypress geranium rosemary |
juniper fir sandal tea tree eucalyptus |
Orange grapefruit eucalyptus tea tree and etc. |
|
|
Fillers, including scrubbing |
lanolin glycerol beeswax |
cosmetic clay ground coffee chopped herbs milk |
cosmetic clay powdered milk glycerol decoctions of herbs chamomile extract, mint, mother-and-stepmother, linden blossom |
cosmetic clay Activated carbon camphor alcohol infusions and decoctions calendula and chamomile propolis tincture |
cosmetic clay Activated carbon eucalyptus leaves infusions and decoctions of herbs |
clay loofah honey sea salt ground coffee eucalyptus leaves tar seaweed |
Geranium oil is recommended for aging skin as it helps to smooth wrinkles. Mint will save you from dryness, and the juniper will saturate the skin with useful substances. For hardened, dry skin, it is recommended to use lanolin. Orange oil, seaweed, loofah and ground coffee have an anti-cellulite effect and make the skin firm.

Essential oils give a beautiful aroma, and also "enrich" the soap with beneficial properties
Making bar soap at home
First, the base is melted in a water bath or in a microwave oven. In the first method, the base melts longer, but a uniformly melted mass is obtained. In addition, you can independently control the entire melting process. When heated in an oven, there is a risk of the base boiling. Therefore, set the power to the minimum and heat for 1 minute, checking the condition of the base every 5-10 seconds.
From a soap base
Having prepared all the necessary ingredients and appliances, do the following:

This is the standard course of action. The amount of ingredients and fillers depends mainly on the recipe.
- base oils - 1/3 tsp;
- essential oils - 3-7 drops;
- flavoring agent - 3-4 drops;
- liquid dye - 1–7 drops;
- dry pigment - 1/3 tsp.
Other additives (herbs, clay, scrubbing components) can be added at will, as well as in accordance with the recipe.
Important! Esters are added at the very end to a warm, but not hot, "soapy" mass. They are quite volatile, evaporate quickly, and their properties are lost.
Video: How to make soap from a ready-made soap base
Cold and hot production from scratch
This is the real soap making. You can prepare only the base and use it in the future as a ready-made purchase.
Making soap from scratch is not the safest activity. You have to work with alkali, and it is known to be capable of leaving burns on the body. Therefore, much attention is paid to means of protection and familiarization with the properties of alkali, its reaction with water, as well as with the chemical reactions that occur during the saponification of fats and their transformation into the very soap.
Alkaline, reacting with water, emits a pungent odor and is very harmful to mucous membranes. Alkaline contact with the skin causes severe burns, so be extremely careful when working with this substance.
Safety rules when working with alkali
- Be sure to use protective equipment: goggles, respirator, rubber gloves.
- Clothes and shoes should be as closed as possible.
- The utensils and tools used to prepare soap are not used for cooking.
- Working with lye is best done outdoors. If this is not possible, open the windows and turn on the hood.
- Food should not be prepared in the kitchen. Children and animals should also not be present.
- Reacting with water, the alkali heats up very much, as a violent reaction occurs. Make sure that the water is as chilled as possible, and preferably with ice cubes.
- The container should be glass, ideally a special container for working with alkali.
This is the minimum list of requirements to keep you safe while preparing a soap base. Then follow the general rules for making soap from scratch.
Another important point. An alkaline solution is poured into liquid oils and not vice versa! You also need to strain the solution to avoid introducing whole soda crystals.
To make sure that the oils and alkali have worked completely and that the soap is absolutely safe for the skin, we recommend using special indicator strips (litmus paper). Just dip the end of the strip into the soap and wait for the reaction. Next, compare the color of the paper with the color scale on the package. The darker the shade, the higher the pH level. Soaps with a pH above 10 are considered unripe and not ready for use.
To prepare the base, they use ready-made recipes or develop their own using a special soap calculator. The latter can be found on the Internet at many soap making sites. The trick is that you have to calculate the amount of oils and alkalis for the correct ratio. It is difficult for beginners to do this, so we advise you to use ready-made recipes from the Internet.

This is what an online soap ingredient calculator looks like.
Prepare a soap base in two ways:
- Cold way. Simpler, but it takes a long time for the soap to “mature”.
- Hot way. More complex at first, but the soap is ready to use within 24 hours.
Let's consider each of them.
Cold way
- Measure out the correct amount of alkali.
- Pour ice water into a special container.
- Pour the lye into the water slowly and stir immediately.

Alkali is added to the liquid gradually, stirring gently
- While the mixture is cooling, proceed with the oils.
- Melt hard oils in a water bath or in the microwave.

Solid oils are heated in a water bath until they are completely melted.
- Mix all oils until smooth.
- Measure the temperature of alkali and oils - one should be approximately the same and be 37–38 ° C (use an electronic thermometer).
- Add an alkaline solution to the oils while filtering it through a strainer.
- Stir gently.
- Turn on the blender and begin to beat the mixture of oils and lye. Alternate whipping and stirring in off mode.

Beat the oils with an alkali solution using a hand blender
- When the mixture becomes viscous, you can start adding various health benefits, colors, and flavors.
- At this stage, superfat, essential oils, and other natural ingredients are added.

When the soap base becomes viscous, you can start adding different fillers and usefulness.
- Pour the finished mixture into molds and leave to harden.
- Remove soap after 24 hours and remove from mold.
- Wrap in plastic and leave to ripen for at least 4 weeks.
A long stage of maturation is necessary for the soap to pass from the "trace" stage to the "gel" stage. In simple words, during this time it will become what it should be.
Video: Soap "from scratch" in the cold way
At the "trace" stage, when the mass begins to thicken, you can stop and leave everything as it is. The solidified mass will be the soap base, which can then be melted and made into a fragrant homemade soap.
Hot way
Before the "trace" stage, soap is prepared in the same way as in the cold process. The fun begins later.
So, the viscous base is ready. We proceed to its next processing:

Video: Hot soap from scratch
As you can see, the hot method is much more difficult, but it has the advantage that the soap can be used almost immediately after it has been prepared.
Soap recipes
There are a huge number of recipes for making different types of soap, which differ in their purpose, properties, fillers and appearance. Let's look at a few recipes using a base, but if you wish, they can also be applied to making soap from scratch.
Baby
- organic base - 250 g;
- carrot juice - 1/2 tsp;
- decoction of a string and chamomile - 1 tsp;
- almond oil - 8 drops;
- mandarin oil - 1-2 drops;
- funny baby silicone molds in the form of animals.
It's very simple: melt the base, mix with the rest of the ingredients, pour into molds and leave for 24 hours to harden the soap.

These cute cubs can be made from a soap base and other ingredients.
Tar
- transparent base - 100 g;
- calendula oil extract - 1/3 tsp;
- birch tar - 1.5 tsp. (sold at the pharmacy);
- mint essential oil - 6-8 drops.
In the melted and slightly cooled base, add the ingredients in the following sequence: oil extract, tar and finally essential oil. Mix everything thoroughly and pour into shapes.
Birch tar has antiseptic and antifungal properties, so this soap will be useful for problem skin.

This is how tar soap from an opaque natural base will look like.
Two-layer colored soap with honey
Using this recipe, you can make a beautiful decorative soap from layers of different colors.
First layer:
- transparent base - 50 g;
- yellow food dye - 3 drops;
- flavoring "Honey" - 10 drops;
- natural honey - 1 tsp;
- grape seed oil - 1/3 tsp
Second layer:
- white base - 100 g;
- avocado oil - 1/2 tsp;
- pasteurized milk - 2 tsp;
- pearlescent pigment - 1/2 tsp;
- form in the form of honeycombs.
First, prepare the first layer of a transparent base, pour it into a mold and sprinkle with alcohol. When the layer has cooled, sprinkle it with alcohol again and pour over the prepared white base.

This yellow-white soap has a unique honey aroma
Using remnants
Agree, sometimes it is a pity to throw away the remains of soap or the so-called remnants. We offer a simple way to "reanimate" remnants and make soap from them, which in the end may even surpass its "original source". Both solid and liquid soaps can be made from "soapy" residues.
In addition to the remnants, you will need the following ingredients and tools:
- remnants - 200 g;
- water - 5 tbsp. l .;
- glycerin - 2 tbsp. l .;
- alcohol tincture of calendula - 2 tbsp. l .;
- essential oils and fragrances for fragrances - optional;
- grater for rubbing remnants;
- containers for a water bath;
- spoon;
- forms.
You can use a variety of remnants, except, of course, residues from laundry soap and various stain removers. You can take any fillers and fragrances. With their help, you "enrich" the soap, give it new useful properties and aromas.

Colored remnants can be used to make wonderful soap
Glycerin is needed to obtain a more viscous consistency, it helps the components dissolve faster and retains the desired moisture. Instead of alcohol tincture of calendula, you can use rubbing alcohol.
The remnants will need to be melted in a water bath. Thus, the contents will be evenly heated and melted to the desired consistency.
So, having prepared all the necessary ingredients and tools, get to work:

In the same way, you can make soap from the remains of the soap base and baby soap.
Video: How to make solid soap from remnants
How to make liquid soap
For the preparation of liquid soap "from scratch" use a different type of alkali, namely KOH (potassium hydroxide) This type of soap is also called potash. Liquid soap can be made from the same remnants, from baby soap, from the remains of a soap base, or any solid soap. Consider the cooking process.
From the remnants
To prepare 1 liter of liquid soap you will need:
- remnants - 50 g;
- distilled water - 1 liter;
- tincture of calendula or rubbing alcohol - 2 tbsp. l .;
- essential oil - 3 drops;
- liquid food dye - 3 drops;
- glycerin - 4 tbsp. l.
Put a pot of water on fire and do the following:

Video: how to make liquid soap from remnants
Liquid laundry soap
It is used for washing linen and dishwashing. You will need one bar of laundry soap (200 g), 1 L of water, essential oils and fragrances - optional. How to cook:
- Rub the soap on a grater - the finer the shavings, the faster it will dissolve.
- Pour the shavings into a stainless steel pot and add water.
- Stir the ingredients and cook over low heat until the chips are completely dissolved.
- At the end, strain the mass through a sieve and cool slightly.
- Add about 20 drops of an essential oil or fragrance.
- Pour the prepared liquid soap into a plastic bottle.
- Concentrated Laundry Gel is ready.

The finished product is stored in a closed container.
Photo gallery: beautiful handmade soap
 Loofah soap has a scrubbing and anti-cellulite effect on the skin
  Herbal soap is always a pleasure to use.
  Coniferous soap has extraordinary healing properties and a beautiful aroma.
  The millet in the form of a jelly dessert looks very appetizing.
  This soap is practically indistinguishable from a natural mineral.
  This soap not only looks beautiful, but also smells delicious.
  The main thing is not to confuse this soap with a real cake!
  Natural soap without artificial colors and additives, the most beneficial for the skin
  Snowflake soap will be a great gift for the New Year
  Homemade colored soap with various additives will decorate the bathroom
  Handmade soap comes in a wide variety of shapes and colors.
Dear readers, I think you will agree with how pleasant it is to pamper yourself with something as pleasant and aromatic as natural high-quality cosmetics. And how can you please the usual, familiar soap! Although why should he have to be ordinary? And we can all the more make it completely extraordinary if we cook it ourselves.
Svetlana Sarycheva will tell you how to make handmade soap today. Like many needlewomen, she took up soap making on maternity leave and began to regularly make home cosmetics, take orders, participate in fairs and conduct master classes. I think we will have something to learn from her. I give her the floor.
Hello dear readers of the interesting and useful blog by Irina Zaitseva! I hope my recommendations and a step-by-step master class with a photo will help you master a new exciting business - how to make soap.
Where to begin
Natural soap is useful. In addition, handmade soap is the very same hand-made soap that does not have to gather dust on distant shelves.
For some time it will remain a decoration of the bathroom, but in the end it will certainly go into business.
Making the simplest homemade soap is easy. I will tell you how to take the first steps in soap making at no special cost. After that, you can decide for yourself whether you are ready to seriously engage in this and whether you should purchase everything you need to create more complex options for soaps, peels, scrubs and other types of home cosmetics.
What do you need for handmade soap?
- cutting board;
- knives;
- cup or mug (solid on the inside);
- stirring spoons;
- a microwave oven or two pans for a water bath;
- the form;
- soap base (or grated baby soap);
- powdered sugar (optional);
- food coloring;
- spices or cosmetic clay;
- oils, honey, tea broth, milk to add to soap.

Soap base
In principle, kits for beginner soapmakers can now be bought even in a children's store. However, I advise you to start differently. To make your own soap at home, purchase a small piece of soap base from a craft store.
This basic soap base is made from vegetable fats. It is not tested on fauna. There is no free alkali in this base, which can irritate the skin.
In fact, this is a semi-finished soap without aroma, which can be white or transparent.
Nowadays, solid bases are becoming more and more widespread, already containing certain additions of natural origin (oils, crushed plants, etc.). There are also soft bases suitable, first of all, for making shampoo, gel, mousse, milk, etc.
Take a close look at any base soap base before purchasing. If it was carefully transported, stored and packaged, then the blocks should be clean, without adhering small debris. Opaque bubbles in a transparent base mean that it is damaged (most likely, the base was kept in the cold).
The highest quality brands of solid bases for homemade soaps melt evenly and quickly and fully accept aromatic oils.
What is the best soap base? What to choose?
The handmade soap made from them hardens and foams perfectly. Such basic foundations of high quality soapmakers with experience include the English Crystal, the Belgian Tensianol and the German foundations Activ and Zetessap. As for the latter, it should be borne in mind that it is produced exclusively in a transparent form and without any additives.
Some sellers also offer a white solid Zetessap base, but in fact it is still the same transparent base that those who bought it at the factory themselves melted in combination with titanium dioxide. This substance turns the base white and is practically insoluble in water.
Slightly Above Average - Chinese Basics. For authors of complex cosmetics, they may not be suitable, but soap makers working with fatty oils will succeed. If you do not add the right amount of oils and fragrances to this handmade soap, then it will smell noticeably of the "original" soap and dry the skin a little. However, foam will still appear.
Malaysian soap bases are considered quite satisfactory for handmade soap.
However, I do not advise buying the basics of Russian production (Myloff, DS-CLRC, ProLab, etc.) and Bulgaria (Re-St, Relina MSDS, etc.). These cheap bases can dry out or, on the contrary, release moisture, and also not completely solidify in the molds.
The best temperature for storing a solid base is +15 .. + 20 ˚С.
You can save on a soap base by using crushed baby soap instead. Although rubbing solid soap with a grater is a rather laborious process. And you need to melt it in the same way as a soap base.
How to make soap
And now my master class with a photo on how to make soap yourself. Here's my recipe, let's get started! Cut a hundred-gram piece of soap base (mine is white, without any additives) cut into cubes.


Prepare the molds. Since I'm talking about the first experience, including in terms of cost savings, existing silicone muffin molds are fine. Pre-rinse them with cold water.
Let's go back to the soap base. The cubes should be melted in the microwave or water bath. Perhaps the microwave is more convenient. Just remember that you need to take not just sturdy dishes, but one that has no drawings, shiny stripes, etc. inside.
Don't melt the base all the way. At high power, a couple of minutes is enough. The base should not boil! Otherwise, the moisture will evaporate, and the required ph (acid-base balance) level in homemade soap will be disturbed.
If you don't have a microwave, make a water bath. To do this, take two pots - larger and smaller. Pour water into a large one and heat it up. Place the soap base cubes in a small one.
Important points:
Use a large heavy-bottomed saucepan to avoid heavy boiling;
at the bottom you can lay a linen or cotton napkin;
do not put a small saucepan in a large one until the water has boiled;
cover the small saucepan with a lid.
When placing the second in the first pan, make sure that the bottom only slightly touches the water. This is how the water bath will turn out: the future soap, which you put in a small pot, will be heated and softened by the action of the hot steam rising from the water from the large pot.
The rest of the cubes will dissolve on their own in the process of further stirring.
Stir the mixture and let it cool slightly. If you have food coloring in your kitchen, add a few drops.
We supplement the base with natural oils
Now you can add oil to the base. I have solid cocoa butter.


You may have previously bought solid or liquid pharmaceutical oils for cosmetic and medicinal purposes. For soap, a small bar or a few drops is enough. Olive oil and glycerin will also work.
Glycerin moisturizes well and protects the skin from adverse environmental factors.
Softens the skin and makes it soft. By forming an airtight barrier on the skin, it prevents it from drying out by retaining moisture. This oil is hypoallergenic and suitable for children.
Cocoa butter has emollient and regenerative properties.
Apricot kernel oil has a regenerating, rejuvenating, tonic effect. It helps restore skin firmness and elasticity.
Nourishes and softens dry skin.
Grape seed oil reduces pores, tones and refreshes.
Gives a rejuvenating effect.
Calendula oil has an antiseptic, bactericidal, anti-inflammatory, emollient and moisturizing effect.
Suitable for supporting dry, damaged or aging skin. It promotes cell regeneration and strengthening of capillaries, relieves swelling and redness, eliminates skin peeling.
Other soap additives
You can also add tea broth, honey or milk to handmade soaps for smooth and soft skin.
If the soap is supplemented with a mixture of spices (cinnamon, ginger, etc. - we choose according to taste and desire) or a small amount of cosmetic clay, then it will have a slight peeling effect.
Stir again after all additions to avoid bubbles and lumps. If in the future you will prepare several bars of soap at once, then a mixer or blender will come in handy. Fear not: soap base and other ingredients are easy to clean!
Pour the mixture into a mold.

In a silicone form, homemade soap will harden quickly (you will have to wait a maximum of an hour), but after that be sure to dry your fragrant product for another hour or two.

How to make liquid soap at home
From the remains of solid soap, you can make liquid soap, which will last for a long time. Dry the remaining soap and grate it. Boil water and mix with soap. Add a few drops of glycerin (for gel consistency) and lemon or orange juice (for flavor).
Stir the solution again, and then pour it into a container with a dispenser. Insist for three days, remembering to shake occasionally.
Soap making is one of the most relevant and low cost ways to organize. Modern fashion trends contribute to the prosperity of home soap making. Now more than ever, products made from natural ingredients are popular: this applies not only to cosmetics, but also to clothing and food.
Business registration
In order to officially register a soap making business, you will need to register an individual entrepreneur. This will allow you to choose a simplified taxation system.

After that, you need to select the OKVED codes:
- 24.51.3 - Manufacture of soap and detergents.
- 24.51.4 - Production of means for aromatization and deodorization of air; production of polishing and cleaning products, waxes.
In addition, you will have to obtain the following permits:
- Conclusion from the Sanitary and Epidemiological Service.
- Conclusion from the fire department.
Important: soap samples must undergo special laboratory tests. This is necessary for the registration of the declaration of conformity of the technical regulation 009/2011 "On the safety of perfumery and cosmetic products." This is the only way you can get a certificate for the production of homemade soap for its subsequent official sale.
In general, about 25-30 thousand rubles should be allocated for registering a business and obtaining all the necessary permits.
Search for areas
Making homemade handmade soap in large batches, especially using the technology of saponification of fats, will require the rental of a specialized room that meets certain requirements. In addition, when officially registering a soap making business, you will also have to indicate where you manufacture your product. The premises must be inspected by fire and sanitary-epidemiological inspectors and found to be in compliance with regulatory requirements.
Advice: to minimize rental costs, choose a premise located in the suburbs.
As for the requirements, they are as follows:
- The area is about 20 square meters.
- At least three rooms: one for making soap, the second for packaging and storing it, and the third for rest and eating by employees.
- Existing communications: electricity, water supply, sewerage and heating.
- Good ventilation system or extractor hood.
The room does not necessarily need to be redecorated, but some conditions are still important to comply with:
- Lack of dampness.
- Nice windows with no cracks and no drafts.
- Walls without cracks.

Important: you need to either immediately rent a room that meets all the requirements, or allocate money for its repair.
Equipment purchase
The production of handmade soap, in contrast, for example, does not require the immediate purchase or rental of expensive equipment. At the initial stages, you may not invest at all in the acquisition of materials, using improvised means and making soap in your own kitchen.
However, with an increase in production volumes and an expansion of the assortment, you will need to purchase equipment and equipment for professional soap making.

The purchase of equipment is the most expensive item of expenditure. You can buy everything you need at a better price in specialized online stores for soap makers, as well as order on Aliexpress.
Purchase of raw materials
The raw materials required for the manufacture of soap may vary depending on the production technology and the characteristics of the assortment. We will list the main ingredients that will be sufficient at the initial stage.

The main components of homemade soap:
- Soap base... It can be either transparent or white - the color is achieved by adding a safe substance - titanium dioxide. The base consists of glycerin, solid oils and detergents and is sold by weight, the price is about 250-300 rubles per kg.
- Base oil... For handmade soaps, coconut, olive, palm, aloe vera, shea and cocoa butter are most often used. Their addition gives the soap nourishing, moisturizing and other valuable properties. Price - from 150 to 800 rubles for 400 gr. The base oil is usually solid. In addition to its basic properties, it also contributes to the production of bar soap, which holds its shape well. This product is much more expensive than homemade liquid soap and is also easier to sell.
- Essential oil... It is used in small quantities for aromatization of the product and for therapeutic and prophylactic purposes. The price is about 100 rubles for 10 mg.
- Filler... Handmade soaps, depending on the purpose, can be supplemented with natural or decorative fillers - or both. Natural ingredients - honey, fruit puree, etc. Decorative fillers - dried flowers, glitters, clays. The prices for these components are different. For example, the cost of mother-of-pearl or dried flowers is about 50 rubles for 5 grams.
- Abrasive... It is an ingredient that gives the soap a scrubbing effect. It can be both natural (ground fruit pits, coffee grounds) and synthetic. The prices are also different. For example, crushed apricot pits will cost 50-70 rubles for 40 grams, and ground lingonberries - about 40 rubles for 5 grams.
- Dyes... They can be both natural and synthetic. The former are more popular, while the latter are most often used to make homemade soap gift sets. Natural dyes - various herbs and flowers, synthetic - ordinary food dyes, the price of which ranges from 40 to 80 rubles per 10 mg.
- Perfume... They are not always used, as they are not natural ingredients. They are used to make a product with a persistent aroma, because essential oils do not smell as strong. Fragrances can be used to create fruity, floral, caramel, coffee, or any other scent on soaps. The cost of an ingredient is from 70 to 120 rubles per 10 mg.
This is the basic set of components that a novice soap maker will need. Those who are professionally engaged in the production of handmade soap buy, in addition to everything, two more components: potassium and sodium hydroxides at a price of 200 to 300 rubles per kilogram.
Important: to work with hydroxides, it is imperative to use personal protective equipment - a respirator, goggles and gloves, and also have an equipped place for such a production, where a good ventilation system or a powerful hood will be installed.
Attracting staff
Of course, at the initial stages of production, you can cope with the soap making process yourself. However, after some time, when you establish the sales processes of the finished product and increase the volume, you will have to attract personnel.

When producing handmade soap in large batches (about 3 thousand units of goods per day), you will need at least six workers - three in each shift.
Advice: in the early stages, in order to save money, you can involve students in technology or art students in the work.
For the first year or two, the procurement of raw materials and the sale of products should be dealt with independently, as well as accounting. However, with the growth of the business and the increase in the volume of production, it will be necessary to delegate these powers by hiring specialists.
Organization of advertising
Marketing and advertising in home soap production is a must. After all, future income directly depends on how well you are able to organize stable sales channels for finished products. And for this you should not only create a quality product, but also present it correctly.
Everything matters: packaging design, decorative elements, label and description of items in the catalog. You must be able to communicate about the product in such a way that potential buyers develop curiosity and interest, as well as positive emotions and a desire to try the product.

Advice: do not skimp and use the services of a designer to create a unique style for your brand. If it is attractive, high-quality and recognizable, then soon your name will work for you, and not you for him.
To make a product popular, a beginner in this niche should use all the promotion opportunities:
- Advertising on the Internet and social networks... Skill is especially useful. An Instagram account will also help to effectively promote the brand.
- Marketing moves... Use various techniques that have proven themselves well: offer discounts or promotions, arrange sweepstakes and contests.
- Flyers and business cards... Create brochures with brief descriptions of your product and photos, as well as business cards with contact information, website address and pages on social networks. Distribute them to gift shops, beauty salons, spas.
- Fairs and festivals... Participate in various events for hand-made masters, sell your goods on them, distribute promotional brochures.

Home soap making for beginners - video
For more information on the technology and features of home soap making, we recommend watching the following videos:
Summing up
Thus, soap making can be a profitable business that even a newbie in business can handle. The main thing is not to spare time for a detailed study of this type of activity and constantly improve in it. Improve recipes, experiment with composition and form, study competitors' products, analyze customer feedback, and get creative with packaging design and advertising.
Making soap at home is a simple and interesting way to organize, which you can use, having only 5-10 thousand rubles, and develop it into a full-fledged enterprise with a staff of workers and a retail outlet. Everyone can walk this path in just a few years, it is enough just to take the matter carefully and seriously.
Many women fell in love with hand-made cosmetics due to their naturalness, low cost and ease of creation. It is popular to make do-it-yourself hygiene products, especially soap. Such bars do not harm the skin, because they do not contain chemical dyes, parabens and preservatives, they have a unique design and a unique aroma.
What do you need to make handmade soap?
There are 2 options for cooking the described cosmetics. The first is suitable for experienced craftsmen, it involves creating pieces from scratch (no base). The second method is recommended for beginners. It is simpler and faster, and the results are almost identical to the professional method. What you need to make soap:
- Base. A quality base is sold in cosmetic stores. It can be replaced with leftover bars or baby soap, but in this case it is difficult to get rid of the pungent specific odor. The base contains oils - vegetable and essential. They perform caring and aromatizing functions. Medical or cosmetic glycerin is sometimes added.
- Dyes. You can give your soap the desired color using natural products and industrial food pigments.
- Forms. The easiest option is to use disposable or reusable plastic containers. Baking dishes are also suitable, including silicone, baby food jars, creams and other containers. Some women make them with their own hands using thick foil and cardboard.
Homemade soap base
The base can be composed of glycerin or vegetable oils, this affects its transparency. Making soap at home is a creative process; it is allowed to add other components to the finished base that enhance its positive qualities. Vegetable oils have a good effect on the skin:
- coconut;
- avocado;
- cocoa;
- olive;
- almond;
- grape seed and others.
Do-it-yourself soap will turn out to be more fragrant and healthier if you add it to it;
- essential oils;
- dry ground herbs or decoctions based on them;
- freshly squeezed juices of vegetables, fruits, berries;
- coffee;
- chocolate;
- tea and other products.
If you plan to make the very first bar in your life, it is better not to spend money on the base. The maximum simple soap at home for beginners is brewed from existing leftovers or whole pieces with a neutral odor. Such a base quickly acquires the desired consistency and is stored for a long time. Both remnants and cheap baby soap will do. It is advisable to select bars without artificial pigments and harsh aroma.

It is easier to give a beautiful color with ready-made products. You can buy dry and liquid pigments, concentrates and glitter (glitters). Many masters prefer to tint homemade soap with natural dyes:
- beet juice;
- coffee;
- chocolate;
- tea;
- herbal decoctions and other means.
Home soap molds
The simplest and most inexpensive option is disposable plastic food containers. If soaps are brewed frequently at home, they can be reused. Silicone molds for cookies and muffins, stencils for cutting dough, deep baking sheets are also used as dishes. To get a unique result, some women sculpt the soap with their own hands until the mass is frozen. Such bars can be given any shape without limiting the flight of creative imagination.
How to make soap?
It is better to start with the simplest recipes with few ingredients. Making soap at home is an easy and enjoyable process that doesn't take a lot of time or effort.
Sequencing:


DIY soap from a soap base
The finished base is considered the most convenient option for the manufacture of hygienic cosmetics. From such a base, you always get a high-quality and beautiful soap with your own hands at home, having an optimal density and structure. In order for it not to delaminate, and to be homogeneous, several rules should be followed. Tips on how to make handmade soap with the above recipe:
- For proper melting of 100 g of the base, it must be placed in the microwave for 30-35 seconds with a power of 750 watts.
- For every 100 g, up to 7 drops of essential oil and 1 tbsp. tablespoons of vegetable oil.
- When using dry pigment, 1/3 teaspoon of powder per 100 g of base is required. In the case of liquid dye, 1-10 drops. Glitter will need up to 1 teaspoon, but it settles at the bottom of the mold.
How to make soap from remnants?
To prepare a new bar from old leftovers, you can use the recipe above. Before you cook soap at home from the remnants, they should be finely grated. The resulting crumb will be the base. It is better to melt it in a steam bath, not in a microwave oven. To speed up heating, you can add water - 5 tbsp. spoons for every 200 g of crumbs. If you rub the remnants coarsely or cut with a knife, the new block will acquire spectacular marble patterns on the surface.
DIY soap with glycerin
The considered component is included in cosmetics to soften the skin and protect it from drying out. If you use the recipe for how to make soap with your own hands, given above, you do not need to add glycerin separately. It is already present in the finished base, especially a lot of this ingredient in the transparent base. When DIY soap is made from leftovers, glycerin should be included in the recipe. It is poured into a melted and slightly cooled mass in an amount of 50 ml per 200 g.
DIY soap at home - recipes
There are a huge number of types of described hygienic cosmetics, each master constantly comes up with new combinations of components and aromas. Any homemade soap recipe is a variation on the basic manufacturing technique. At the stage of adding flavors and colors, additional ingredients are included in the composition. Even a beginner is able to invent a unique soap with his own hands - recipes can be changed according to personal preferences and tastes. Cosmetics are prepared in the same way, depending on individual needs and the type of epidermis.

Excessive activity of the sebaceous glands often provokes rashes and an unpleasant shine on the face. To reduce the oily skin, you can make your own soap with herbs, essential oils (lavender, tea tree, lemon), but menthol has the most pronounced effect. This chemical refreshes the epidermis for a long time and normalizes the sebaceous glands.
Homemade soap recipe for oily to combination skin
Ingredients:
- glycerin base - 80 g;
- base vegetable oil - 4 g;
- powder menthol - 2 g;
- dye - 8-10 drops (optional).
Preparation


DIY soap for dry skin
You can moisturize and soften the epidermis with different products, most craftsmen prefer to use honey and milk. It is important to purchase good quality products before making homemade soaps with nutritional properties. It is advisable to buy dry milk, it does not spoil, and it is easier to control its concentration and fat content. The honey should be thick and completely natural.
DIY cream soap for dry skin
Ingredients:
- white and glycerin base - 100 g each;
- sea buckthorn oil - 2 tsp;
- honey - 1 tsp;
- powdered milk - 1-1.5 tsp;
- shea butter - 1/3 teaspoon;
Preparation
- Cut the base into small cubes.
- Melt the glycerin base, mix it with sea buckthorn oil.
- Add honey.
- Pour the soap into a mold, sprinkle the surface with alcohol.
- Melt the white base in the same way. Add milk powder to it.
- Dissolve the shea butter in the mixture.
- When the honey layer thickens well, pour the milk base on top.
- Allow the composition to harden, remove the finished product.


Soap for problem skin
In the presence of rashes and comedones, you can prepare special cosmetics with exfoliating and soothing properties. It is advisable to cook such handmade soap at home on a high-quality natural basis without comedogenic components. Essential anti-inflammatory oils - tea tree, ylang-ylang, lavender, will fit well into the composition of cosmetics.
DIY soap with coffee
Ingredients.
Soap making has now become a favorite hobby of many people. It's so interesting! You can create your own soap. And it will be much healthier for the body than the purchased one. If you also decide to do this interesting business, then you should know that there are three ways.
Soap making for beginners:
1 way -
This type is suitable for those who have just begun to master the technology of soap making. The method is quite simple. It is based on the fact that it is of very high quality compared to the usual cosmetic from the store. And additional useful and natural ingredients are added to this baby soap.
Required ingredients:
- a piece of baby soap
- liquid or herbal decoction
- base oil (olive or other vegetable)
- melters (usually sugar and honey are used)
- aroma oils
These components must be used to prepare soap in this way. But there are also additives. You use them as you wish. Oatmeal, ground coffee and citrus fruits are commonly used.
Manufacturing technology is simple.
- First, take one piece of baby soap and grate it.
- Pour it into a small container.
- Add one tablespoon of base oil and 150 ml of liquid there.
- We put the container in a water bath.
- Then add the melting substance to the mixture. For example, a teaspoon of honey.
- Now we begin to cook our soap. The mixture must be constantly stirred to make a viscous mass.
- After the mass in a water bath has become homogeneous, you can begin to add your favorite essential oils and other additives to it.
- After that, remove the mixture from the water bath and add the selected dye as desired.
- Then take the soap molds and grease them with vegetable oil. We pour our mixture into them and put in the refrigerator so that the soap in the molds hardens. After that, it can be pulled out and transferred to a special tray. For the soap to fully mature (reach the state of ideal washing), you will need to wait 1-2 weeks.

2nd method: cold method of soap making
The point here is that soap is created from scratch with its help. And the process itself is quite dangerous, because you have to use chemicals for cooking.
Required ingredients:
- water (it should be soft)
- alkali (either caustic soda or caustic soda will be needed)
- base oils (you can use burdock, vegetable, olive, castor)
- fillers.
- dyes
- essential oils

everything you need for cold soap making
Before starting work, you need to take care of the place where you will brew your soap. The room must be well ventilated. Protecting ourselves. We put on:
- gloves,
- glasses,
- respirator.

First you will need to prepare an alkaline solution. We measure out the required amount of alkali (caustic soda or caustic soda).

Then we measure out the required amount of cold (or better ice) water. Pour water into a heat-resistant container.
We put the container with ice water in the sink. Not because it definitely needs to be done. But because it is the safest place to combine water and alkali.
Little by little, we begin to pour alkali into the water. Be careful here. The solution will start to get very hot and give off a lot of steam. The vapors that are released during such a "boil" are poisonous. That's why you put on a respirator. If you do everything without a respirator, at least take your face away and do not inhale these vapors.
After that, stir our alkaline solution for 1-2 minutes and leave it to cool. the alkali should completely dissolve and the solution should be clear, almost like ordinary water.

Now we take the required amount of base oil and heat it in a water bath.

A thermometer should measure the temperature of the alkaline solution and oil. The temperature should be in the range from 36 to 50 degrees, and it is the same for both mixtures. You can mix mixtures of only one temperature.

After the base oil is poured into the alkaline solution, stir the mass constantly.

It will thicken and grow cloudy. This is the process of turning it into a soap base.
To make it thicken even more, you need to beat it with a mixer to a trace state. This is when droplets of mass leave traces on the mixer. This can be achieved by running the mixer for 1 minute and then stirring with a spoon. And so several times.

Now you can add auxiliary components: dyes, fragrances, and more.

Pour the mixture into molds, cover them with a lid, wrap them in a cloth. We leave in this form for a day.

After hardening, cut the soap into pieces and leave on a cutting board for a couple of days. Then we wrap the soap in parchment and leave it for a month to mature.

3rd method: hot method of soap making
The good thing is that you don't have to wait a week for the soap to mature. This method almost completely repeats the cold one. And the main ingredients are exactly the same. It is also necessary to mix water and lye, heat the base oil and mix it with the mixture when their temperatures equalize. Then beat everything with a mixer. We repeat everything until the stage of the trace.
Then we take our container and put it in a water bath so that the water in the lower container is at the same level with the soapy mass.
Cover the container with a towel and then a lid. We cover with a towel so that condensation does not get into the soap, which will accumulate on the lid.
Boil in this form for 2 hours. But every 30 minutes the mass will need to interfere. To determine if the soap is ready, you need to taste it with the tip of your tongue. Exactly. If the mass is ready, then it will not pinch the tongue. Then you can add all the other additional components. We pour the mass into molds. Already on the second day you will receive ready-made soap.
On the video from 11 minutes you can see how the soap begins to cook hot. The texture of the soap composition is shown very well already at the end of the process.