Drawing a rooster in pencil in stages. How to draw a rooster with a pencil and paints in stages for beginners and children? How to draw a rooster's head with a pencil and paints? How to draw a rooster
Pets are of particular interest to children, because geese, ducks and roosters can be seen in almost every village yard. The rooster, of course, stands out among other poultry in appearance, because its color is bright, special.
Often, children want to capture the image of the owner of the poultry yard on paper, to convey with a pencil the features of the structure of the birds and its proud appearance.
It will not be possible for small children to transfer to paper all the details of the structure of the body, head and limbs from nature. For this purpose, it is best to use a ready-made sketch and create your own drawing of a rooster in stages.
To draw a bird correctly, observing all the proportions of the body, you must initially make blanks on paper with a pencil. The image of the main parts of the body with the help of geometric shapes will help to orientate faster, further drawing of details will not cause any particular difficulties for children.
Working together with adults will turn a fine arts lesson into a fun game.
First, voice the course of actions to the child, tell us how you can draw a rooster in stages, then get to work. The more complex first sketches should be made by an adult, then, at the request of the baby, continue a more detailed drawing of all parts of the body: from the body to the very extremities.
You can finish the drawing of poultry using paints or colored pencils. Bright colors will help "revive" the rooster on paper, make its image brighter and more realistic.
There are many options for how to draw a rooster in stages, the method of depicting a bird suggested below is detailed and illustrative. Drawing for children will not be so difficult under the guidance of adults, any inaccurate line or bend can be easily removed using an eraser.
Well, now it's time to start a drawing lesson, everyone can draw a rooster in stages with a pencil, you just have to approach this process with imagination and desire.
Drawing process
- First, you should conventionally divide a sheet of paper into three identical areas. It is necessary to schematically draw the torso, tail, and also the neck. Note that the contours can be of any shape, the main task is to accurately transfer the dimensions of the rooster to paper, because it is on this that the preservation of the proportions of the drawn bird depends.
- We schematically depict the comb together with the "earrings", these body parts can be considered "identification marks" of an important poultry.
To do this, it is necessary to draw an oval, which will serve as a head, and a little below the contours of future "earrings" should be drawn. Then you can start sketching the contours of the legs with a pencil, for children this task will not be too difficult.

- Draw the general outlines of the bird according to the sketch shown. Then you can start removing unnecessary lines and strokes from the image. At the same stage, you should start drawing the legs.

- Now we gradually apply clear zigzag lines, which will help to conditionally separate the tail from the body itself, draw the outline of the extreme long feathers.
We arbitrarily depict the wing, draw the details of the head and limbs (this is a task for children). Do not forget to mark the beak, slightly smooth out the contour of the "earrings". We make sketches for the further image of the eye, draw the contours of the comb.

- We proceed to the final stage of creating a sketch. By drawing curved lines with a pencil, select the tail feathers, draw a zigzag line in the neck area, draw an eye. If you wish, you can depict spurs on the paws, so the drawing of a rooster will look more believable.

- Drawing with a simple pencil looks dull and dull, you need to paint the rooster. To do this, you can take markers or colored pencils.
If the image needs to be black and white, be sure to make the shadows as shown in the image below. A simple landscape will look great in the background: a flowering meadow or a wooden fence.

This is how quickly and easily you can draw a rooster for children, a simple and at the same time original image of a poultry can be supplemented at your own discretion. Give the children an opportunity to dream up and add their own touches to the drawing, because this brings the kids great pleasure.
Very soon, the most long-awaited and beloved holiday is the New Year, the time to give and make gifts, to delight and pamper yourself and your loved ones. As you know, the Fire Rooster will be the symbol of this year according to the horoscope, which means it's time to come up with something unusual and original so that happiness does not pass your home and family by. What can you think of? Yes, perhaps today absolutely any idea and dream can be realized, but if the family has children, then a postcard with a drawn cockerel can be a good option for decoration and a gift, including. How to draw a rooster for the New Year 2017? This is a question that may be faced by many who want to please family and friends.
Painting step by step, in pencil, photo.
If you have absolutely no skills and abilities in this work, then, first of all, you should master the elementary basics, which will definitely be useful to you in the future.
To complete this work, you should stock up on the following necessary materials and tools in advance.
Option 1.
- 1.Red cardboard ring with an outer diameter of 17 cm and an inner diameter of 12 cm, which will serve as a base.

- 2. Colored paper - light green, dark green, red, pink, yellow.
- 3.Gold foil.
- 4.Glue stick.
- 5. Threads.
- 6.Scissors.
- 7. Simple pencil.
- 8. Template for making a New Year's symbol.
Now we proceed directly to the work, and for this we should try to adhere to all instructions and execution techniques as much as possible.
- Step 1. Cut out the spruce branches from dark green and light green paper. From the cut out parts, with neat movements in a circle, we compose spruce branches.
- Step 2. We fix all the details with glue.
- Step 3. With a hole punch we prepare circles and always from multi-colored paper, which we also place in a circle and fix everything with glue.
- Step 4. Carefully cut out the silhouette of the future shape from red paper. Next, we do, that is, we cut out decorations for the cockerel. For this, it is best to use the brightest and most golden colors and shades. We fix such finished parts as a comb, head and tail with glue.
- Step 5. Inside the ring we glue the already formed and prepared silhouette of the cockerel.
- Step 6. We make or cut out bells from gold paper. Using a hole punch, we make holes in the cut out bells and thread them through the thread.
- Step 7. Using glue, fasten the threads with a bell at the bottom of the ring.
Our unusual and very original cockerel is ready. You yourself will not notice how your child will independently master the manufacturing technique and will delight you with something else interesting.
Option 2.
Another very interesting idea and idea is the "Cockerel" toy for children, which will be a big surprise for them. For this craft, you should have tools such as paper, knitting thread, scissors, double-sided tape, or glue. Now we proceed directly to manufacturing. What does that require?

- First, we are looking for a Cockerel template, which, by the way, can be found and printed on the Internet in a large variety.
- Secondly, using a template, we cut out figures and details for the Rooster.
- Thirdly, on the body of the Cockerel we glue double-sided tape or grease it well with glue. Then, with gentle movements, remove the film from the tape.
- Fourthly, we cut off the threads of yarn and apply their ends to the sticky side of the toy. If you want the Cockerel to be able to hang in the future, then for the suspension you need to cut off about 20 cm.
- Fifth, we glue the end of the yarn to the center point of the circle and, with cautious, unhurried movements, begin to wind the yarn in a spiral. And we lay the threads, tightly to each other, coil by coil. But, in no case should one layer of yarn be superimposed one on one.
- Sixth, we glue all the threads over the entire surface of the circle and cut them off.
- Seventh, on the back of the toy we glue yellow cardboard so that the toy looks and looks like double-sided.
- Eighth, using cattle or glue, we attach a comb, wing, beak with eyes.
The toy "Cockerel" is ready, from the outside it looks very funny and unusual, since the yarn resembles a soft carpet and is pleasant to the touch.
As you can see, the technique of how to draw a rooster for the New Year 2017 is not too difficult and pleases with its diversity and splendor. The main thing is to decide and make the right choice so that the final result will surely please you.
Draw a rooster, so that friends gasp with admiration? Easily! Catch drawing schemes for a cockerel for every taste, get inspired and decorate your room with a bird image. Do not hesitate, the vociferous singer will not remain in debt - he will certainly bring good luck next year.
Simple pencil drawing of a rooster
The rooster is a born leader who requires special attention and respect for his person. Therefore, when placing the winged in your album, try hard - the owner of the next year does not like sluts.
1. Draw a circle at the top of the sheet. This is the head of a rooster.
2. Draw the neck. Pay attention to the proportions.
3. To make the rooster look a real handsome man, decorate his head with a comb.
4. The bird's beak consists of two sharp parts. Since the cock is turned to the side, draw two small triangles to the right of the head.

5. It's time to draw the torso.

6. Decorate the tail with a bunch of feathers.

7. Draw the eyes and legs of the cockerel.

8. Now add the wing. Draw a clear line, add strokes.

The drawing is ready!
How to draw a rooster with colored pencils?
What appears to the human ear as clicking, crowing and clucking is actually chicken speech. Scientists have identified more than 30 meanings of the language of chickens, ranging from the simple "time for me to lay the egg" or "all here, there are many worms!" before calling a partner during the mating season.
Let's draw another bright representative of the chicken family with colored pencils, because he asks: "Draw me!"
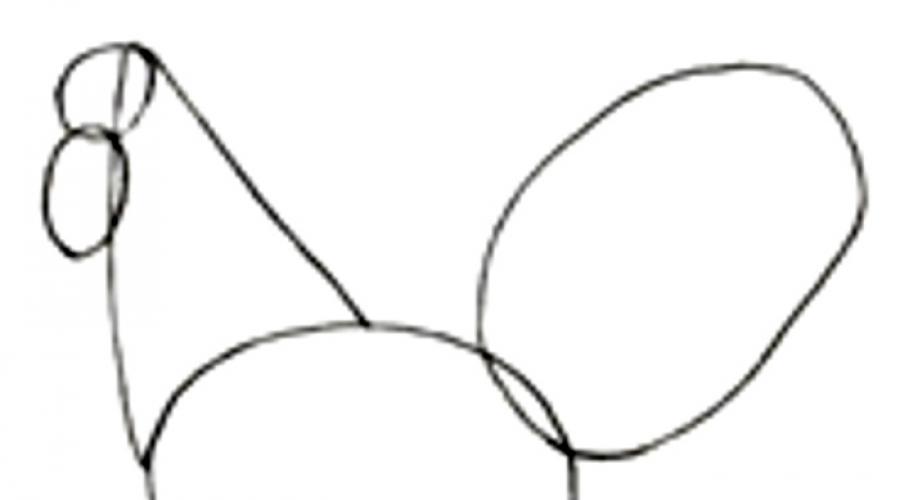
1. Draw ovals for the main body parts of the rooster.

2. Draw the eyes, crest, beak and earrings underneath.

3. Now you can outline the legs.

4. Add feathering to the tail, detail the legs.

5. And now - the most important thing. Color the cockerel with colored pencils.
First, paint the eye clearly, paint over the crest and beak.

6. The neck and legs will be yellow.


8. Draw the feathers clearly.

9. Add contrast to the drawing with black pencil.

Congratulations! The proud handsome rooster is ready.
How to draw a rooster step by step
In the wild, female chickens face many dangers. The worst of them is predators. That is why the fairer sex, who hatch eggs and raise offspring, have plumage that reliably hides them in the forest. What can not be said about the roosters! This is who can boast of luxurious feathers: red, bright red, blue with green tints ... It's a sin not to portray such a handsome man in your album. Let's start?
1. Draw two ovals on a piece of paper: large (body) and small (head). Connect with a slightly curved line (cock's neck). Use light pencil strokes to mark the paws.

2. The next step is the beak. Draw it like a small triangle. Then draw a bent arc - the future tail of the rooster. Mark the comb and earrings, add lines on the neck. Use the cross lines to mark the paws.

3. Within the large oval, draw a line that defines the boundaries of the rooster's wing. Do not forget to outline the "pants" on the legs and draw the contours of the tip of the tail.

4. Detail the tail and wing by drawing the plumage. Draw the teeth of the comb.

5. Draw well the legs with sharp claws. You can finish the drawing with colored pencils on plain paper, or transfer to tinted paper and paint over with oil pastels.

6. Paint over the head, legs, part of the wing and some tail feathers with light brown color. The comb and earrings will be red. Paint purple on the lower torso and wing, as well as the tail. Trace the outline of the head and scallop in cherry color, and outline the wing, torso and tail in black.

How to draw a rooster with oil pastels
Interestingly, roosters have a sufficient level of intelligence and are able to remember those who treat them badly or well. Therefore, do not be lazy, portraying the next handsome man, otherwise in 2017 he will still remember this to you.
I propose to draw a rooster with oil pastels. The main thing here is to color the bird correctly. Watch the photo master class and repeat after the author.
1. First draw a rooster (use some of the top diagrams). The crest, eyes and beak were seen in red.


2. We turn to coloring the feathers. Start with lighter colors, gradually adding darker shades and shadows. You should have a vivid drawing.


3. For this little masterpiece you will need pencils of all colors of the rainbow. Draw the background with thick strokes.


The drawing is ready. A bright cockerel will decorate any interior and will certainly bring happiness to its talented owner.
In December, along with frost and snowstorms, the most fun and beloved holiday - the New Year - rushes to us. According to the eastern calendar, 2017 will be held under the symbol of the red rooster - a strict, serious, but fair bird. Do you want luck, health, happiness to settle in your home? Coax the rooster - draw the fiery host of the coming year and place the picture under the tree next to Santa Claus.
How to draw a rooster - the first option
The drawing is done with a pencil; under your supervision, even a preschooler can cope with such work. Take - a sheet of paper, a pencil, an eraser, a postcard with a cock (for clarity).
- In the center of the sheet, draw a circle (head), in it - a small circle (eye). On the left side of the large circle, draw two closed triangles - a nose. From the top of the head, with three adjacent semi-ovals, arrange the scallop. Drop the beard of the bird under the beak.
- Draw two parallel lines down from the head - one starting from the bottom of the beard, the other from the back of the rooster's head, this will outline the neck. Connect the ends of the lines with a smooth wavy line. Outline the body of the bird with a crescent, the back of which is covered with fluffy tail feathers, similar to narrow leaves of willow-tea.


- Draw a wing on the body, drawing a segment symmetrical to the line of the abdomen. Blend it with a pencil, simulating the protruding feathers. From the body down, lower two perpendiculars - future paws, draw four fingers with claws. The drawing is ready, if you wish, you can paint it with colored pencils and write a congratulation on the holiday.

How to draw a rooster - the second option
A complicated version in which the bird is more believable, like a living one.
You will need: a sheet of paper, a simple pencil, paint.
- Draw a small circle for the rooster's head. In it, mark the eye, depict the beak, the arched neck, focusing on our drawing. Sketch the body by drawing straight rays from the neck. Smooth the corners with semi-oval outlines, define the line of the wing.

- Draw a comb on the head, hang an earring under the beak. Add vertical shading to the rooster feathers on the neck and back. Draw the paws in shaggy pants, with three crossed toes and one back spur. Use curved teeth to select the tail feathers and slightly shade the plumage of the head.

- You can leave the drawing like this, shading the body of the rooster with soft shading, or paint the bird with bright watercolors.

How to draw a rooster - the third option
The basis of such a pattern will be circles, ovals, semi-ovals.
- Draw a horizontal line in the middle of the sheet, draw a semi-oval down from it - the body. Below, describe two small semicircles on top of each other - future legs. Lift the pencil up, lean to the right and depict the head with a circle, from which draw two rays to a horizontal line - you get the bird's neck.
- Draw an elliptical wing on the torso. Add a triangle nose, a pendant beard, and a round eye.
- Make another circle in the upper left part of the large semi-oval - a beautiful fluffy tail will come out of it. Then outline the comb, legs in shaggy shorts, feathers on the side wing. Trace the outline of the rooster with a black marker and color the bird of your choice with felt-tip pens or paints.


As you understand, it is not difficult to portray a rooster. The main thing is to follow our advice and draw with your soul, then the wise bird will become your talisman and will protect you all year round.
What drawing for the New Year to prepare for the competition at school or in kindergarten? This question is asked by many students and parents in the month of December. It would seem that there are no restrictions in the plots and you can choose absolutely any, but not all guys are able to effectively depict a bright and attractive New Year's composition with their own hands using pencils, felt-tip pens and paints. It is for those who are not an artist by nature that we have put together a collection of lessons that tell you how to make a beautiful, original and catchy festive picture on paper. After studying the step-by-step instructions, you can easily draw Santa Claus, the symbol of 2017 - the Fire Rooster and other thematic images, and the video will tell you how you can create color portraits of traditional New Year and fairy-tale heroes in the cells.
Step-by-step drawing for the New Year 2017 with a pencil for beginners
Beginning artists should not immediately tackle complex works that require careful study and high detail. It is better to try your hand at simple tasks and, so to speak, get your hands on it. And the lesson below will help with this, telling how to draw an interesting New Year's drawing with a pencil step by step.

Necessary materials for a phased New Year's drawing
- plain HB pencil
- simple pencil 2B
- A4 sheet of paper
- eraser
- compass
Step-by-step instructions on how to draw a pencil drawing step by step for the New Year 2017

Drawing in stages for the New Year 2017 - Do-it-yourself rooster to school

This step-by-step lesson will tell you how to draw a bright, colorful Rooster, a symbol of the upcoming New Year 2017, to school with your own hands. To create the work, you will need a simple pencil, paper and a set of pastels. But if you do not like to draw with crayons, you can replace them with felt-tip pens, watercolors, acrylic paints or gouache.
Necessary materials for a phased New Year's drawing to school
- A4 sheet of paper
- plain HB pencil
- color oil pastels
- eraser
Step-by-step instructions on how to draw a Rooster to school with your own hands

DIY drawing for New Year 2017 in pencil - Santa Claus to primary school

On the eve of New Year's holidays, elementary schools often hold contests and shows of children's drawings, where children demonstrate their little artistic masterpieces. Winter landscapes, fairy-tale characters and traditional New Year's paraphernalia can serve as the subjects for such works, but the most relevant, of course, will be the image of Santa Claus. Moreover, following the instructions of this lesson, a mobile bearded man with a bag of gifts can easily and quickly draw even a kid who is very far from painting.
Necessary materials for the New Year's drawing of Santa Claus to school
- A4 sheet of paper
- plain HB pencil
- eraser
- ruler
Step-by-step instructions on how to draw with your own hands Santa Claus primary school

Children's drawing for the New Year 2017 in kindergarten - Rooster in stages with paints

In kindergarten, drawing a Rooster symbolizing the upcoming 2017 year will not be difficult if you use the recommendations of this simple lesson. The guys from the preparatory and senior groups can easily cope with such work on their own. Younger children will need a little help from a teacher, but only at the last stage, when it will be necessary to make a clear and neat contour.
Required materials for a children's New Year's drawing of a Rooster
- A4 sheet of paper
- plain HB pencil
- eraser
- set of paints
- brush
- blue felt-tip pen
Step-by-step instructions for a step-by-step drawing of a Rooster with paints
- On paper, create a primary sketch of the torso. Approximately in the middle of the sheet, closer to the left edge from top to bottom, draw a semi-oval line, sharpen a little to the bottom, and then move it up and make triangular bases for the tail. To them add a more lush tail, divided into feathers.
- In the center of the body, depict a wing and make three contours for the feathers on it.
- Draw "pants" and legs, consisting of fingers and a back spur, below the body.
- Finish the neck from two tiers and the head. Above, depict the counter of the ridge, and in front - the silhouette of the beak and beard.
- Paint over the bird's body in light orange, the wing in yellow, pink and green, the feathers on the neck in blue and beige, and the head in yellow. Cover the beak, comb and beard with red paint, paint the eye on the head with black paint.
- Shade the legs with a black shade, and the "pants" with light gray.
- Decorate the tail as brightly as possible. Cover the base adjacent to the body with green, and the edges of the tail with blue, red, yellow and pink.
- Leave the drawing to dry very well. When this happens, trace the outline with a thick blue felt-tip pen.
Drawing competition for the New Year at school and kindergarten - a selection of works
At the end of December, schools and kindergartens always hold a drawing competition for the New Year. Such events give children the opportunity to show their imagination and demonstrate their artistic talents to friends, teachers and guests. Young painters choose the subjects for their works on their own or consult with teachers, mothers and fathers. Images of Santa Claus, Snow Maiden, a Christmas tree with toys, a snowman and various fairy-tale characters, made with pencils, paints or felt-tip pens, are always considered relevant. Colored winter landscapes and compositions are very popular, where the family celebrates the holiday sitting at the New Year's table.


No less popular are pictures in which there is a symbolic creature, patronizing, according to eastern horoscopes, the coming year. The upcoming 2017 will be held under the sign of the Fiery Rooster, which means that bright, colorful images of a magic bird, made by students with their own hands, will be quite appropriate in the children's drawing competition.


If a child does not have a natural talent for painting, do not despair. Step-by-step lessons will come to your aid, with a detailed explanation of all the intricacies of creating a beautiful and harmonious image on paper.
For those who do not want to waste a lot of time fiddling with pencils and paints, a video teaching how to quickly and effortlessly create an original New Year's image by cells will help.