Drawing a tree in a circle with a pencil. How to draw different types of trees? Let's mark the tree trunk
The question of how to draw a tree, for example, as widespread as an oak, is asked by almost every novice landscape painter. After all, the beauty of the surrounding nature is simply impossible to display without being able to draw trees correctly.
Many great painters, for example, such as Shishkin, loved to depict such a tree as an oak in their paintings. Perhaps the reason for the popularity of these plants is their imposing and powerful appearance. The crown of oaks is wide, the branches are long and thick, and the trunk becomes more and more voluminous every year. Thanks to all this, this tree drawn in pencil in stages always looks extremely impressive.
In order to depict an oak tree, you will need the following items:
1). Mechanical pencil (or the most common pencil, but sharpened);
2). Gel pen with a black tint;
3). A set of colored pencils;
4). Eraser;
5). Paper.
Now you can move on to learning how to draw a tree with a pencil step by step. This process can be broken down into separate steps:
1. Draw a horizontal line to indicate where the tree will grow. Then draw the beginning of the trunk and roots of the oak;

2. Draw with light lines the outlines of the crown of the tree. After that draw powerful and rather long branches. Try not to make the branches completely straight. In order for the tree to look realistic in the end, depict them curved in some places, and also sometimes overlapping each other;

3. Draw the grass under the tree with short strokes. Then draw individual thin branches;

4. Mark the location of the foliage. Remember that the crown of the tree must have an irregular shape, otherwise it will not look natural;

5. Once you understand how to draw a tree with a pencil, you can move on to coloring the finished image. To do this, you must first circle the pencil sketch with a pen, and then erase it using an eraser;

6. With pencils of brown tones, start shading the trunk of the oak;

7. Continue painting the trunk of the tree, as well as its branches;

8. Finish painting over both the branches and the trunk of the tree, using pencils in the same color scheme as at the very beginning;

9. In order to draw the grass, use pencils in dark green and light green shades;

10. Start painting the crown of the oak tree. Shade the darkest areas with an olive-toned pencil. For well-lit areas, choose a light green pencil, and use a deep green pencil as an intermediate shade;

11. Finish painting the foliage using pencils of the same green scale;

12. Having understood how to draw a tree in stages, you need to give the picture a finished look. To do this, you need to finish painting the grass so that it matches the span of the crown. After that, you need to shade the sky with a light blue pencil.

The drawing of the luxurious oak is ready! Now that you know how to draw a tree, you can create a very interesting landscape. For example, next to a tree, you can depict a small house or a horse grazing peacefully. You can color the finished drawing of a tree not only with pencils, but also with felt-tip pens or paints.

It would seem that it could be easier to draw a tree. But in order for you to get a beautiful, eye-pleasing drawing, you need to try hard. It is not necessary to have the talent of an artist, you can master special techniques and you will succeed.
The tree can be drawn in completely different ways. It can be a bright colorful drawing, or vice versa, a black and white picture. It all depends on your mood, on the emotions that you want to convey.

By depicting just one tree, you can convey the entire situation around it.

How to draw a tree in kindergarten in stages
From a very young age, children strive to draw. Yearlings will be happy to imitate you, waving a pencil over a piece of paper. By the age of two, child's hand coordination will allow him to draw the simplest things. At this age, many children start going to kindergarten.

In the kindergarten, classes are held in which children learn to draw. They begin to hold the pencil correctly, draw lines and circles. Parents should practice with their child at home. To do this, you need to know how to correctly explain to a novice artist the technique of drawing an object.
Drawing a tree is also divided into several stages, which the child must remember well and master in practice. Do not try to complete the task instead of him, assigning the child the role of an observer. In early childhood, all manipulations with hands and fingers help the development of the child's speech.
Let's take a look at the easiest way you can teach a child.
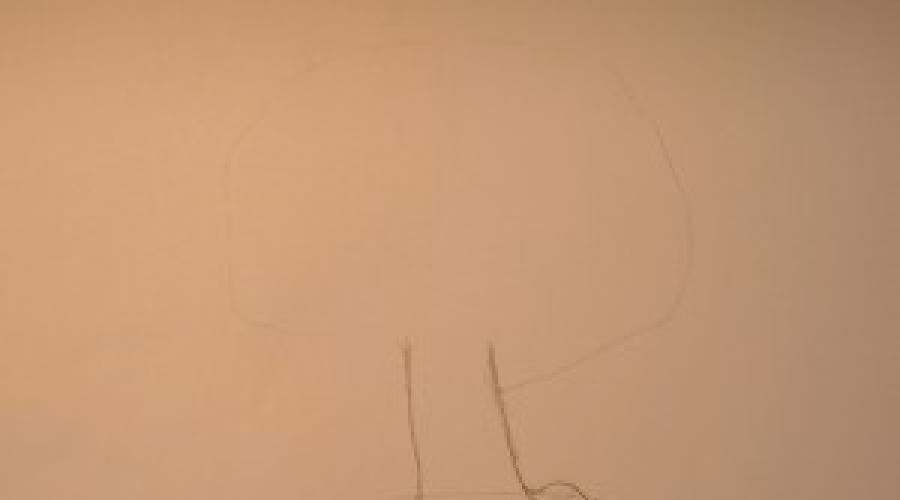
First stage is to draw a tree schematically. To do this, the child must understand that the tree grows from the ground, that it has a trunk and a crown with leaves. Do not forget that at first we do all the sketches with a simple pencil. We do not press hard on it, so that later it would be easy for you to remove unnecessary elements.

We mark the ground with a horizontal line, and draw a tree trunk perpendicular to it. So that the tree has a crown, where the tree trunk ends, draw a circle or an oval.
The second stage making our tree more real. Outline the trunk by adding some root appendages and a couple of large branches.
V third stage outline the crown.

Stage four. Making the tree realistic. Add a few more lace turns of the crown in the center, remove all unnecessary details. The tree is ready.

How to draw a tree trunk
The trunk is the base of the tree. It does not matter which tree you are drawing, whether it is a lonely birch tree in a field or, on the contrary, a dense pine forest, you will start drawing from the trunk.
To make the tree look more natural, the trunk must be drawn correctly, regardless of whether you have a pencil in your hand or a brush. According to the rules, starting from the ground, the trunk is wider and gradually tapering closer to the crown.
If you paint with paints, then draw the base with the wider part of the brush, and the upper part with the narrower one. The line should be thin and flying.
Try to paint so that the trunk looks alive. It is difficult to find a tree with a perfectly flat trunk or symmetrical branches. Don't forget about shadows and highlights. They will add volume to the picture.
How to draw a tree branch
The tree has large main branches and smaller branches growing from the main ones. Like the trunk, the larger branches are thicker at the base. The type of tree determines the nature of the branches. In a birch tree, branches stretch up to the sun, in a pine or spruce they fan out to the ground.

First make a sketch, deciding where the branch will grow, how many branches it has, what structure.

How to draw tree leaves
Leaves are an essential part of any tree. Each tree has its own type of foliage. If you do not have a goal to depict the tree in detail and as accurately as possible, then you should not thoroughly draw every leaf.
Let's see how to draw more realistic leaves, for example maple leaves.

First, make sketches, draw the base and outline. Gradually outline the entire edge of the sheet and remove the excess with an eraser.

Add a twig and veins to the leaf. Fill the drawing with color. For the summer version, we use several shades of green, for autumn, warm red-orange tones.
How to draw a tree with a pencil step by step
We will not draw any specific type of tree, we will draw an ordinary tree. Follow all the steps below and you will have a good quality drawing.
First step.
Remember that you don't need to press hard on the pencil, otherwise it will be difficult to erase the sketch later and the drawing will turn out to be dirty. So, first we draw the trunk and the approximate outline of the crown of the tree.

Second phase.

We sharpen the outline of the trunk and add some branches.
Stage three.
It's time to paint the foliage. Decide whether the weather is windy or calm. If the wind is blowing in your drawing, the foliage should tilt to one side or the other. In our example, calm weather.

Stage four.
Now you need to remove the sketch and draw the tree elements in detail starting from the bottom. We draw the bark and branches.

Fifth stage.
For the bark to be more natural, the lines should be like sketches, no neatness is needed here. Add a branch with leaves to the left at this point.

Sixth stage.
We continue to sketch the foliage with rounded movements. Add ground to the drawing.

Seventh stage.
Select the trunk of the tree with a darker pencil, and, on the contrary, paint over the foliage softly and lighter.

Eighth stage.
Do not forget about the play of shadows. Since the sun shines from above, the crown of the crown should be lighter, and where the shadow is, in this case the lower left corner, a little darker.

Ninth stage.
Draw some leaves in random order.

Tenth stage.
On the right side, also add some shadow under the branches.

Eleventh stage.
At the last stage, it remains to add highlights. For work done with paints, take white, and if you paint in black and white, just wash it a little with an eraser.

How to draw a tree step by step for beginners
If you are a very beginning artist, then this method will definitely suit you. Prepare a white sheet of paper, including pencils, and an eraser.
Stage 1 and 2. First, let's draw a trunk and some thin branches.

We add volume to the branches, draw the same lines next to the existing branches, which smoothly pass into new branches. We remove unnecessary details with an eraser.

We draw foliage. To do this, draw a crown with smooth lace lines, as if we are putting on a hat on a tree. Draw the next larger one behind it. Next is the third, largest crown.

Now it remains to paint over the trunk with brown color, and each part of the crown with different shades of green.

How to paint a tree with paints
Before you start painting, you need to choose quality paints. It is better to learn to paint with gouache, it does not spread, unlike watercolors. This means the drawing will be more accurate.
Let's paint a winter fir tree.

First, draw in brown the trunk and branches upward from it. Then you need to outline the needles in green. In some places, the paint should be lighter in order to make the drawing more vivid. We paint the inside of the spruce with green paint with the addition of blue.

We are waiting for the paint to dry completely and proceed to the snow. To depict snow on the branches, add a little blue to the white.

How to draw an autumn tree
With the onset of autumn, nature is painted with all shades of red. In September, you can see a mesmerizing landscape, when, against the background of still green foliage, another, already red-orange, glows. Hands are drawn to paints.
The autumn tree is drawn in the same way as everything, starting from the trunk. Draw de-parallel uneven lines at a wide distance from each other. Draw twisting branches from these lines.

To make the tree look more lively and voluminous, draw small shoots in different ways, do not repeat ourselves. We draw part of the branches clearly, and part as a sketch.

Next, draw out the bark. To do this, we apply a lot of chaotic lines and a few bumps to imitate the real bark of a tree. To make the tree take on color, draw the bark lines in red-brown color.

Paint over the rest of the areas with a lighter brown color, follow the lines, they should be in the same direction. Add shadows.

The last step is to add foliage to the tree. On small branches we depict orange-red leaves.
How to draw a beautiful tree
Each tree is beautiful in its own way. But you must admit that a large tree, with its roots spread above the ground and a dense crown, is a little more impressive than an ordinary park maple. To draw such a tree, you will need a sheet of white paper, a simple pencil, and an eraser.

We draw a trunk tapering upward. At the bottom of the trunk line we connect with an arc. Set the direction of the roots in four directions, and depict them like curved pipes that taper towards the bottom.

We release two main branches from the tree trunk, draw a fold between them. Remove all unnecessary auxiliary lines with an eraser.

We mark the places of the crown with circles. Build foliage by filling the main circles with smaller ones outlined with small scribbles. Add shadow.
How to draw a rowan tree
The mountain ash is very beautiful in winter, against the background of white snow. Try painting a winter mountain ash with paints.
Paint the background with a light gray color, let the paint dry. First, sketch out with a pencil. Several trunks grow from one mountain ash from the ground. They are thin and branched. Mark the place of future bunches with small ovals. Now you can take up the paint.

We outline the trunks and branches with a dark brown color. Take a rich red color and fill in the ovals with small strokes. You will get bunches of rowan. Since we are drawing a winter mountain ash, put some white snow on each bunch. Using the same white, paint drifts at the base.
How to draw a maple tree
The maple leaf has a characteristic acute-angled shape. The maple itself is a tall, branched tree.

We sketch the maple tree, draw the trunk and crown cap. Further complicate it a little by adding a few stripes inside. We divide the crown into parts, drawing the branches and partly the foliage. Next, we outline the crown in more detail.<<колючими>> lines.

Paint the maple with shades of yellow, orange and brown. Don't forget to add chiaroscuro.
How to draw a sakura tree
It is not at all difficult to draw a beautiful Japanese cherry. We use a simple pencil.
- Draw a large oval. Beneath it is a curved tree trunk. Draw curved branches from it, they should intertwine a little and curl above the ground.
- Add more forks. This will make the tree look thicker. Get started with flowers.
- Do not draw all the flowers clearly, only turn some of them into a hint.
- Draw bark on the trunk.
- Remove all unnecessary lines with an eraser. Get started with paint.
- Paint the trunk with a dark brown color. The bark lines are black. Paint over the flowers with all shades of pink.
Plants are one of the most interesting creatures on our planet, they can be studied endlessly and every time you discover amazing and entertaining details. Take an ordinary twig - it would seem, what's unusual about it? But the bottom line is that you see an ordinary branch with leaves swaying in the wind, but in fact at this moment there are many complex processes associated with the processing and accumulation of solar energy, moisture evaporation, and so on.
In this lesson, I would like to tell you in detail how to draw a twig with a pencil step by step. We have already tried, and, but the question of how to draw exactly the branches did not touch.
In fact, I'm not a big fan of drawing nature - I like it better, but nature very often becomes the object of modular paintings that look just amazing - such a trick will not work with a drawing of a person. Therefore, we conclude - any novice and experienced artist should be able to draw nature, so let's study together.
So, let's start drawing a twig. We need paper, a pencil and an eraser, you can also add paints, felt-tip pens, colored pencils and crayons to this set, but they will only be needed at the final stage. I use a graphics tablet and an editor on my computer, and you can try too - for example, draw a twig in SAI with a mouse.
First of all, we create a light sketch that will determine the direction of the branch, its size and the number of branches. Draw light pencil lines so you can erase them later.
Now add shape and volume to the branches, making them thicker. Few trees can boast perfectly smooth twigs, so the surface doesn't need to be super flat.


Add leaves to the other part of the twig.

You can add flowers if you are drawing a flowering tree, such as sakura or apple tree. And we got it like this.
Already painted +4 I want to draw +4 Thank you + 149
How to draw a deciduous tree in stages
- Step 1
On a sheet of paper, you need to outline the general outline of a deciduous tree, symbolically designate the crown and trunk.

- Step 2
The next step is to draw a "skeleton": outline the outlines of the branches.

- Step 3
Each has a crown, so it should be marked in full.

- Step 4
The lower branches of large trees are always thick and powerful, and this is how they need to be shown in the picture.

- Step 5
How to draw a tree without many branches, which become thinner and shorter as they grow towards the top? This is what should be done in the next step.

- Step 6
The trunk of the tree along its entire length must be covered with "clothing" - bark.

- Step 7
Branches without leaves are only in autumn, so if you draw a tree in summer, then we frame each branch in foliage.

- Step 8
To prevent the tree from hanging in the air, we will attach it to the ground with a powerful rhizome, and draw grass and flowers around.

- Step 9
The bark of the tree has a rough texture, which can be shown using curved lines and dark shading.

- Step 10
With a lighter shading, we begin to gradually cover the left part of the crown.

- Step 11
Then we proceed to the right side and draw leaves on it in the same way.

- Step 12
With the help of color, dark and light transitions, it is necessary to show that the tree has volume and shape.

- Step 13
You should not fanatically write out each leaf separately, it is enough to designate them symbolically. This will be enough for credibility.

- Step 14

- Step 15
The final touch will be the image of the highlights. They are designated with an elastic band. That's all, now you can draw a deciduous tree with your own hands.
Hey! Today I will show you. This tutorial is intended more for beginner artists and may be useful for sketching and sketching various trees. For example, I took different tree species - birch, oak and spruce. Before you start drawing, it is advisable to look at real trees, or at least at their photographs, and note for yourself the peculiarities of their structure. All trees have their own different structural features, but drawing principle will be the same for them:
- First, with a slight pressure of a pencil, the contours of the tree and its branches are determined.
- Then the details are drawn, slightly increasing the pressure.
- Foliage is added and final details are added if necessary.
 Drawing oak and spruce will follow the same pattern. First, we outline the shape:
 Next, we draw the bark of the oak and the branches sticking out towards the side, and the spruce, respectively, needles:
 Details in the video, how to draw trees:
Now you know, how easy it is to draw trees with a simple pencil... True, they still lack foliage and they look more like trees in winter (except for spruce). But we will fix this in the next release. Follow the information on the site. TO BE CONTINUED...
Details in the video, how to draw trees:
Now you know, how easy it is to draw trees with a simple pencil... True, they still lack foliage and they look more like trees in winter (except for spruce). But we will fix this in the next release. Follow the information on the site. TO BE CONTINUED...