Training programs for blind typing on the keyboard. Keyboard trainer - blind and fast typing method
Hello friends and colleagues! In today's article, I want to start a new series of materials on the most important skills and abilities that every modern person needs to learn. Especially for those who work remotely via the Internet or build their business on it.
I'll start with such a simple skill as touch typing with two hands. I'll tell you what it is, how to learn how to quickly type on the keyboard and what auxiliary tools exist for this.
I understood the meaning and importance of the skill one day from a conversation with a successful Internet entrepreneur, sitting in a small Indonesian warung on the island of Bali.
Let me share with you my thoughts on its benefits, which you may not even know about.
Why learn touch typing with 10 fingers
Surprisingly, I learned touch typing with two hands while still in college, trying to keep myself busy with at least something useful during the lessons. The fact is that I studied at an ordinary Russian college, where I could enter for free, since my parents were not able to pay for my education, and I myself did not burn then with a desire to strive for something, limiting myself to herd thinking.
Well, most of our teachers, I don’t know how in other educational institutions, put a big bolt on our knowledge and training, because the main thing for them is to work out the study hours in order to earn money.
So, in pairs in one core subject, while the teacher played a browser game, we learned to type on keyboard simulators. There were no modern smartphones and unlimited Internet at that time, and only educational software and standard Windows games were installed on college computers.
In general, I believe that this is one of the few important skills acquired in 4 years of study, which now helps me to earn big, by the standards of Russia, money.
Time saving
The first advantage of the blind typing method with two hands for me, of course, was the typing speed, which is increasing to this day. Typing at random, it is hardly possible to develop this skill so systematically, since you have to constantly look at the monitor and at the keyboard.
Nowadays, we have begun to communicate more in writing and to be able to type quickly is already a necessity. It happens that I communicate on a social network with 10-20 people at the same time, which is unrealistic to do with live communication, since these are completely different people, including my employers, clients, friends and readers. Such a written conversation saves a lot of time.
Increase Productivity
The second plus for me is that I began to keep up with my own thoughts when writing an article and communicating. When you have to write and communicate a lot, with a low typing speed you don’t always have time to type what you just formulated in your head, and the thought is lost. Even when talking, it happens, but we speak much faster than we type on a computer.
For this reason, in our course, where we teach people to write texts, formulate their thoughts correctly and earn 20-30 thousand rubles a month from home, we pay special attention to training correct typing on the keyboard.
Preservation of health and energy
The third and fourth pluses are the conservation of energy and health when working at a computer. No need to constantly switch attention from the monitor to the keyboard. The eyes and neck became less tired, the working capacity increased, and the chance to plant vision and ruin your health decreased.
brain development
I will finish on the fifth plus, the essence of which is that by training all the fingers of both hands, new neural connections are formed in the brain, which also affect our ability to think, learn and remember information.
From childhood, our parents teach us new skills that affect our mental and physical development. But then, when we grow up, for some reason we stop developing these skills consciously, deciding that we already know how to do everything. About such "imperceptible" skills that need to be constantly developed, for example: to be able to ask questions, to be able to build relationships, etc., I will talk about in this permanent column.
If you want to be always up to date, . Let's study them together.
How to learn to type quickly on the keyboard
The main secret here lies in the fact that you need to learn a simple technique developed by an American stenographer over a hundred years ago, and then train it continuously. The technique is the correct use of all 10 fingers.
Correct position of hands on the keyboard
The letters and symbols on the keyboard are arranged according to a special layout and divide it into 2 parts - for both hands. It is enough to understand and learn the correct position of the fingers. Here is how they should be placed.

In the following image, zones are highlighted in different colors, indicating which finger should press which button. In college, next to the computers, there was always such a color reminder picture.

Learning to type correctly is quite a complex process, it's like learning to write again or learning to write with a different hand. I remember how my hands did not obey, my fingers did not unbend and did not reach the keys.
Tags for the blind
Have you ever wondered why there are small protrusions on the keyboard on the letters “A” and “O”? They are specially made to place the fingers correctly without looking. Start typing when you find them.
Pressing spacebar and duplicate keys
I want to pay special attention to pressing the space and duplicate keys (shift, ctrl, alt) when typing a capital letter or some character. According to the rules, you cannot press 2 keys at once with one hand. That is, when, for example, you type the exclamation mark “!” - these are the shift + 1 keys, you need to press “1” with your left little finger, and “shift” with your right.
Do the same with a space, when you type a character with your left hand, put the next space with your right and vice versa.
I understand that at first it will seem wildly uncomfortable, but then the result will surprise you.
No need to rush
Don't try to type fast right away, work on your technique. Try not to peek, you can even cover the keyboard with something. At first, the speed will be very slow, but as the fingers “stretch” and muscle memory appears, it will begin to grow.

Workplace organization
I also recommend that you choose a comfortable workplace. This is important not only for mastering the touch typing method, but also for maintaining health and efficiency. Here, read an article about how to organize a place to work and what it can lead to if you sit incorrectly (the link will be later).

Constant practice
Well, the last piece of advice - never type wrong again! Having spent, starting from this moment, a month or two (maybe more) to learn, you will save tens and hundreds of hours over your whole life.
Training simulators
There are already dozens of different simulators on the Internet, some of them are free, some are paid.
Keyboard solo
SOLO on the keyboard(best) is a very old machine that I used in college. The author is a well-known psychologist and journalist Vladimir Shakhidzhanyan.
You can install a program for your computer or study online. It is constantly updated and recently the developers have made a new version of the tutorial.
It's very cool that there are consecutive lessons that train all the fingers separately. In total, you need to complete 100 classes.
In addition to the course for the Russian layout, there are also other languages. I am now studying English, because I also have to type a lot in Latin.
It has a good function - typing speed test.
Stamina
Stamina is also a very good simulator program that allows you to learn the ten-finger typing method. The course is also based on the passage of step-by-step classes.
VerseQ
VerseQ- a very simple simulator that adapts to the mistakes that you make. There are no consistent lessons and a feeling of achieving some goal, but in itself it is not bad.
VerseQ online- online version of VerseQ.
Worse analogues
- bombina
- Rapid Typing
- iQwer
- funny fingers
- Baby Type
- Clavogonki- the most popular in the game format.
- All 10
Conclusion
It takes time to master this skill, it can take months to train, until the fingers begin to obey and press the right keys automatically, without even thinking about where the right character is.
The basis of learning, of course, is the correct keystroke, not speed. Try not to make mistakes, type slowly but correctly.
It remains for me to wish you success and hope that you will not miss the next skill that I will analyze on the blog.
Leave your feedback about how you learned to type quickly and what programs you used. Bye!
Pumping typing skills stretched for six months. But the game was worth the candle.
In the US, touch typing is owned by 95% of PC users. In the post-Soviet space - only 5%. The prevalence of computers is comparable in both cases, but in the first case the 10-finger touch typing course is included in the school curriculum, in the second case it is not. And it's weird.
In the modern world, the ability to type quickly and without errors is akin to the ability to count and write. After all, the computer has become an integral part of the life of almost every person for five to ten years. Yes, it is quite possible to type with two fingers, and if you do it often, then the speed will be impressive. But the efficiency of the set is in any case lower.
At a minimum, you get physically tired more, because you have to constantly look from the keyboard to the screen. Even with the so-called "semi-eye" typing method that I have developed over the years of typing with two or four fingers.

Below I will talk about my experience in mastering touch 10-finger typing and the problems that arose in the process. After all, retraining is always more difficult than starting from scratch. But the final result was worth overcoming all the difficulties.
I hope my example will inspire you, dear readers, to improve your typing skills. Believe me, investing time and effort now will give a tangible advantage in the future and increase labor efficiency in many areas of human activity.
Why break something that works well

I started studying blind typing at the end of January and finished in October. Was the game worth the candle? Definitely yes. The reasons I described above are the ability to double the typing speed (for me personally), and more comfortable work in any conditions, and the lack of binding to Russian notation on the keyboard.
It seemed to me that I had already reached the level of a “keyboard ninja” a long time ago and there was nowhere to develop further, and there was no need to. The problem is that when there is nothing to compare with, it is difficult to understand the full benefits of a new initiative. So please take my word for it. Printing has become ... how to put it more accurately ... kayfovo - that's the right word.
What tools to use? Whatever - the most popular I have described. If you want to try to learn touch typing on the machine without much strain - try KeyKey. If you don't want to spend extra money - VSE10 and "Klavogonki" to help. We decided to approach the issue thoroughly - " SOLO on the keyboard"A great option, albeit the most expensive one.
Only one advice - exercise daily. It is better to spend 15, 30-60 minutes every day than to try to study touch typing in “raids” for three to five hours once a week or two. Also, if the speed of typing is not critical, from the first lesson, try to print with ten fingers in everyday life. The learning process will go faster.
If you look at the keyboard while typing, you reduce the quality of the text, waste time and health.
You have to run your eyes from the screen to the keys and back. Your thoughts go astray, shifting your gaze wastes time and strains your eyesight. You get more tired.
More comfortable for a person who types blindly. He doesn't get distracted by searching for letters and focuses on how to write better.
Without straining, he types in 250 characters per minute - this is the speed at which most people "think" in writing. It turns out that a person thinks - and thoughts instantly appear on the screen.
Advice from Pavel Durov, creator of Vkontakte and Telegram:
Learn to type on the keyboard blindly. Time is one of the few treasures you have, and you should be able to type almost as fast as you can think. And you should not think about where the desired letter is, but about what you write.
What is the "blind method" based on?
It doesn't take a genius to be able to write without looking at the keyboard. Everyone can master the blind method.
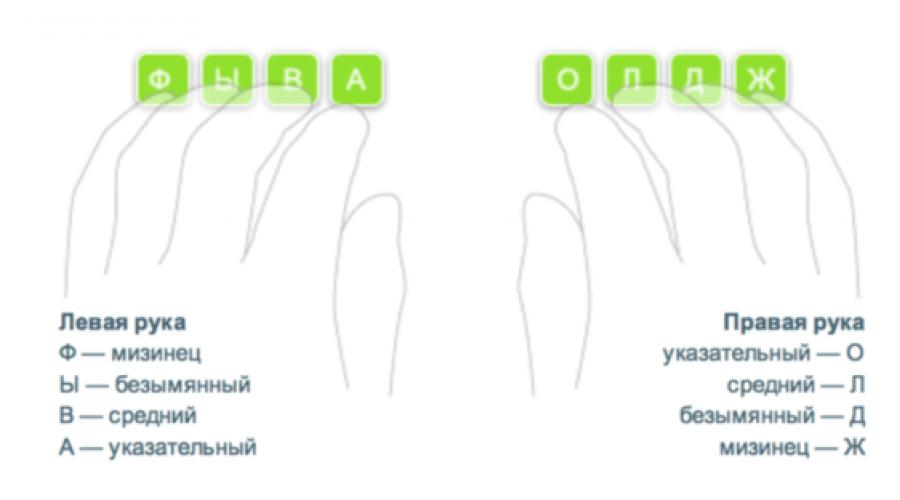
You have ridges on the "A" and "O" keys:
The ledges are made so that you put your hands in the starting position without looking at the layout.
The starting position is the following.
There are index fingers on the keys with ledges:
The fingers of the left hand are on the FYVA keys, the fingers of the right hand are on the OLJ
Thumbs up for space.
Each finger presses the key on which it stands. This allows you to blindly find and type letters.
In order to type the rest without looking, the keys are distributed over the fingers:
How to learn touch typing. Two stages
Each finger presses "their" keys. To remember all this, keyboard simulators will help.
For the first stage of training, the site vse10.ru is suitable.
The first lessons are a set of several letters. Each time their number increases.
First exercise of the first lesson
It will be uncomfortable at first
Usually people do not use all fingers, so it will be unusual to press any keys during training. For example, my ring finger did not bend to the letter "h".
To write a capital letter, I used only the left "Shift". It was a discovery for me that the keyboard has a "Shift" on the right. It needs to be clamped right little finger when typing capital left hand. This increases the print speed.
Similar feature with space. Here I am writing the word "Odie", the last letter in the word is "and". I got her left hand, so I have to press the spacebar right. This also affects speed.
If it's inconvenient, you don't need to change the rules. Over time, everything will become familiar - now I easily type "h" with my ring finger.
Don't look at the keyboard
Sometimes you forget where the key is and want to look at the layout. It is not necessary to do this, because the wrong habit will be developed. Eyes only on the screen.
Don't make mistakes
Beginners try to type fast and because of this they press the wrong keys. These people manage to learn touch typing, but they continue to make many typos. Typos have to be corrected - waste of time.
So that you do not have such a problem, do not chase speed during training. Remember: the fewer errors now, the greater the speed in the future. Slowly type each key with the correct finger. It will be tedious, but the result will justify itself.
Also, this will help the simulator. To move on to the next lesson, you can make no more than two mistakes:
How to build learning
Take a new lesson in the evening, repeat it in the morning. One lesson is about 15 minutes. In this mode, it will be comfortable to train and go about your business.
There are 16 lessons in total. It turns out that the first stage of training will take 17 days. If you think this is too long for you, try exercising more often. But, most likely, you will get tired and abandon your studies. Therefore, I advise you to train a little, but regularly.
You will have the next question.
Here you have learned how to blindly type the middle row. How to be in real life? One row is not enough to write a letter. Should I look at the keyboard?
Better not worth it. Print out the diagram "" (version) and lay it in front of you. Look at the diagram when you need a letter that was not passed.
When you go through all the letters and symbols, leave the scheme for a few days.
The main thing is not to look at the keyboard.
After going through all the lessons, you will roughly remember which key to press with which finger. To remember to the end, you need to practice and type words and text.
Suitable for the second stage of training klava.org website.
Select the "initial" mode:
There is a timer in the middle of the hat.
After a week, change the mode to "training" - you will already be typing. Do the same three times a day for 10 minutes.
"Training" mode on klava.org
This way you will learn to type without thinking about the keyboard.
Turn off Capslock
Capslock keyhinders:you accidentally press it, type in CAPITAL LETTERS, then erase them, turn off the "caps" and write again.
To save time, disable this key. Do not be afraid that this will create some inconvenience - it does more harm than good.
How to turn off Capslock
on Windows
on Mac
How to learn touch typing fast
The main thing is to learn the blind method; speed will come with time. You can not use any programs, but just practice: blindly, write text, communicate by mail, chat with friends.
But in order to gain more speed faster, do it on simulators. Type text on klava.org and compete in speed with real people on klavogonki.ru.
On klavogonki.ru, in normal mode, opponents type a random quote from a book
How learn to touch typein English
Learning two layouts at the same time is difficult and inefficient. Therefore, I advise you to learn Russian first.
After learning the Russian layout, people say that they start touch typing in English without any simulators: the brain likes not to look at the keyboard and it tries to learn the layout of the keys itself.
This is true, but still these people do not type as well as they could after training on the simulators.
To type in English with ease and without errors, practice in the same way as in Russian: having set English, start learning with vse10.ru, after completing all the lessons, go to klava.org and then hone your skills on klavogonki.ru.
Blindly not only text
The skill of touch typing is useful in programs. The rule is: the more you do with the keyboard, the faster you work. It is always faster to reach for the keys than to poke with the mouse, especially if you find them blindly.
Let's take Photoshop as an example. To select a tool, I do not click on the toolbar, but press a hotkey. To select a layer, I don't click in the layers panel, but go down by pressing Alt + [, or up by pressing Alt + ]. Thanks to this, I work faster.
Remember
- Starting position - fingers on FYVA and OLJ.
- Each finger presses "their" keys.
- Complete all lessons on vse10.ru. New lesson - in the evening, repeat - in the morning.
- At first it will be uncomfortable, do not look at the keyboard, do not make mistakes.
- Practice in Beginner mode at klava.org. Three times a day for 10 minutes for a week.
- Practice in the "Workout" mode on klava.org. Three times a day for 10 minutes, until you feel confident touch typing.
- Increase your speed by competing on klavogonki.ru.
Subscribe to "". This is the editor-in-chief's weekly newsletter with the best links for graphic designers.
The speed of performing a task on a computer may depend not only on obvious factors: processor performance or, roughly speaking, human ingenuity. Sometimes the most limiting factor is purely mechanical work, namely typing on the keyboard. Thoughts go far ahead, and the fingers do not have time to fix the text. Obviously, this situation is faced not only by writers, journalists, programmers, but also by all those who have to type text with two or three fingers without taking their eyes off the keyboard.
Surprisingly, the blind ten-finger typing method, discovered back in the 19th century, is now many times more relevant for every active computer user. Its skillful application can significantly reduce the time spent on text input.
The review includes keyboard simulators, each of which has at least one distinguishing feature among programs of this kind. Therefore, when choosing a simulator, you can navigate by the headings of the review.
"Solo on the keyboard": a reliable all-rounder
"Keyboard Solo" is the most versatile keyboard trainer, so it's worth starting the review with it. In addition to Russian, English and German, the Taming of Numbers course, which will be useful, for example, to accountants. Universal edition includes Russian, English and digital layout.
The first impression after installation can be skeptical: too informal approach. However, the further the user moves away from the beginning of the course, the more meaningful these digressions become. They allow you to take a break from fairly monotonous exercises. Perhaps the greatest benefit from textual material is recommendations on the correct pressing, posture, and correct technique, which is important with ten-finger blind typing. Looking ahead, only Solo delivers this information evenly throughout the course.
Before doing the exercises, you need to do a warm-up, which helps to adapt to the "Solo". In real time, as well as after training, you can get acquainted with the statistics: average score, speed gain, number of errors. Statistics are available not only for exercises, but also for days, it can be used to trace the dynamics of the exercises.
Keyboard training does not contain meaningful phrases, these are pre-prepared "synthetic" expressions - unlike, say, the VerseQ considered further, where the string for typing is formed based on user errors. By the way, in "Solo" mistakes are extremely unwelcome, often you have to redo the task several times. The requirements for passing are strict, the exercises become more difficult with each new level, of which there are about a hundred. Yes, apparently, it is not in vain that the program provides for psychological tests.
The interface of the program makes an ambiguous impression. Comparing with previous versions of Keyboard Solo, it cannot be said that the new interface, designed in gray and green tones, has significantly improved the ergonomics of the program. On the one hand, it is quite convenient to work with, all settings and elements are well documented in the help. But you can find fault with the fact that on the virtual keyboard it is not indicated which finger to press this or that key, no hints are displayed during the exercise. As a result, not having sufficient experience, you need to return to the description of the exercise.
VerseQ: learning from your mistakes

In the description of the program, what is more important is not that the user will be able to type blindly “literally in an hour” (according to the author of the simulator). Attracts something else: VerseQ uses algorithms in training that are not based on “training”, and also does not “punish” for mistakes made during exercises. Moreover, the course is based on user errors and problematic phrases, which, according to statistics, most often have difficulties. Moreover, by design, the user does not learn about his mistakes from the statistics, VerseQ imperceptibly adjusts them in further exercises. Despite this, overall statistics are displayed both during training and in the form of training dynamics by pressing F9.
Three modes of operation are available - with German, Russian and English layouts. There are no introductory exercises, in addition, all the letters of the alphabet are already initially involved. However, you should not expect that the typed text will be meaningful: as a rule, these are repeated combinations of letters that are phonetically related to each other (they can be pronounced). The technique is based not only on pressing, but also on the transitions between the keys.
A distinctive feature of VerseQ is a moderate "tone" of presentation, a soothing color scheme and a neutral design in general. It is not known how much effort it takes to exit the program in a state of irritation. By the way, if we talk about the price issue, in "Keyboard Solo" a warning about an unregistered version appears after each exercise, in VerseQ - only at the beginning of the program launch.
All the most important information is collected in a concise help file: how to use the program correctly, teaching methodology, keyboard techniques. Perhaps what is missing in this simulator is more detailed instructions for working with exercises, as is done in Solo.
Typing Master - a classic of the genre

By and large, this simulator could not be included in the review, since it does not support the Russian-language layout, but still: a) it is useful for improving touch typing skills in Latin in English, Spanish, German, French or Italian; b) The Typing Master is a great example of a structured, balanced course.
Typing Master's strict approach and conservatism will not appeal to every user, at the same time, compared to Solo, the program is presented even more concisely. Typing Master offers the following courses:
- Touch Typing Course - directly, touch typing course
- Speed Building Course
- Numbers Course - a small typing course on the top digital row
- Special Marks Course - an express course on additional characters: brackets, mathematical signs, etc.
- Numeric Keypad Course - Numeric Keypad Course
Each course consists of theoretical and practical blocks. At the beginning of the exercise, the time for completing the task is indicated, it is also proposed to choose the difficulty (from 90% to 98% of correct hits). In the mode of learning new keys (“new keys”), the letters for typing are not connected phonetically, but in the “drill” mode, you need to enter exactly the words: there are separate exercises for words, sentences, paragraphs. At the end of the task, statistics are displayed from which you can find out which keys cause the greatest difficulty.
Additionally, it is worth noting the TypingMaster Satellite - an assistant that works in the background and tracks the mistakes made, and also creates individual exercises for the most difficult combinations.
The interface was created by developers who are attentive to detail. First of all, it explains very intuitively and literally which finger to press which key, with attached keyboard diagrams. It is very useful that errors on the keyboard are displayed as crossed out keys (in other simulators this is not, which leads to several repeated errors after one wrong press).
TypingMaster does not allow you to deviate from the given program even one step and is somewhat reminiscent of dry language grammar courses. However, this cannot be called a disadvantage, but rather a characteristic feature of this simulator, which will either keep the user or repel him.
Stamina - freedom of action

After reviewing the Typing Master, Stamina turns out to be the most “non-serious” simulator in the review. The program will not appeal to users who find the developer's sense of humor inappropriate and at the same time are fully committed to learning the ten-finger typing method. Non-seriousness begins with help, all kinds of comments and ending with voice acting. To the sound - special claims made by visitors on the home page of the program. This point can be fixed with a patch or through the "Censorship" option in the Stamina settings.
Despite the foregoing, it is not worth jumping to conclusions and ignoring the simulator. It is enough to pay attention to the variety of training modes - "Lessons", "Phrases", "Letters", "All Symbols" and "External File". Of greatest interest are the lessons, which are divided into basic exercises, combinations of letters, numbers and symbols. Regarding the lessons with the numeric keypad: the developer claims that he “did not make them very hard” and invites users to participate in the development process themselves (quote: “Can you do something smarter?”).
Unfortunately, the author of Stamina placed the program with its wide capabilities in an inconvenient shell, so when starting the simulator it is not entirely clear how and in what sequence all this functionality should be handled. On the other hand, the help explains quite intelligibly the course methodology, basic concepts, typing techniques (the position of the fingers on the keyboard, etc.). Particular attention is paid to an alternative method of placing fingers on the keyboard.
The keyboard simulator can also be advised to work with the Ukrainian or Belarusian layout (that's something you won't find in other simulators). The basic distribution contains lessons in Russian, English, Ukrainian, it is possible to connect phrases in other languages.
Thus, the main feature of Stamina is the freedom of action provided to the user. Therefore, you can perform the exercises in any order, create your own course. The disadvantage of the method is that it is not known how soon concrete results can be achieved with this approach.
Klavarog - online training

Klavarog is a self-sufficient online simulator, indicating that the project can exist and develop through donations. And development progress is actually noticeable if you look at .
In Klavarog, similarly to the same Stamina, there is no set sequence like step-by-step exercises from simple to complex. The simulator fixes errors and adds problematic words to each generated line of text (the principle of operation is similar to both Stamina and VerseQ).
It is convenient to navigate the keyboard layout using the color scheme, it can be turned on in the program settings (the "fill" icon). A hint in the form of a hand is very useful, with which finger to press the desired key (a similar possibility was seen only in Typing Master). Experienced users can turn off all hints or switch to Zen mode, where there are practically no distractions.
In addition to standard courses with Russian and English layout, there are courses in digital layout, Esperanto, PHP, Python, SQL, XML/XSLT programming languages. Special attention is drawn to vocabulary exercises: you need to enter the correct translation of the word from the available options. If the word is chosen incorrectly, it must be entered three times. Thus, it is possible to kill two birds with one stone: "keyboard" and language skills are improved at the same time. True, due to the fact that the set of words is generated by the program, guessing the correct translation is quite easy.
Unfortunately, in this keyboard trainer you cannot record results, track statistics and skill development. In general, the possibility of creating an account on the site would not hurt - technically this can be implemented.
You can make your suggestions for the development of Klavarog on the page.
Bombina: a simulator for the little ones

"Bombina" occupies a free niche where there are no competitors. This simulator is designed to teach schoolchildren (rather, even children of primary school age) the blind ten-finger typing method.
The shell of the program is “cartoonish”, children should evaluate it. However, reasonable complaints may arise in adults. The interface is not intuitive in all places, and it will seem inconvenient that the navigation elements or, for example, the "Start" button at the beginning of the exercise are not clearly marked out: you have to look for them. For example, who would have thought that the image of a rag is the local analogue of the "Exit" button.
There are questions about the method of the simulator: how the training takes place, what to pay attention to parents and children. It turns out that there is a fairly detailed help that exists separately from the program. It is recommended to start "Bombina" with an introductory course, which explains in detail the placement of fingers on the keyboard, and gives a description of the keys. Then you can move on to the exercises. If in other simulators the emphasis is on transitions and keyboard chords, here you need to pay attention to jumping "chips" and repeat their movements.
The "Bombina" provides difficulty levels that affect the number of errors allowed in the exercise. You can activate auto-transition from one difficulty level to another: it will work after successfully completing the exercise with a high score at least three times.
As a result, given that the program has a lot of interactive elements, modes (there is even a logic game), it can be recommended for teaching children the basics of computers. At the very least, Bombina would be a smarter choice than an endless string of casual games.
Table 1. Comparison of keyboard simulators by functionality
| Name of the simulator | Distribution terms | Layout support | Training Modes |
| shareware | Russian, English, German, Italian, digital | Warm-ups, tasks, exercises, exam | |
| trial | Russian, English, German | Exercises | |
| trial | English, Spanish, German, French, Italian | Exercises, games, tests | |
| Freeware | English, Russian, Ukrainian + | "Lessons", "Phrases", "Letters", "All Symbols", your own text | |
| donationware | Russian, English, digital, Esperanto, phonetic + | Training, beginner, speed, vocabulary, programming | |
| Freeware (1 user), shareware (multi-user version) | Russian, English | Exercises, games, your own text |
(1st-4th grade)
The Federal State Standard for Primary General Education approved the requirements for the basic educational program for elementary schools: the content, conditions and results of its development.
The results of mastering the main educational program include personal, metasubject and subject.
The meta-subject results, which include the universal learning activities mastered by students (cognitive, regulatory and communicative), which ensure the mastery of key competencies that form the basis of the ability to learn, and interdisciplinary concepts, include the ability of students to “enter text using the keyboard, record (write down) in digital form measured values and analyze images, sounds, prepare your speech and perform with audio, video and graphic support; comply with the norms of information selectivity, ethics and etiquette.
The substantive section of the exemplary basic educational program of primary general education includes a program for the formation of universal educational activities for students, including the formation of students' competencies in the use of information and communication technologies.
Orientation of junior schoolchildren in information and communication technologies (ICT) and the formation of the ability to correctly apply them (ICT competence) are one of the important elements in the formation of universal educational activities of students at the stage of primary general education.
In ICT competence, educational ICT competence is singled out as the ability to solve educational problems using ICT tools and sources of information that are generally available in primary school in accordance with the age needs and capabilities of a younger student.
The solution of the problem of the formation of ICT competence should take place in all classes in individual academic subjects, and may also be included in the content of optional courses, circles, and extracurricular activities of schoolchildren.
Modern realities are such that the personal computer has become an integral part of everyday life for many. The modern PC user writes e-mails, communicates on forums and blogs every day. At the same time, the speed and ease of communication with new and old friends are directly related to the speed of printing.
Blind typing(blind ten-finger typing method) is a technique for typing with all fingers without looking at the keyboard keys.
The ten-finger touch typing method provides:
- literacy training (students better remember the image of a printed letter, train to compose, read and print syllables, words and sentences);
- development of spelling vigilance;
- increasing literacy;
- accumulation of experience in working with information objects (texts, figures, tables, animation, etc.);
- preparatory training in informatics and successful mastering of ICT from elementary school, mastering the computer as a tool;
- development of memory, imagination, thinking;
- stimulation of fine (fine motor skills) and activation of the corresponding parts of the brain, as well as neighboring areas responsible for speech;
- development of tactile sensitivity and complexly coordinated movements of the fingers and hands;
- quick communication with friends and classmates via the network;
- low fatigue during prolonged work (there is no need to look from the monitor to the keyboard and vice versa, as well as from the "paper" original to the monitor when reprinting text and vice versa).
Common in the initial study of a computer is the so-called. "sighted", or "two-finger" dialing method - "find and press". With this set, you need to find each next character, visually guided by the markings on the keys (which significantly slows down the set, but, on the other hand, does not require any prior user preparation).
Learning the blind typing method can allow you to enter text "blindly" quickly and accurately. With touch typing, more emphasis is placed on muscle memory and tactile sensations of the fingers than on vision. However, this method requires special training.
The speed of mastering the method largely depends on the psychophysiological characteristics of a person, and the speed of touch typing depends on the time of training and individual characteristics of a person (structure of hands, state of the nervous system, etc.). The average trained user achieves speeds of 200 to 400 beats per minute when passing the "10-minute test".
Blind typing training
The advantages of the blind printing method are not only in saving time, but also in health-saving aspects, such as maintaining vision and posture.
If you type a long text, constantly looking from the monitor to the keyboard and back, then your eyes very quickly begin to get tired. The reason is that the distance from the keyboard to the screen is usually different, there is a constant refocusing. In addition, the position of the eyes when looking at the keys is often close to the extreme bottom, in which it is not easy to hold them (this, of course, depends on the location of the keyboard). In poor lighting, the situation is even worse - there is a big difference in the brightness and contrast of the objects between which our gaze moves. As a result, at first, the eyes may simply start to hurt, and then, probably, the vision may deteriorate.
The correct body position when working at a computer is something like this: the back is not bent, the shoulders are straightened. And if you look at the keyboard, you just want to hunch over, lower your head and, as a result, earn scoliosis.
Blind Printing Methodology
Proper posture and hand position
Each session should begin with a check on the fit and position of the hands.
Before completing assignments, always draw students' attention to the landing and position of the hands.
Sit preferably in a chair or swivel chair with a back. The angle between the spine and thigh and between the thigh and lower leg should be 90 degrees. You need to sit straight, without bending over or tilting your head. The gaze should be directed forward to the center of the monitor screen. Wrists should not sag. The distance from the eyes to the monitor screen is from 40 to 70 centimeters.
Practice the correct hand and finger placement on a PC keyboard with students:
- Bend your arms at the elbow, stretch your hands forward with your palms down.
- Connect the brushes, touching with index fingers; thumbs down.
- Lower the first two phalanges of the fingers down, slightly bending them.
- Spread the brushes apart, leaving a distance of 4 cm between the index fingers.
- Place your hands on the keyboard (the left index finger will land on the A key, and the right index finger on the O key; these keys have a protrusion that allows you to control the correct position of the hands).
If the recommendations are followed correctly, then all fingers will take the main position, touching the tips of the middle of the keys assigned to them. When entering the main position, the fingers should be slightly bent, as if the hand is holding a round object. The index fingers lightly touch the tips of the middle of the keys A and O, but do not rest on them. Landing at the PC and the correct position of the hand are shown in the figure.
Advice: When practicing the first strokes on the keys, do not forget about the position of the elbows. Do not press them too tightly to the body or take them far to the sides. From the shoulder, the arms should be freely lowered down, otherwise the hands will take the wrong position on the keyboard.
Printing Rhythm
When doing exercises, draw students' attention to the rhythm of typing.
The typing rhythm is the alternation of keystrokes at regular intervals. The shorter the intervals between strokes, the higher the print speed.
Advice: When working on a computer, it is necessary to observe a certain rhythm, evenly perform strokes on the keys. This is the only way to achieve high print speed.
To develop rhythmic typing, rhythmic training is used, which is part of the system of exercises for working out the correct strokes on the keys and finger movements. Hits on the keys should be jerky and not strong, but sharp, without delaying the finger on the key; finger movements to the keys of the corresponding zone are accurate. The blow is performed with the fingertips, the hands also take part in it. When typing, the hand is raised above the keyboard by about 1-2 cm, and then quickly and vigorously hit the desired key and return the finger to its original position. The impact force must be sufficient to achieve a jerky impact.
Advice: For fast typing, you should observe a uniform rhythm with a gradual increase in tempo, that is, a reduction in the time intervals between keystrokes.
From the first lessons it is necessary to achieve independent finger movements: when one finger strikes, the others are relaxed. The muscles of the fingers must act during the execution of the blow, and immediately after it relax.
The automatism of finger movement is developed as a result of prolonged training. Blind printing method can be considered mastered only when the operator ceases to control the movement of the fingers on the keyboard.
Advice: Do not chase speed, pay special attention to the error-free printing. Typing speed is easy to increase in the course of everyday work, after you have already mastered the keyboard in full.
Ten-finger typing method on the keyboard
Show students that PC keyboards are designed to allow you to perform all the necessary operations: type, edit and format texts using keyboard shortcuts without using the mouse, which greatly increases the speed of writing texts.
Explain to students why the typing speed slows down when the typist looks at the keyboard.
Advice: You should not press the keys with the wrong fingers, which can subsequently greatly reduce the speed of typing.
When performing exercises, one should achieve complete automatism, only mechanically and in the right sequence by pressing the keys.
Advice: To effectively learn the ten-finger method, it is better to practice daily.
Each student will master the blind typing method, at their own pace, move on to each subsequent task.
Student advice: You should not move on to the next exercise without having achieved sufficient flexibility in the fingers in the previous exercise.
Position of fingers on the keyboard
Please note to students that all computers, regardless of operating system and brand, have a standard keyboard with alphabetic characters, numbers, and symbols. The keyboard consists of four rows: the top row contains numbers and special characters, the rest are letters and punctuation marks. In the center of the keyboard there are keys with letters that are most often repeated in texts; they are served by more developed and mobile fingers: index and middle.
The rows of the keyboard are arranged from bottom to top: the 1st row is called the bottom, the 2nd - the main, the 3rd - the top, the 4th - the digital. Keyboard learning start from the second row. This row is called the main row, since it contains the letters of the alphabet that are most often repeated in texts. From this row, located in the center of the keyboard, it is convenient to make finger movements when hitting while writing within the zone allocated to them.

The figure shows a diagram of the Russian keyboard. The scheme gives an idea of the zones of movement of the corresponding fingers to the desired keys, teaches to blind writing with ten fingers.
Particular attention of students should be paid to the location of the fingers on the keys of the main row (see figure):

These keys are called the "home position".
Letters not included in this list are located on the so-called additional keys of the second, main row of the keyboard.
Letter keys are distributed as follows:
- left hand: little finger - f, ring finger - s, middle - c, index - a;
- right hand: index - o, middle - l, nameless - d, little finger - f;
- to the left index finger - a, p, k, e, m, and;
- to the right index - o, p, n, g, t, b;
- to the left middle - y, v, s;
- to the right middle - w, l, b;
- to the left nameless - c, s, h;
- to the right nameless - u, d, u;
- to the left little finger - d, f, i;
- to the right little finger - h, f, e, x, b;
- press the spacebar with the thumbs of both hands.
At the initial stage, training blind ten-finger printing method conducted without regard to register. Cases, punctuation marks, numbers, auxiliary symbols - this is the next stage, which you can proceed to after mastering the skill blind ten-finger typing in lowercase (lower case). Practice shows that their study takes no more than 5–10% of the time spent on studying the lower case of the keyboard. Yes, and their location on different keyboards, in different operating systems is different.
Before you start mastering typing in Russian, draw students' attention to the following keys: backspace, Delete, Enter, Space.
- key backspace pressed with the little finger of the right hand. This key is used to delete the character to the left of the cursor. It is designed to correct errors that occur when typing texts.
- Key action Delete resembles the action of the backspace key. It is also pressed with the little finger of the right hand. Deletes the character to the right of the cursor.
- key Enter pressed with the little finger of the right hand. Used to translate strings.
- key Space press with the thumb of the left or right (currently free) hand. It is designed to put spaces between words in a sentence.
A set of exercises necessary to master the touch typing method
Level 1 Exercises (Beginner)
Exercise 1.1. Set your hands in the main position. Print the letters of the main position one by one. Under the left hand you get FIVA, under the right - OLJ. When typing, try to capture in memory the sensations that arise when you move your fingers. After each hit, reproduce it mentally.
Exercise 1.2. Set your hands in the main position. Hit the index finger of your right hand on the P key and return it back. The finger should make a sharp blow, rebound and return to the main position. Non-working fingers are relaxed. Make sure that the brushes do not move to the sides.
Exercise 1.3. Set your hands in the main position. Hit the index finger of your left hand on the P key and return back. The finger should make a sharp blow, rebound and return to the main position. Non-working fingers are relaxed. Make sure that the brushes do not move to the sides.
Exercise 1.4. Set your hands in the main position. Hit the H key with the index finger of your right hand and return it back. The finger should make a sharp blow, rebound and return to the main position. Non-working fingers are relaxed. Make sure that the brushes do not move to the sides.
Exercise 1.5. Set your hands in the main position. Hit the index finger of your right hand on the G key and return back. The finger should make a sharp blow, rebound and return to the main position. Non-working fingers are relaxed. Make sure that the brushes do not move to the sides.
Exercise 1.6. Set your hands in the main position. Hit the index finger of your right hand on the T key and return it back. The finger should make a sharp blow, rebound and return to the main position. Non-working fingers are relaxed. Make sure that the brushes do not move to the sides.
Exercise 1.7. Set your hands in the main position. Hit the b key with the index finger of your right hand and return it back. The finger should make a sharp blow, rebound and return to the main position. Non-working fingers are relaxed. Make sure that the brushes do not move to the sides.
Exercise 1.8. Set your hands in the main position. Hit the I key with the index finger of your left hand and return back. The finger should make a sharp blow, rebound and return to the main position. Non-working fingers are relaxed. Make sure that the brushes do not move to the sides.
Exercise 1.9. Set your hands in the main position. Hit the index finger of your left hand on the M key and return it back. The finger should make a sharp blow, rebound and return to the main position. Non-working fingers are relaxed. Make sure that the brushes do not move to the sides.
Exercise 1.10. Set your hands in the main position. Hit the K key with the index finger of your left hand and return it back. The finger should make a sharp blow, rebound and return to the main position. Non-working fingers are relaxed. Make sure that the brushes do not move to the sides.
Exercise 1.11. Set your hands in the main position. Hit the index finger of your left hand on the E key and return it back. The finger should make a sharp blow, rebound and return to the main position. Non-working fingers are relaxed. Make sure that the brushes do not move to the sides.
Exercise 1.12. Set your hands in the main position. Print W and B with the right middle finger, Y and C with the left. The fingers should make a sharp blow, rebound and return to the main position. Non-working fingers are relaxed. Make sure that the brushes do not move to the sides.
Exercise 1.13. Set your hands in the main position. Print with the right nameless Yu and Shch, with the left - C and Ch. The fingers should make a sharp blow, rebound and return to the main position. Non-working fingers are relaxed. Make sure that the brushes do not move to the sides.
Exercise 1.14. Set your hands in the main position. Print with your right little finger E, Z, X, b and Yo, with your left - I and Y. Fingers should make a sharp blow, rebound and return to the main position. Non-working fingers are relaxed. Make sure that the brushes do not move to the sides.
Advice: Repeat the exercise with all the letters: hit once and mentally reproduce three times, keeping your hands in the main position. Make sure that only the working finger is tense. The hands should only make vertical movements, otherwise the fingers will lose their main position. Perform all exercises rhythmically, without rushing.
Through the beginner level exercises, students should be able to:
firstly, to be able to put hands on the main position automatically and not to shift them during work;
secondly, to know the location of the letters on the keyboard perfectly;
thirdly, remember the movements of the fingers to each key;
fourthly, all exercises, including mental ones, should be performed only rhythmically, that is, at the same speed.

Advice: To quickly memorize the keyboard, we use the imagination and the senses. Imagine that your index fingers and the keys assigned to them are green, the middle fingers with their keys are red, the ring fingers are blue, and the little fingers are yellow.
Look at the drawing.

Perhaps for students, the best color arrangement would be the arrangement of colors in the rainbow. The order of the colors is suggested by the well-known phrase: Every Hunter Wants to Know Where the Pheasant Sits. By the first letter of the words, it is easy to remember the order of the colors.
But in this case, the coloring of the keyboard is made in four opposite colors. Red is the opposite of green, and yellow is the opposite of blue.
Advice (physical minute “I am a finger”):
Stand up straight, bend your arms as if you are about to type. Imagine yourself as the yellow little finger of your left hand. You are hanging over the yellow square key F. Jump forward and, as it were, a little up on the yellow triangular key Y. Pause a little and imagine a large soft and hot key under your feet. Return to your original location. While jumping with the little finger of your left hand, perform movements similar to what you do when printing. Jump back and, as it were, a little down on the yellow round key Z. Feel the cold of prickly ice under you. Come back. Jump up and imagine that you hit the F key. Do the exercise with imitation of the movements of all fingers. If you are not tired, repeat again. During the exercises, the fingers whose movements you imitate exactly repeat the actual movements at the keyboard.
One lesson should last at least 20-25 minutes. Spend at least an hour studying every day. And it’s better to spend two or three short lessons a day separated by time than one long continuous one. Don't overwork.
Tip: If your hands are tired, clench your fingers into a fist and straighten them sharply, lower them down and relax. Do 8-10 times. Massage your hands with movements reminiscent of putting on tight gloves..
Level 2 Exercises (Basic)
Remind students to use punctuation marks when typing. Remember the rules for punctuation.
Familiarize students with the rules for printing punctuation marks. For example, to type a period, you need to hit the key with it and immediately with the other hand (thumb edge) - the space key.
- The Backspace key is pressed with the little finger of the right hand. This key is used to delete the character to the left of the cursor. It is designed to correct errors that occur when typing texts.
- The action of the Delete key is similar to that of the Backspace key. It is also pressed with the little finger of the right hand. Deletes the character to the right of the cursor.
- The Enter key is pressed with the little finger of the right hand. Used to translate strings.
- The Space key is pressed with the thumb of the left or right (currently free) hand. It is designed to put spaces between words in a sentence.
Set your hands in the main position. Type punctuation marks: dot, comma, exclamation mark, and question mark. Mentally repeat everything three times. During the exercise, try to remember the spatial-muscular sensations.
Exercise 2.2. Set your hands in the main position. Print the line:
i can i can i can i can
Advice: At the beginning of the lesson, students type in lowercase letters and without punctuation marks 3-4 times with the obligatory mental repetition of each new word. The sentences are separated from each other by a space. You need to try not to look at the keyboard, type without typos and keep the same intervals and margins.
Exercise 2.3. Set your hands in the main position. Print lines:
I can (mental repetition) I can (mental repetition)
Advice: Hit the keys rhythmically, but don't rush. Rhythm reduces fatigue and increases productivity.
Exercise 2.4. Set your hands in the main position. Print the line:
I can type I can type I can type I can type
Exercise 2.5. Set your hands in the main position. Print the line:
I can type fast I can type fast
Exercise 2.6. Set your hands in the main position. Print lines:
I type faster I type faster
Exercise 2.7. Set your hands in the main position. Print lines:
typing easier and faster typing easier and faster
Exercise 2.8. Set your hands in the main position. Print lines:
can i type well can i type well
Exercise 2.9. Set your hands in the main position. Print lines:
I print everything in an instant I print everything in an instant
Exercise 2.10. Set your hands in the main position. Print lines:
I'm good at it I'm good at it
Exercise 2.11. Set your hands in the main position. Print lines:
and easier with every moment and easier with every moment
Exercise 2.12. Set your hands in the main position. Print the couplet four times:
I can type fast
and every moment faster
Exercise 2.13. Set your hands in the main position. Print the lines:
I will remember everything quickly. I will remember everything quickly.
Punctuation exercises.
Exercise 2.14. Set your hands in the main position. Print the lines:
I remember a simple rhyme:
Quotes, semicolons,
Star sign, parenthesis and other,
Plus, equality and transfer,
Percentage, number, comma,
Both an exclamation and a question.
Exercise 2.14. Set your hands in the main position. Print the same lines, replacing the name of the punctuation mark with its symbol:
I remember a simple rhyme:
Exercise 2.15. Set your hands in the main position. Print the same lines, gradually replacing all the characters with words according to the chaining rule. First four times:
I remember a simple rhyme:
(and another
And the transfer
%# comma,
AND! and a question.
Then four times:
I remember a simple rhyme:
Quotes, semicolons,
(and another
Plus = and carry,
% number, comma,
Both an exclamation and a question.
And so on until the complete replacement of signs. Print each new word also mentally.
Numeric exercises.
Exercise 2.16. Set your hands in the main position. Print out the rhyme as follows:
I won't stop repeating:
One, two, three, four, five.
Six, seven, eight, nine, zero.
Then four times like this:
Repeat again four times, adding signs to the digital rows:
I won't stop repeating:
№6, №7, №8, №9, №0.
Level 3 exercises (basic level)
Exercise 3.1. Set your hands in the main position. Type text:
At the apiary.
Alyosha Solovyov lives in the village of Sosnovka. It stands on the banks of the river Bystrica.
Alyosha has an older brother, Kostya. He works as a beekeeper. Alyosha loves to help him.
Early in the morning the brothers come to the apiary. Among the trees are beehives. The bees are buzzing. The brothers are preparing the frames, cleaning the notches.
The day passes quickly.