Key combination to enter safe mode. Entering Safe Mode in Windows XP

Read also
Hello dear readers of the blog site. Today I will try to talk about how to enter Windows 7 Safe Mode at startup (Safe Mode) and what it is for. Safe mode allows you to boot the system without additional settings. Most of the system components will be blocked without using installed devices and on a minimal schedule. Usually, safe mode allows you to independently eliminate basic PC malfunctions and debug the system. Thanks to such actions, it is possible to carry out after critical errors that block the launch and correct operation of windows. But first things first.
There are two ways to enter Windows 7 Safe Mode:
- Safe mode starts when the computer boots;
- Configuring boot in the operating system
How to enter windows 7 safe mode at computer startup
To start windows 7 safe mode when the device is turned on, immediately after the computer starts booting, we begin to press the F8 key at a certain frequency until the list of boot modes appears. If, after the performed operations, windows began the standard boot process, then, accordingly, you pressed the F8 key with the wrong frequency in a certain period of time, or there were small nuances about which I described below. You may need to repeat the operation. To do this, wait until the final startup of the system, start a reboot and repeat the above steps.
When using this method, you need to consider some possible situations:
- Initially, on some computers and laptops, the F1-F12 keys are locked. They can only be used in combination with the Fn key. To do this, before the computer starts to boot, hold down the Fn key, and then periodically press the F8 key.
- On some computers and laptops via Bios, a fast system boot is installed, which does not always allow launching Safe Mode via the F8 key. In this case, when turning on the computer, carefully look at the bottom of the screen. In this place, for a short time, information should appear about what keyboard shortcut you can start safe mode in windows 7.
If you did everything correctly, then a new window with Additional boot options will be displayed in front of you.
The figure above shows several options for how to start Windows 7 Safe Mode:
System boot options
The computer starts up without connecting any drivers or devices. The most primitive option for eliminating errors. This option will allow you to produce which were installed during periodic system updates. Also, for advanced users, it will be possible to edit the registry. Thanks to proper configuration, this will eliminate most of the critical errors.
Safe mode with loading network drivers- Allows you to start the system with the ability to access the Internet and connect to a local network. This method allows you to solve the problem that caused the need to debug the system, thanks to the ability to download, and subsequently and. You can also see a way to solve the problem on the Internet.
Safe mode with command line support- This option is designed to run the operating system in safe mode. The difference is that the system will not start in the graphical image you are used to, but with the output of the command line. This mode is intended for more experienced users and it is unlikely to be useful to us.
If you are going to move the cursor using the arrows on the numeric keypad, make sure the Num Lock key is disabled. If the key is pressed, movement will be impossible.
Change boot settings in windows interface
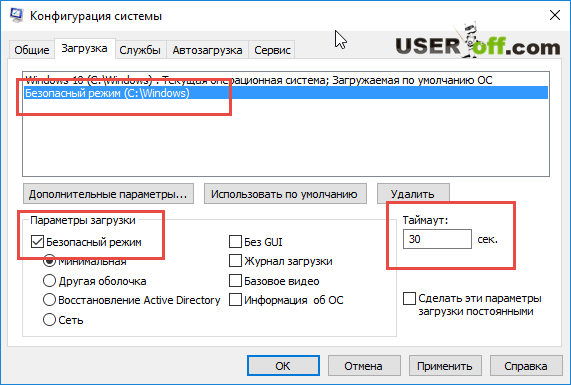
To change the Windows settings, you need to go to the Start menu, and find the Run tool there. Or, by pressing Win + R on the keyboard, call it from the desktop. After the Run window appears, you must enter the msconfig command. In the newly opened System Configuration window, go to the Boot tab. Check the box next to Safe Mode as shown in the figure below. Then, in the same field, you must select the Minimum download type.

For information, I will give you what types of loads can be selected in the bottom window:
Minimum- Allows you to start your computer with a minimum of connected components. All additional devices and drivers will be disabled.
Another shell is Launch Safe Mode from the command line without displaying the main GUI.
RecoveryActiveDirectory - Boot Safe Mode operating system with a graphical interface, basic system services and Active Directory directory services.
Network - Start your computer in safe mode with Internet access and LAN connection.
After you have set the necessary parameters, click Apply and OK. After the actions taken, the operating system will prompt you to reboot. As a result, the computer will allow both to enter the safe mode of windows 7 and to continue the standard boot. If you are going to apply all the changes immediately, then you must click the Restart button. If you want to continue working without rebooting, you should click Exit without rebooting. When choosing the last item, you need to take into account the fact that you will continue to work as usual. However, the next time you start the computer, you will be logged in through safe mode.
Return to original state
To return to the standard system start, go to the System Configuration and remove all the changes made earlier. Then we restart the computer and rejoice at the return of the familiar and beloved interface.
Finally, I would like to say that starting windows safe mode will allow. Read about how to use this method of solving the problem in one of the articles on my blog.
This description is based on the windows 7 operating system, as it is currently the most popular. If you need to enter safe mode under a different version of the operating system, then ask questions and I will try to answer them. But soon I will write some articles for the most popular systems. So subscribe to updates and follow the news.
I hope that the time spent reading this article was not wasted. And you finally figured out how to enter the safe mode of windows 7. If you have any questions, feel free to ask in the comments and we will all try to answer them together.
Safe Mode in Windows is a kind of "cure" for ailments plaguing your computer. Its essence is to load the operating system, and preferably nothing more. All programs from automatic start, all services, drivers, as well as, possibly, viruses will not start in safe mode, so that you can determine and fix the cause of your computer's malfunction. In Windows 10, the developers removed the convenient function of entering Safe Mode using the F8 key, so I decided to tell you how to enter Windows 10 Safe Mode in other ways:
- Through the restart button;
- Through the system configuration utility (msconfig);
- Advanced way using the command line;
- With special boot options;
- Using a Windows 10 installation disc.
Attention! If you do not understand how to perform these methods, then there is a video below that will help you deal with this issue.
Safe mode with restart button
This method is convenient and simple, so I decided to tell you about it first. You need to click on "Start", then on the "Shutdown" button. A menu will pop up, in which there will be three ways to shutdown, hold down the "Shift" key and select the "Restart" item.
The image on the monitor turns blue and “Please wait” appears. After loading, we will see three possible options for further actions. The first allows you to continue working on the computer, the second takes you to a further selection menu, and the third shuts down the operating system. You need to select the second option "Diagnostics".
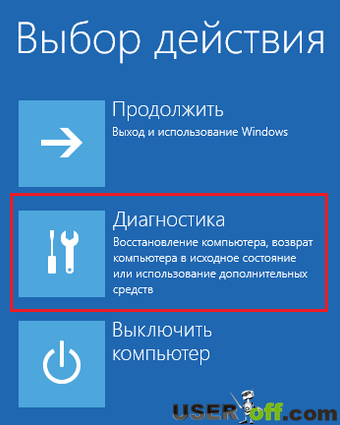
The Diagnostics menu appears. Now you have to click on "More Options".

If you click on it, then we will see a menu with many icons, select the "Boot Options" item, which will allow us to configure the Windows boot parameters to get into Safe Mode.

Here you will find the system boot options that will allow you to select Safe Mode. Now you need to click on "Restart":
After a quick reboot, you will see a blue screen with boot options. We are interested in the options that are under items: 4,5 and 6. They differ from each other in the loadable drivers and services that can enable network mode or the command line. But we need to select the mode under the number 4, to do this, press the F4 key.
Starting safe mode with msconfig
The utility is a very useful tool in working with the operating system. With the help of it, we will now launch Safe Mode in Windows 10.
To run this program, press the "Win" + "R" key combination on the keyboard and enter "msconfig" in the window that appears, click "OK". You can also launch the Run window in a simpler way - right-click on Start and select Run.
The system configuration window appears. It contains five tabs, each of which is responsible for a specific functionality. Go to the "Download" tab, it contains the settings for safe mode. The first step is to choose an operating system that will boot safely.
In the group of elements called "Boot Parameters" you need to check the box opposite the "Safe Mode" item, under it, using the switch, you can select the boot type, the minimum - standard mode, another shell - allows you to use the command line and the network - allows you to work with a local network and the internet. We will also set the parameter defining the timeout, i.e. time delay before choosing the boot type before starting the operating system.
If such boot settings for a given OS should be made permanent, then you can check the box next to the corresponding item. Done, it remains to click apply and on the next reboot you will be prompted to choose which mode to start Windows 10 in.

After you enter safe mode and do all the necessary actions, you can go to msconfig and do a normal boot of the system.
Using the command line to enter safe mode
I find this method quite advanced and interesting. We need a command line to run it, right-click on "Start" and select "Command line (administrator)" in the menu that appears.

A small black window has appeared, in which you can enter various commands that the program will execute with the specified parameters. Let's introduce the following line: bcdedit / copy (current) / d "Safe Mode"(or any other name) and press Enter. Now you can close the command line.

The above command will create a new parameter in the msconfig program (we looked at it earlier). In the "Boot" section there will be a new opportunity to start the operating system, which will be called "Safe Mode".
When you go to "System Configuration" and go to the "Boot" tab, you need to click on the 2nd item - "Safe Mode (C: / Windows)" and put a checkmark next to "Safe Mode". Also, pay attention that the timeout is at least 10, because if it is less, then you may not have time to select the parameter you need.
Now this option will always be present in your system, if it interferes and creates some inconvenience, then this function can be disabled. To do this, you need to run the utility - press the "Win" + "R" keys and enter "msconfig" and press Enter.
A familiar window will appear, go to the "Download" tab. To delete, select the desired item with the left mouse button and click on the "Delete" button.

Now, when you turn on the computer, everything will happen without delay.
Special download options
To use this method, click on the notification icon in the lower right corner of the desktop. And select the item "All parameters".


The next stage and all subsequent ones are the same as in the first method described in this article, we confirm the reboot.
The computer will start shutting down, before Windows starts, a window for choosing a boot method will appear. Choices 4,5 and 6 correspond to the F4, F5 and F6 keys. All of these modes are briefly described in the first method discussed in this article.
Bcdedit / set (default) safeboot minima l and press Enter. Now, restart your computer, and you will automatically enter Safe Mode. If you need to return to its original state (as it was), then enter bcdedit / deletevalue (default) safeboot.
You can also use another method, enter in the command line - bcdedit / set (globalsettings) advancedoptions true and then reboot the system. Next, the system will show the boot options, where the safe mode will be. To disable this option, you need to type in the command line bcdedit / deletevalue (globalsettings) advancedoptions. Attention! This command can be entered in normal Windows mode.
When working on a computer, to solve special problems, troubleshoot errors and problems with starting in normal mode, sometimes you need to boot into "Safe Mode" ("Safe Mode"). In this case, the system will work with limited functionality without starting the drivers, as well as some other programs, elements and services of the OS. Let's see how to activate the specified operation mode in Windows 7 in various ways.
Activate "Safe mode" in Windows 7 in various ways, both from the directly working operating system, and when loading it. Next, we will consider all possible options for solving this problem.
Method 1: "System Configuration"
First of all, we will consider the option of switching to "Safe mode" using manipulations in an already running OS. This task can be completed through the window "System configurations".
- Click "Start"... Click "Control Panel".
- Go to "System and safety".
- Open up "Administration".
- In the list of utilities, select "System configuration".

The required tool can be launched in another way. To activate the window "Run" apply Win + R and enter:
Click "OK".
- Tool is activated "System configuration"... Go to the tab.
- In a group Boot options add a mark next to the position "Safe mode"... Below, by switching the radio button, we select one of the four types of launch:
- Another shell;
- Network;
- Restoring Active Directory;
- Minimum (default).
Each launch type has its own characteristics. In the mode "Network" and "Restoring Active Directory" to the minimum set of functions that starts when the mode is turned on "Minimal", activation of network components and Active Directory is added, respectively. When choosing an option "Another shell" the interface will start in the form "Command line"... But to solve most problems, you need to choose the option "Minimal".
After you have chosen the required type of download, click Apply and "OK".
- Next, a dialog box opens, which offers to restart the computer. For immediate transition to "Safe Mode" close all open windows on the computer and click on the button. The PC will start at "Safe Mode".

But if you do not intend to log out yet, then click "Exit without rebooting"... In this case, you will continue to work, and "Safe mode" activated the next time the PC is turned on.


Method 2: "Command line"
Go to "Safe Mode" you can also use "Command line".
- Click on "Start"... Click on "All programs".
- Open the directory "Standard".
- Finding the item "Command line", click on it with the right mouse button. Please select "Run as administrator".
- "Command line" will open. Enter:
bcdedit / set (default) bootmenupolicy legacy
Click Enter.
- Then you should restart your computer. Click "Start", and then click on the triangular icon, which is located to the right of the inscription Completion of work... A list will open where you want to select.
- After restarting, the system will boot in "Safe Mode"... To switch the option to start in normal mode, you need to call again Command line and enter into it:
bcdedit / set default bootmenupolicy
Click Enter.
- The PC will now start up again normally.


The methods described above have one significant drawback. In most cases, the need to start the computer in "Safe Mode" caused by the inability to log into the system in the usual way, and the above algorithms of actions can be performed only by first starting the PC in standard mode.
Method 3: Launch "Safe Mode" on PC boot
In comparison with the previous ones, this method has no drawbacks, since it allows you to boot the system into "Safe Mode" regardless of whether you can start the computer according to the usual algorithm or cannot.

As you can see, there are a number of options for entering "Safe mode" on Windows 7. Some of these methods can be implemented only by first starting the system in normal mode, while others are feasible without the need to start the OS. So you need to look at the current situation, which of the options for the implementation of the task to choose. Still, it should be noted that most users prefer to use the launch "Safe Mode" when the PC boots, after the BIOS initialization.
Windows 7 Safe Mode can really help something? You have many good articles on your site about recovering Windows 7, but not a single one about Safe Mode. Tell me, what problems can be fixed using Safe Mode and is it really worth spending time on it in case of a serious malfunction? Please do not send me to other sites, as you usually do, I am interested specifically in your opinion. Michael.
Windows 7 Safe Mode
Dear Mikhail, in case of serious malfunctions and breakdowns that happen to our operating system, it is usually not possible to load it. But very often it happens that if the system cannot be started normally, then in Safe Mode, Windows 7 is loaded. In this mode, only the main system services and drivers start, this is always a chance to correct the situation, think about what our last actions caused the breakdown and fix it.
In this article, we will look at a large number of faults that can be fixed using Safe Mode. But if you do not solve your problem, then in case of problems with loading the operating system, you can use the Windows 7 Recovery Environment, for example Startup Repair, you can also run a simple system restore, we have a lot of articles on our website about eliminating all kinds of problems with unstable Windows 7 , here is some of them:
Well, now, let's look at specific examples of application in Windows 7 Safe regime. I will describe the very last case. An acquaintance of mine installed a game, which, according to him, offered to update DirectX after installation (a technology that allows you to run multimedia and games), he agreed, despite the fact that it is better to update DirectX on the official Microsoft website. After that, the computer began to work unstable, the system took a long time to load and the Internet periodically began to disappear, the attempt to uninstall the program also ended in nothing (in such cases, our article can help). The next day, he could not start the operating system, even the Windows 7 Startup Repair Tool did not help. Then we decided to use all the available recovery tools for the operating system and started with safe mode.
If you have problems loading Windows 7, you must first try to select in Additional options iantah boot parameter Last Known Good Configuration... The operating system will attempt to load the last good startup configuration saved by Windows during the last successful session.

Let's admit failure, restart the computer and press the F-8 key on the keyboard in the initial phase of the computer boot and get into the Windows 7 Advanced Boot Options Menu, select Safe mode... ... In safe mode, we try to uninstall our program through Uninstalling or changing programs, then we need to remove it from startup and try to reboot.


But this does not help us, we cannot boot in normal mode, apparently the violations in the system files are serious.
Very often my friends and I have been able to solve a rather difficult problem by using Windows 7 Safe Mode or safe mode with command line support, for example, the easiest option is to roll back using a restore point to the time when our computer was working normally. We go into safe mode, we already know how to do this.
Next, go to the system recovery menu Start-> Control Panel-> System and Security-> Restore the computer to a previous state-> Start System Restore.


You cannot create a restore point here, you can only rollback to a previous state of the computer. Next, we select the restore point and roll back a day when we have not yet installed this program and have not updated our DirectX with anything.

When using safe mode, with loading network drivers, along with the main drivers of Windows 7, the drivers will be loaded onto the network card and you can go online and look for the answer there.

Enter the sfc / scannow command in the command line and you will run the Windows 7 system file checker, if it finds damaged ones, if possible, they will be replaced by normal versions.


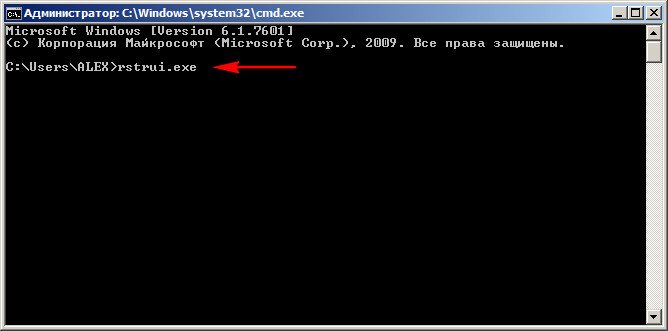
Sometimes I could not enter safe mode, but it turned out to get into safe mode with command line support, in order to start system restore, here you need to enter the rstrui.e xe command and please, you will be taken to the system recovery window.
How else can you use safe mode with command line support, for example, once I installed the wrong driver for the device and Windows 7 also pleased me with a blue screen. In order to get into the device manager, I had to enter the command line mode from the Windows 7 recovery environment and type the devmgmt command. msc, then the unsuitable driver had to be removed. How to use the recovery environment is described in detail in the article How to recover a Windows 7 system, the link above.

Many of the things that we associated with Windows slowly disappear over the years as technology advances and we form new habits to adjust. For example, I remember the days when you simply had to press F8 repeatedly to boot into Safe Mode.
It was such a little secret - something like a life hack that you could teach a friend at the right time on the phone. Those days are long gone, however, even if entering Safe Mode has become more confusing, it is also a hallmark of progress in the Windows boot sequence.
Windows 10 Safe Mode
In Safe Mode, Windows automatically excludes some programs and drivers that are not necessary for Windows to boot and function properly. And he takes only the most necessary in the minimum amount. Thus, the download process will be fast and safe.
In Windows 10, booting your computer in Safe Mode is slightly different from previous versions of Windows. Starting with versions 8 and 8.1, Microsoft has changed the way we all get into Safe Mode.
If earlier we just used the F8 keys or the Shift + F8 combination to enter Safe Mode, then in Windows 10 these old methods rarely work. But this does not mean that you have no other way to enter Safe Mode in Windows 10. In this post, I will show you 4 ways to boot your PC to Windows 10 in Safe Mode. Let's take a look.
# 1 F8 or F8 + Shift
In this case, the oldest method is not the best. Pressing F8 or F8 + Shift repeatedly during boot can bring back memories of your first Windows 95 or XP. But the truth is, the keyboard shortcut will rarely work on Windows 10.
Since Windows 8, Microsoft has been able to dramatically reduce boot times and therefore a large percentage of modern computers are too fast to register keystrokes. Even if the method is still technically supported by the operating system, the system simply cannot respond quickly enough.
Of course, you should try this easiest way first. If everything went well, you will be directed to the Advanced Boot Options Menu, where you can select and run Safe Mode.
Note: You must press the key quickly enough before the boot logo appears. The boot logo will look like a picture, which may be different for each user, depending on the manufacturer of the equipment.
# 2 Special boot options
The Custom Boot Menu was introduced in Windows 8.1 and provides a wide range of options for users who have computer problems. It also allowed for additional boot options that we need. Here are some ways to access the menu with special boot options:

- One of the easiest ways to boot into a menu with special boot options is with the Shift and reload button combination. To do this, hold down the button Shift and press reset button... This can be done in Start Menu, v login menu and other places where there is a restart button.
- Another way is to connect recovery drive. Immediately after connecting the disk, start the system. You will be prompted to select a keyboard layout, after which you will be taken to a menu with special boot options. It is very easy to create a recovery disc. Just enter "recovery drive" in the search box, plug in your USB flash drive and follow the onscreen instructions.
- Finally, you can boot into the menu with special boot options, via Options> Update & Security> Recovery... There, click the Restart Now button under the Special Boot Options chapter and your computer will restart.
All three of these methods will lead you to the same menu. There select Diagnostics> Advanced Options> Boot Options... Then press the restart button, after which different download options will appear on the screen. Pressing F4, F5, or F6 to load one of the available safe mode options.

# 3 System configuration
The System Configuration menu provides the fastest method, at least when you're already in Windows. Open the search box, write msconfig.exe and press Enter. Then, in the tab, check the box "Safe Mode". If you want to enter Safe Mode with advanced options, select the option Another shell, not minimal. Click OK and you will be prompted to reboot the system immediately.

If you need to do something before rebooting, then simply select the “Exit without rebooting” option and you can restart your PC afterwards.
# 4 Interrupt startup
The latter method is a bit harsh, but necessary in some cases. For example, if you cannot boot to the desktop, then of all the options that I described above, only one is guaranteed to work on Windows 10 - this is a recovery disk. Pressing F8 or F8 + Shift simply won't work on most modern computers, and if you don't have a recovery disc, there seems to be no way to get into Safe Mode.
If this is your situation, then I want to please you, you can still get into Safe Mode. Do you remember that your computer crashed repeatedly and after that a message was displayed notifying that Windows was not shutting down correctly, or the startup was interrupted (similar to the screenshot below)?

You can do the same with your computer. Just start your computer and interrupt startup before or while the Windows logo appears. Do this three times and then let your PC start up normally. Instead of booting to the desktop, your PC will ask you how to start the system, among the options available is Safe Mode.