How to make a coin ring with your own hands at home. Video and photo lesson
Read also
Nowadays, when it’s difficult to surprise people with something, but you really want to, you can make a stylish ring from a coin that will amaze those around you. Especially if you choose an unusual specimen. The first way to make rings out of metal pennies was invented in America, and the man who did it was called Nicholas Hackman. They say that when Lenin married Krupskaya, they exchanged rings made of coins. Now this idea gives enterprising people good income, because such rings are sold for good money, and they are in demand.
There are two manufacturing technologies: one is simple, and the second is a little more complicated, but anyone can master it if they want, they just need more tools. Let's start with the one that is simpler.
How to make a ring from a coin
The ring can be made from absolutely any coin. If you wish, you can take silver or gold. To turn a ring into a coin we need:
- Spoon.
- Drill.
- Zeal.
In the process, everyone will have additional tools that will be convenient for them to perform actions at a certain stage. If you plan to have a thick ring, then you need to take an appropriate coin, for example a nickel; in general, it should be larger in size than your finger. It is not recommended to take multi-layer pennies, at least until you have sufficient experience in manufacturing.

So let's begin. You need to take something metal, you can, for example, a hammer or another flat piece of metal, place a penny on top of it on its edge and, holding it with your fingers, hit its edge with a spoon. This will take quite a long time, so you need to be patient. This is the only way you can understand how to make a ring from a coin and whether it is worth it. It is better to take a massive spoon to make it easier to work with. You need to hit it about three times, then turn the penny and start working further on a new area.
Production nuances
In this case, the main thing is to knock often, but not very hard, so that the surface expands gradually from impacts and is smooth. If you hit it too hard, dents may appear, which will ruin the whole look. Another nuance is that you need to tap the coin evenly on all sides so that the surface is flattened evenly. It’s worth developing a rhythm and moving in it constantly.
You need to continue knocking until the penny reaches the desired size. Making a coin ring requires a good eye. When the size of the jewelry becomes visually close to the desired one, you need to start measuring the diameter with a caliper in order to maintain the exact parameters.
Drilling a coin ring

To drill a coin, it must be fixed. This can be done in a vice, having previously placed wooden blocks so as not to scratch the surface. If you don’t have a vice, you can take two pieces of board and drill a hole in them a millimeter or two smaller than the size of a penny. Connect two bars and make small holes in the corners for self-tapping screws. After this, we insert a ring between the boards so that the coin can be accessed through the drilled hole. We securely fix it and, holding this massive structure well, we drill out the money. When making a ring out of a coin, it is better to center it before drilling so that the drill does not jump off and scratch the surface.
Expanding the hole in the ring

Without removing the coin ring from the clamp, you need to widen the hole in it. To do this, you can use a large drill or round file of a suitable diameter and insert it into the drill. In a word, if there is no special tool, then you just need to improvise.
Sanding the outer part
Now we already know exactly how to make a ring from a coin, and all that remains is to polish it to a mirror shine. To do this, you need to take a bolt and nut of a size very close to the diameter of the inner circumference of the decoration. We put it on the bolt, placing a piece of fabric, and then fix it with a nut. It is very important that the ring does not come into contact with the metal and does not get scratched. We clamp the bolt into the drill, turn it on and sand the ring, first on the finest sandpaper, and then on felt or thick fabric. This way the appearance of the ring will become dazzlingly perfect.
The inside can be easily sanded by inserting a straight piece of stick into the drill instead of a drill. You can hold the ring with pliers, having previously wrapped them with thick fabric in several layers. That's all - the ring is made from a coin with your own hands, now it needs to be polished by hand, and the fashion accessory is ready.
Ring with external coin design
To turn the design of the ring outward, you need to take a slightly different approach. This method is more complicated, but the result is many times more interesting.
The manufacturing scheme differs radically from the first option. You need to immediately drill a hole in the coin of such a size that the rim matches the thickness of the ring. After this, it will need to be expanded using a metal cone. It is firmly installed, a coin is put on top, on which we place a plastic tube and hit it with light movements from above. The coin gradually decreases, expanding at the same time. When performing these actions, you need to feel the metal and monitor the product to prevent the ring from breaking. After the coin has dropped a little, it must be removed and heated. This can be done in a fireplace or using a gas cutter.
After the penny heats up, you need to continue the same actions as before, only with a hot product. We do everything gradually, each time removing and heating the future ring. When the large circle, which is located closer to the bottom of the cone, becomes the required diameter, the product is turned over and also put on the cone while hot. Work continues until both circles are the same diameter. Here's how to use a coin to make a ring with a design on the outside. After this, you need to polish the ring, as described in the first method.

When sanding, it is not necessary to completely remove all carbon deposits. The combination of shine and carbon deposits makes the metal look very impressive, and the coin pattern gives the ring a special charm. Such a stylish accessory will definitely be noticed by everyone around you.
Unique things always attract our views and interests. Today, you can make yourself special by wearing a ring made from a coin on your hand. You won’t find exactly the same one anywhere, so let’s learn how to make it yourself. It will take a lot of time, but it's worth it.
How to make a coin ring at home?
Before you start making a ring, you need to choose a good and beautiful coin. As a result, we will get a ring where the coin will be partially displayed, so the more beautiful it is, the better the ring will look. After we've picked up the coin, we can get started!
1.
Let's take a piece of steel to make a good support on the work surface. Next, put a coin on it and hold it in a vertical position. Now we need to take a spoon or a small hammer and start hitting the edge, all the while rotating the coin. You need to hit the coin evenly and the hits should be the same.
Here's what we'll get after a while:

This is the most difficult stage, it can take a lot of time.
Continue shaping until the ring fits your hand.
2. After the coin has received the desired size, the middle needs to be cut out. To do this, we use a drill and a metal drill. Before doing this, you can go over the outside of the ring with fine sandpaper.

We try to make the hole as large as possible.


So we got our result, a ring made from a simple coin!
Today I want to conduct a master class on making a ring from a coin.
I myself only recently learned to do this by watching videos and reading foreign authors.
Since I live in Israel, for example, let’s take an Israeli coin with a face value of 10 agorot - a tenth of a shekel.

Before we start working with the coin, we must heat it up to red, this process will release the metal and it will be much easier to work with the coin. There is one important point - you must not overdo it with heating, as the coin may become deformed and not all elements will be clearly visible on it.
When our coin has already turned red and whitened a little, you can stop the heating process and sharply lower the coin into cold water. She'll be so scary, but don't be afraid. 
That's it, the first stage is completed, now we move on to the second stage
At the second stage we must make a hole exactly in the middle of the coin, this is very important because the ring may come out uneven. Also, an important aspect is the size of the hole in the coin; if it is large, the final product (ring) will turn out to be very thin and may simply burst during further actions.
To punch holes, I use this custom-made device, but many have their own systems - a drill or a cutter disk, whichever is more convenient for you. 


The next step is to take the bolt (my bolt is slightly modified from above, as you can see, for my own needs (hahaha), put our holey coin on it.
Now we take a plastic hammer, it is very important to take just such a hammer, if you use a metal one, then the elements of the coin will, as you understand, be destroyed and the ring will not have the effect.
Now, with even blows of the hammer, we begin to pull the ring down, very carefully, do not apply strong blows so as not to deform the ring. We bring this whole thing to the dimensions we need, there is a marking on the crossbar and accordingly stop tightening the ring. One more small nuance, the ring needs to be removed and turned over from time to time so that it does not turn out to be such a strongly cone-shaped shape. 

Our ring is already half ready, the next step is processing. It can be processed on sandpaper, and then polished using appropriate equipment, now I will show you photographs. Personally, I use a Dremel and appropriate brushes (goi paste).


That's it, our ring is ready, let's list the equipment used:
The first is the coin itself.
The second is the crossbar.
Third - a plastic hammer.
Fourth - a tool for making holes in a coin - a drill or whatever is convenient for you.
Fifth - sandpaper and everything for polishing.


In principle, that’s all, if you have any comments, please write, if you have any questions, I’ll be happy to answer. If I remember something that I forgot to say, I’ll definitely write it, don’t judge strictly.
I can suggest the idea of making coin rings at home.
With a certain skill, you can master almost mass production of rings. As you all know, handmade, so-called handmade, is now valued and will allow you to have an additional source of income for your family.
Using the simple technology described below, you can make excellent rings of different sizes at home and even decorate them with patterns. Fortunately, in markets and in various thrift stores you can find plenty of material for the production of rings at low prices. For work, you can use both the recommended and other tools that, in your opinion, will simplify the process. But this is not the point - the main thing is the process itself and its stages. I’m telling you this, I’m doing it, and you decide - how is more convenient for you, you can improve my technology
To begin with, you will need a small, durable metal platform that will serve as an anvil base, a small hammer, an ordinary steel spoon and the coin itself. At first, it is recommended to choose coins minted from soft alloys.
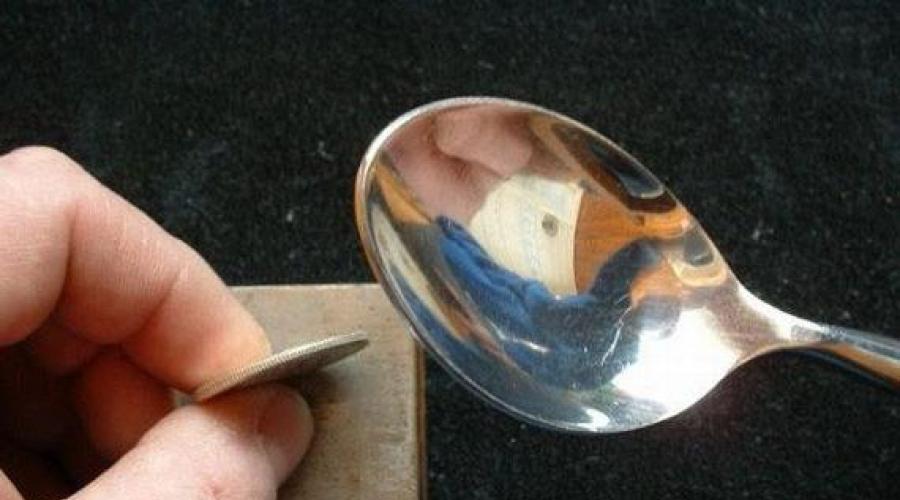
Take a coin, place it on its edge, cover it with a spoon, the spherical shape of which is ideal for the first stage.
Using gentle blows of the hammer on the spoon, begin to flatten the edge of the coin. At this stage, do not rush and strike hard, be patient. Try to process the edge of the coin evenly, and periodically look at the intermediate results.
Then take your drill and start drilling a hole in the center of the coin. There is one very important point at this stage. It is necessary to make the hole “a little bit not all the way”, i.e. stop the drill as soon as it “hatches” on the reverse side. Thus, you will save yourself from the need to attach the coin to the rotation axis for further processing. The drill will jam into the metal, allowing the process to continue.
Then take fine-grained sandpaper and begin sanding the outer part of the future ring. Look at the photo - comments are most likely unnecessary.
Upon completion of this operation, it is necessary to carry out final surface treatment. Take a piece of cloth and apply an abrasive compound. Polish the surface to a mirror shine. This operation may need to be repeated several times to achieve the best result.
After this, prepare some kind of grip that can securely hold the coin. It is desirable that the gripping jaws have a curved shape rather than a straight one for a more secure hold. To protect the newly polished surface from scratches and dents, use paper pads (cloth, rubber, felt or other soft material).
The next step will require precision and patience. It is necessary to enlarge the hole in the center of the coin. Make sure that the drill does not “play” against the sides and ruin your previous efforts. There is no need to rush when performing this operation; feel like a jeweler doing painstaking work.
Then you need to smooth the inside of the ring using an emery roller.
Having achieved a good result, we proceed to the final stage of processing. We take a polishing wheel with an abrasive material applied to its surface and polish the inside of the almost finished ring, which no longer looks like a coin at all. Show neatness, trim unnecessary elements, etc.
That's basically all - enjoy the result! If everything works out, you like it and your hands grow from where they should, then you can make money by producing such rings. For serial production (even when working alone), I recommend performing all operations in stages. Those. First perform the first stage on all coins, then move on to drilling and grinding, and then to reaming and finishing.


Well, and one more thing....
Owned by Nicholas Heckman. He independently took up a hammer and created such an accessory for his beloved. The girl was amazed, as were all her relatives. General admiration inspired Nicholas so much that he began to improve his creation and, as a result, released a whole series of original silver rings, but after that he stopped his business. Today, everyone can do such work for their beloved. A homemade ring will be a great surprise, because the most valuable thing is what you create with your own hands.
What is needed to make a coin ring?
First of all, you will need a plastic hammer, bolt, drill, or any other tool that can be used to make a hole. This could be, for example, a special device. Use what is convenient for you. To add shine, prepare sandpaper. It will be useful after completing the main work.
How to choose a coin for a ring?
It should be noted that it must meet certain requirements. Main characteristics:
- strength;
- safety;
- size;
- color.
Brass, silver, bronze and steel do not pose a risk to human health. That is why preference should be given to these materials. Copper and nickel can cause skin diseases and poisoning of the body.
Pay attention to the size. Small coins, with a denomination of up to 1 ruble, are definitely not suitable.
Make a ring yourself: first stage
First, decide what coin you will use to make the ring. Silver would be an excellent material. Then heat it until red hot until it becomes elastic, but do not overheat it. Otherwise, the coin will be deformed, and some of the elements will be smeared. After it turns red and turns slightly white, drop it sharply into cold water. At this moment you will hear a hissing sound. Don't be alarmed - this is a common occurrence.
Let's move on to the main work to make a coin ring with your own hands. Use a drill to make a hole. Make sure it is level. The larger it is, the thinner the ring, but don't overdo it. Otherwise, the coin may burst.
Once you have made the hole, you will need a plastic hammer and a crossbar, thanks to which you can select the required size and create the shape. This tool resembles a metal stick that expands from the base to the end. Place the coin on the bolt and, with even blows of the hammer, lower the ring down, stretching it. This is a very painstaking process. Try to tap the product lightly, otherwise it may become deformed. Carefully adjust the ring to the size you need. There is a special marking on the crossbar. When you reach a certain level, remove the ring.
What do you need to know?
To make a ring from a coin, you only need to use a plastic hammer. If you take a metal one, you risk damaging the smallest elements of the coin. Accordingly, the surface of the product will be uneven, even after treatment with sandpaper.
Making a ring from a coin is not easy, but if you follow the rules, you will certainly succeed. There is one more very important nuance. To prevent your product from acquiring a cone shape, remove it from the crossbar from time to time and turn it over. This is the hardest part, because choosing the right size is not as easy as it seems at first glance. Follow the instructions carefully, and you will certainly be able to make a ring out of a coin.

When you remove the product from the bolt, use tongs or pliers with a clamp to avoid scratching it.
Safety regulations
When working with hot metal or silver, be sure to wear special gloves, as you risk getting burned. It should be noted that at the first stage of manufacture, when you work with a drill, you need to wear a mask. Set up your workplace in accordance with all safety regulations. When you make a hole in the coin, cover the table with a sheet of fiberboard.
Grinding

When wondering how to make a ring from a coin, you need to carefully familiarize yourself with the manufacturing process. This article describes all the instructions in detail. As we have already said, the most difficult stage of the work is creating the form. Sanding is the most enjoyable process. When the ring is ready, you can enjoy the fruit of your labor to the fullest. All that remains is to add gloss and shake off the excess husk.
Create shine and bring beauty
To make the surface of the ring smooth, you can make several dozen strokes with an ordinary spoon. They must be light, otherwise you risk deforming the ring. To make it smoother, use sandpaper or a special power tool to remove external imperfections. The surface of the ring, the photo of which you see below, will take on a polished appearance.
It should be noted that there are several types of polishing tools: coarse grain and rough. Choose what suits you best.
The manufacturing method used in this article is quite complex, but the result is a perfect product that will delight you for many years. After polishing, you can decorate the ring with beautiful engraving or an original design. However, the result of your work depends on your efforts.
How to organize the workflow?
It is necessary to prepare a workshop where you will have everything at hand. Choose minted soft alloy coins as the material. Always remember this, because the preparatory process is no less important than the work itself.
What other technologies are used to make a ring out of a coin? As you know, there are several methods. The second one can be used as an alternative. It begins with the fact that you need to put the coin on its edge and cover it with some kind of shape. An ordinary spoon is suitable for this. This manufacturing method differs from the previous one in that the coin does not need to be melted. Here you need to flatten the rib using strong blows with a hammer. The edges should be processed evenly. Periodically look at what happened. Once the edges of the coin are rounded, drill the hole, but not all the way. Stop the drill before it goes through. Then sand the inside and sand the outside.

How to make a perfect ring? Take the abrasive compound and apply it using a small piece of cloth. To achieve a mirror shine, wipe several times. After this, prepare a grip that will allow you to firmly hold the coin in your hand. It is necessary that its lips have a curved shape. This will provide protection from dents and unwanted scratches. You can also use rubber felt or paper pads (any soft material will do).
The next step is to enlarge the hole in the center. Carefully ensure that the drill does not slide towards the sides, otherwise all the work done will go down the drain. At this stage you need to be patient. Using careful and painstaking movements, highlight the circumference of the ring. After you have made a ring of the required size, you need to smooth the inside with an emery roller.

Making a ring from a coin is a rather painstaking process. It requires precise movements and following instructions. There are a lot of technologies. You can use various tools for making. For example, you can use ordinary pliers as a clamp, wrapping them in soft material. This will prevent damage to the surface of the product. There are also many different polishing machines available to make the process easier.
A coin ring is an original and romantic gift. Any girl will appreciate such a broad gesture.
History of the idea
In the recent past, American designer Nicholas Heckman decided to create a ring for his beloved girl from a silver coin and a hammer. No one could have imagined that the result would be an exclusive and original piece of jewelry that would delight not only the young lady, but also her relatives.
How to make a coin ring with your own hands at home?
First of all, you need to prepare for the process. You need to choose not only a coin, but also tools for work. The requirements for the coin are not that extensive. Of course, coins equivalent to less than 1 ruble are unsuitable for work, since they are not the right size. And the rest of the qualities are quite standard for metal.
Choosing a suitable coin
When selecting a coin, pay attention to the following set of qualities:
- Maximum strength. The coin will be processed to create jewelry, so the metal must withstand all mechanical and thermal stress.
- Safety. A handmade coin ring should not cause any harm to human health.
- Color. This option depends on individual preference. According to the color scheme, the coins are: bronze-yellow and silver-steel.
- Size. It is impossible to make a ring of even medium diameter from small coins.
Important! The larger the coin, the wider the ring will be.

You can make a coin ring with your own hands at home from the following materials:
- Silver.
- Brass.
- Bronze.
- Steel.
All these materials are absolutely harmless and quite durable.
Important! Be careful with coins containing copper and nickel. Metals are not safe. They can cause skin diseases, allergies and poisoning of the body.
Handy materials for work
In addition to the coin, you also need to select tools. If you have a whole workshop, then making jewelry will not be difficult using special tools. We will talk further about how to make a ring from a silver coin under such conditions. In the meantime, we will conduct a master class for “crazy hands” who prefer to do everything at home.
Coin ring. Method No. 1
So, for work you will need:
- Drill or crossbar and plastic hammer.
- Vise.
- Sturdy stainless steel spoon.
- An anvil (or piece of rail).
- Coarse and fine grain sandpaper.
- Drill.
- Power tool with attachments for grinding and polishing.
- Pliers.
- File.
- A piece of woolen fabric.
- Abrasive composition for polishing.
As you can see, there are no technical difficulties in finding tools. Now let's get to work, acting to the best of our skill and ingenuity. However, do not forget about safety precautions.
Prepare the following protective equipment:
- Protective glasses. Do not take off your glasses until work is completed.
- Mask.
- Specialized gloves. During your work, you will be dealing with heated metal, and this is unsafe.

Coin ring - step by step instructions:
- Take a coin in your left hand and place it edge-on on the anvil.
- Take a spoon in your right hand. Applying with the convex part, start tapping evenly along the entire edge of the coin. For example, tap one side three times, then turn the money a little and tap the other side. Everything should be evenly, if you knocked three times on one side, then the same number of knocks should be on the other side.
- Check the shape of the workpiece periodically. Stop when the edge of the coin is wide enough to fit the width of the ring.
- Mark the center of the coin using a nail or other pointed object.
- Make a hole in the center of the coin using a drill and metal drill bit. Stop the drill as soon as it passes through the money. The tool will jam into the metal, allowing you to move on to the next step.
Important! Be careful, the coin may get hot when drilling, so hold it with pliers.
- Use coarse sandpaper to sand the outside of the ring blank.
- Turn on the drill so that the coin spins on the drill. Process the edges of the workpiece.
- Take fine-grit sandpaper. Turn on the drill and repeat the sanding.
- Prepare a cloth and apply an abrasive compound to it.
- Carry out the final stage of polishing the outer surface of the workpiece using an abrasive cloth. To obtain a mirror shine, polish several times.
- Clamp the workpiece in a vice. To avoid scratching the coin and protect it from dents, use paper or cardboard pads.
- Enlarge the hole in the coin to the required size using a drill or other tool (bolt and plastic hammer). This is the most difficult and painstaking stage of the work. It is very important to monitor symmetry and thickness here. Everything must be done carefully so as not to damage the product. Periodically remove the coin holder and check the diameter of the hole.
- Turn on the power tool with the sanding roller and smooth the inside of the workpiece. After processing, the edges of the product will become sharp.
- Run a file along the edges of the workpiece on all sides at a 45-degree angle until they become more rounded.
- Sand the inside surface of the product with a polishing pad and a small amount of abrasive material. Remove any remaining roughness.
- The homemade ring is ready.

- If you only have a drill, a bolt and a plastic hammer, then to make a hole, place a coin on the bolt (a rod that widens towards the bottom). Accompany it with precise, neat blows of the hammer into the lower, expanding part of the tool. Focus on the mark located on the crossbar indicating the completion of the work.
Important! To prevent the product from becoming like a cone, periodically remove it from the crossbar and place it on the reverse side.
- To grind the workpiece from the outside, you can make a homemade attachment from a suitable bolt and two nuts. Insert the drilled coin into the bolt and secure it with nuts on both sides. Attach the homemade attachment to the drill and sand the workpiece using fine-grit sandpaper. Next, using the same technique, polish the product with a piece of leather.
As you can see, making a coin ring with your own hands is not as difficult as it might seem at first glance. You can use other methods, which we will discuss below.
How to make a ring from a silver coin. Method No. 2
This method is for those who have specialized tools, such as a press and a punch (which applies pressure to the material during stamping).
So, proceed as follows:
- Place the coin in the punch.
- Punch a hole using a press. The hole can be drilled with a suitable drill.
Important! You can measure the wall thickness around the hole using a caliper.
- Remove any burrs from inside the hole using needle files and sandpaper.
- Place the workpiece in a solution of denatured alcohol and boric acid to protect the metal from flames before firing.
- Hook the coin by the center using a metal wire and bring the blank to the burner to burn off the alcohol. As a result, the coin will be covered with a protective white film.
- Heat the workpiece with a torch until it turns a dull orange color.
- Immerse the coin in water. Repeat the heating and cooling process several times.
- Decide which side of the workpiece will be on the outside of the ring.
- Place the coin face down in the frame.
- Place a large bearing ball in the center of the workpiece.
- Place the frame with the coin in a vice and squeeze slowly.
- Remove the frame from the vice. The coin must have a conical shape.
- Place the workpiece on a conical mold. Using a wooden hammer, lower the ring as low as possible while rotating the mandrel.
- Remove the ring. Now it needs to be aligned and the size checked on the ring mandrel.
- Lightly align the ring in a vise.
- Take the mandrel with the smallest cup and place the product with the wide side down.
- Squeeze the vise very slowly.
- Check the ring after alignment.
- To level the surface, place the ring in the mandrel and squeeze it in a vice.
- Check the ring from all sides. Place it on the sizing guide to make sure the diameter of the product is accurate.
- Finish the edges with a file.
- For polishing, use aluminum oxide powder mixed with water. Apply the mixture to the rough side of a piece of leather and polish the product.
- The ring you created with your own hands is ready and shiny.
There is another interesting way to make a ring with your own hands. We suggest making jewelry from a common plastic bottle. This method of making a ring will appeal to the female half of our readers, since no special tools are needed to create a unique accessory.
How to make a ring from a bottle?
Many original decorations and crafts are made from plastic bottles. For example, necklaces, bracelets and rings. Various materials are used to decorate products, and the method of making unique jewelry is quite simple.
For the ring you will need:
- Plastic bottle.
- Scissors.
- Scotch.
- Iron.
- Thermal gun.
- Ribbons (lace).
- Rhinestones, beads, chain (for decoration).
Step-by-step instruction:
- Wash and dry the bottle.
- Cut a strip 1-2 cm wide using the smooth part of the container.
- Make a blank from the strip to the size of your finger.
- Cut off the excess material.
- Secure the workpiece with tape.
- Turn on the iron to maximum temperature.
- Press the edges of the ring with an iron. Process the workpiece on both sides.
- Decorate the base of the ring with thin ribbons. Wrap the tape around the ring and secure with silicone glue.
- Cut the end of the tape, singe it with a match and glue it.
- Glue a bead (rhinestone) in the center of the ring using a heat gun.
Now you know how to create a unique piece of jewelry using improvised materials and without special expenses. In the same way, you can make rings of different widths using colored threads, lace or ribbons. You can decorate the finished ring with beads, rhinestones or a chain. Glue all elements using a heat gun.