How to draw a tree crown with a pencil. How do I draw trees? We draw oak, pine and weeping willow in stages
Read also
Trees are almost always the most striking and characteristic indicator of the geographical conditions that are inherent in a particular area. Therefore, it is natural that the artist should approach vegetation with special attention, and his sketches should be made especially carefully. So, for example, if he draws a pine tree, then he should have a pine tree in his drawing, and not just a tree. Let's talk how to draw trees with a pencil... We draw trees with a pencil. Trees do not always have such a characteristic appearance as a pine tree. Nevertheless, many trees have a fairly typical appearance. The most characteristic trees in our forests are from coniferous spruce, pine and larch, but from deciduous birch, oak, partly Linden... From the south - pyramidal poplar, cypress, palm trees and some others. First of all, we will get acquainted with these, the most typical trees. Children very often paint trees. And the question of how to draw trees with a pencil appeared for many in school or kindergarten.
How to draw a Christmas tree (spruce)
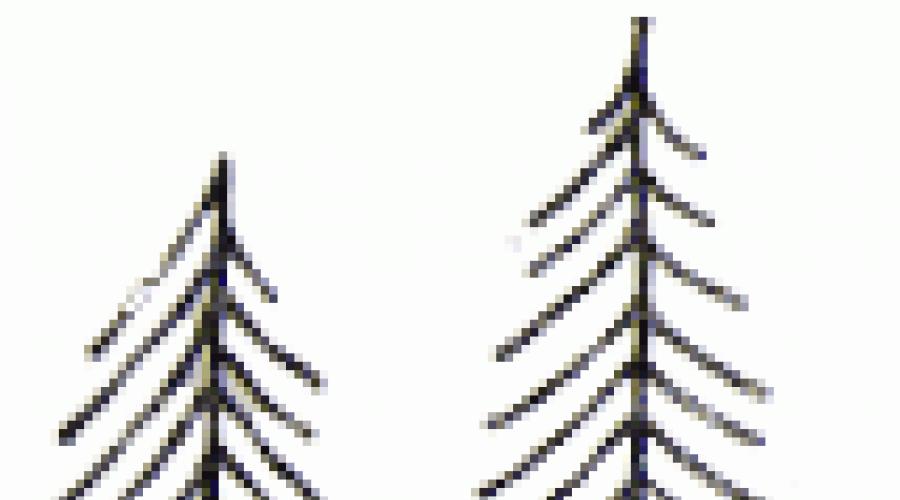
Spruce is so characteristic that it is easily remembered and depicted even by preschool children (Fig. 1). Figure 1 - Spruce in the image of children Before you know how to draw a christmas tree, you need to find out what is characteristic of this tree? A tall, erect trunk, a whorled arrangement of branches, and whorls of branches go almost from the base to the very top, the branches are densely covered with needles. All this is located in a certain regular order. The branches of the upper whorls are short, thin, and stick out to the sides and even slightly upward. The lower whorls consist of heavy, branching, rather long rays, which, due to their gravity, hang down. We'll look at how to draw deciduous trees with a pencil later on.
 Spruce drawing examples
 Figure 2 - Developed and not developed "whorls" of a young spruce Speaking about character drawing a young spruce, we must remind you of one more detail. Every year a new whorl grows from above. But not every whorl persists. Usually the stronger survive and jam the nearest, lower located whorls. As a result, rather large distances are obtained between the preserved whorls. From the dead whorls, only traces remain in the form of dried and broken off twigs. To draw a spruce, it is these features that need to be depicted.
  Figure 3 - Simplified drawing of an adult spruce Look at figure 2, how a young tree is drawn. The beams of her whorls are still light, and they hardly hang down. Drawing an adult Christmas tree slightly different. Heavy lower branches (legs) hang down almost to the ground (Figure 3). If we do not know the nature of the structure of the trunk, the nature of the branching of the whorls, then we will not be able to correctly depict the spruce. Anyone who almost cannot draw will draw a spruce if only he understands the nature of the structure with the trunks of the whorls. Thus, before drawing a spruce, you need to familiarize yourself with the “anatomy” of the spruce. This is easily achieved if we think over and draw first a simplified diagram of the "skeleton" of a tree (Fig. 4), then a young spruce (Fig. 5) and, finally, an adult spruce (Fig. 3).
  Figure 4 - Skeleton of a young spruce
  Figure 5 - A more mature spruce When the spruce is worked out, you can move on to drawing spruces and a spruce forest from a distance. (We need these exercises so that later, when depicting landscapes, we do not need to think about how to draw a spruce, how to draw a fir forest and in the distance, and near, and on the plain, and on the slope of the mountains.)
 How to draw a fir forest
Spruce forests, even from a distance, do not lose their external features. They are distinguished by their sharp-toothed tops. We are not talking about the characteristic blue velvet tone, which spruce forest it differs sharply from other forests located at the same distant distance. Of course, we are not yet setting the transfer of tone in front of us, but we will have to depict the transfer of the character of the mass of the spruce forest (Fig. 6). Figure 6 - Drawing Christmas trees at different distances When drawing a Christmas tree, you have to apply hatching. Distant trees, in which it is impossible to make out the details, can be covered with a simple stroke, the farthest - with vertical strokes. Each such stroke should, as it were, emphasize the character of tall and relatively narrow trees. On nearby spruce trees, not only large branches of whorls are clearly visible, but also small, usually hanging down, branches, densely pubescent with needles. We cannot draw such details, but by vertical shading we can also convey the character of these hanging branches (Fig. 3). It is clear that here the strokes in different parts of the spruce are not the same. On the lower branches, they can be thicker and longer, and on the upper branches, thinner and shorter. At first, these drawings are more convenient to do with a pencil.
 How to draw a pine tree
Pine, like spruce, belongs to conifers, but there is a huge difference between pine and spruce. Spruce is shade-loving. It can grow in a deep forest under conditions of almost twilight lighting. Pine, on the other hand, is extremely light-requiring. Pine tolerates stone soil, sand, and lack of moisture, but dies with a lack of light. Thus, pine and spruce have a completely different attitude to light, and hence a different appearance, therefore, there is a difference in that how to draw a pine tree. Young pines, growing in an open place, are generally similar to a spruce, only the rays of the whorls are less frequent and the needles are more authentic. The rare arrangement of branches is already a consequence of photophilousness. As it grows, the lower branches, darkened by the upper ones, die off. And the upper branches, in the struggle for light, develop very unevenly. Strongly developed separate rays of whorls turn into thick branches, which grow in wide umbrellas. The weak rays of the whorls perish. We see the remains of these dead branches on any pine tree. As a result of the struggle for light, the character of the crown changes so much that an adult pine no longer resembles a spruce in any way, and even the whorled arrangement of branches becomes hardly noticeable (Fig. 7). Figure 7 - How to draw a pine tree: on the left - a pine growing in an open area, on the right - simplified silhouettes of pine trees Having understood the characteristic ones, we better understand how to draw a pine tree. First, we will deliberately make the most simplified drawings, in which all the most characteristic features are emphasized (Fig. 7). It is very useful to see in nature the separately growing pines, and then the pines in the forest. It is also useful to view the paintings of the artists. In the pictures of the painted pine, everything that is most characteristic is usually expressed.
 How to draw a pine tree in the forest
So far, we have talked about a pine growing in an open area. Conditions in the forest are different. There, the pine is struggling with the neighboring pine trees. The struggle for light leads to the rapid growth of some pines upward and the death of others, which are lagging behind in their growth. As a result, the pines in the forest have a cylindrical high trunk, almost devoid of branches, and dense at the top. In a pine forest, you can always see trees that are different in their vitality. Some have high and, in comparison with others, thick trunks, with a richly developed crown, which rises above the neighboring crowns. These are the "dominant" trees. Nearby there may be weaker pines with a thin, but also high trunk and less developed crown. Finally, here there will be pines with very thin trunks and a poorly developed crown, which cannot break out into the open space. These are trees "oppressed", dying or completely dead, devoid of green needles (Fig. 8). Figure 8 - Pine in the forest: a- "dominant", b and v- the oppressed, G- the dead.
 Drawing a pine forest
Just as we drew a spruce (first close, then far, then moving on to groups of spruces and a spruce forest), we will also draw pines. As you move away from the viewer, the outline of the pine becomes simpler, and finally, the pine takes the form that is close to the conventional pine symbol used on profiles and some maps (Fig. 9). A group of pines or a pine forest from a distance seems to be a dark mass, which from above has irregular, sparsely located, rounded teeth of various sizes. Below, if there is no edge, vertically standing trunks are clearly visible. These trunks are most conveniently conveyed with vertical strokes (Fig. 10). In general, it must be said that for drawing pine forest and individual pines, the character of the strokes is of great importance. However, due to the characteristic pine crown, you can successfully use the usual strokes. Figure 9 - Near and far pines Pines in different areas are not the same. Thus, the pine of the taiga zone is very different from the Crimean pine. The shapes of the pines of the Mediterranean countries and Japan differ even more. In the latter, the crown is more developed in width, which gives the pine the appearance of an umbrella with a flatter top. They also differ depending on the conditions in which they are. Thus, freestanding pines in open areas have a thicker trunk, powerful branches and a richly developed crown (Fig. 7). The pine trees of mountain gorges, on the contrary, have unusually high and relatively thin trunks with a small crown at the top (Fig. 11).
  Figure 10 - Drawing a pine forest in the distance
  Figure 11 - Trees in deep gorges, where there are weak winds and little rainfall. The tree trunks are unusually elongated in height (Altai).
 How to draw a larch
Larch is especially typical for the taiga zone of Siberia. But it is often found within our European territory. Larch differs from other conifers in that it loses its needles for the winter. The latter circumstance is reflected in a known way on her appearance. In winter, larch has no needles - this is already one of its peculiarities. Larch branches, devoid of needles, do not retain snow on themselves. Hence, the branches, devoid of needles and snow, even with their small thickness, very rarely bend downward, as we saw with a spruce, and more often stick out freely to the sides and even bend upward in the upper parts of the tree (Fig. 12). Figure 12 - Simplified "larch skeleton". Larch has a high, erect trunk and a kind of whorled branching, which is sharply different from spruce and fir. Let us give, as an example, several sketches of larch trees made in winter (Fig. 13 and 14). Far away larches retain their character well (Fig. 15).
  Figure 13 - Simplified image of adult and old larch in winter.
  Figure 14 - Simplified drawing of a larch forest in winter Larch trees are characterized in summer by a light, bright green color, very pleasing to the eye, pale yellow or silvery yellow in late autumn and a kind of green haze in spring.
  Figure 15 - A highly simplified image of distant larch trees
 How to draw a birch
White bark, peculiar branching and especially hanging thin branches are very characteristic features of our birch. Considering the branching of a birch, we immediately notice rather thick branches extending from the trunk, at sharp angles, which similarly branch out further, passing into thin and unusually long terminal branches. Such a structure of the branches is precisely what determines their overhang. And the drooping of the branches largely determines the peculiar appearance of the birch, which we all know so well. Note that for drawing birch as in other cases, the most important is building the base of the tree: trunk, branching, the nature of the terminal thin branches and, finally, the foliage (Fig. 15 and 16). Figure 15 - Simplified drawing of a birch tree without leaves and with leaves
  Figure 16 - A row of gradually receding birches.
 How to draw trees: aspen and poplar
Aspen growing on the site of forest fires and clearings, is distinguished by a thin, high, erect trunk and thin branches extending from the trunk in succession, most often at an angle of 30-40 ° (Fig. 17). Thin aspen branches do not hang down, the outline of the crown is simple, in the form of a lancet blade. There are also other forms of aspens with a powerful trunk and thick branches. This shape is quite close to our common poplar (Fig. 17). Figure 17 - Left: Draw a young aspen without leaves and with leaves. On right: The branching scheme and the outline of the crown of an ordinary poplar As you can see, the question of whether how to draw trees with a pencil, is not unambiguous. Let's take a look at how to draw a tree like Lombardy poplar... It is very typical for our southern regions, especially for the steppe areas. It grows in small groups near rivers and other bodies of water, and is especially common near dwellings. The poplar appearance is very typical. It is determined by the presence of a tall, erect trunk and a kind of branching, as shown in Figure 18.
  Figure 18 - Pyramidal poplar without leaves and with leaves
 How to draw a tree with a pencil: linden
The appearance of the linden tree is such that it can be confused from a distance with some other deciduous tree species. Nevertheless, linden also has its own characteristics, which are easy to notice when comparing, for example, with. poplar or oak. Linden is characterized by the division of the trunk into thick large branches, which most often depart from the trunk at sharp angles. The branches reach a great length, densely branching towards the end. This dense branching leads to an increase in the weight of the terminal parts, which, in turn, leads to some drooping of the apical branches. This overhang is much less than that of birch, but more than that of poplar and oak (Fig. 19). Figure 19 - We draw a linden tree From a distance, linden groves and forests are distinguished by soft rounded outlines of crowns, resembling the tops of cumulus clouds. Let's also look at how to draw trees with a pencil, such as an oak tree.
 How an oak is painted
The oak has a different character with its strong and slightly bent branches. Unlike drawing a tree such as linden, poplar, and some other broadleaf trees, the branches of the oak branch out from the trunk at near-straight angles. The branches of the second and third order also approximately depart (Fig. 20). The branches are thick, nodular and densely pubescent at the ends (the pubescence consists of thin branches and dense foliage). This peculiar nature of branching is observed not only on large mature trees, but also on young ones (Fig. 20). The general outline of the crown partly resembles the outline of an oak leaf, but with a secondary, sharply pronounced serration (Fig. 21). In general, the appearance of oak expresses the inflexibility and strength of the mighty tree. No wonder oak is a symbol of stamina and strength. Figure 20 - How to draw an oak correctly: Left: Simplified depiction of an oak tree without leaves and with leaves; On right: Young oak trees without leaves Oak trees in the forest have a more elongated upward shape, but the main features remain approximately the same.
  Figure 21 - Outline of the oak tree Without being able to dwell on the characteristics of our other less common or less characteristic trees, we will very briefly touch on some of the most typical southern trees with which we often come across. This should include cypresses, palms, baobab and some others.
 How to draw a cypress
Cypress a very typical plant for Mediterranean countries, it is also widely distributed as an ornamental plant along the southern coast of Crimea. Strongly elongated upward, narrow, slender, with a sharp top, cypress is easily conveyed in the picture. Its strong elongation upward is due to the large height of the trunk and characteristic branching (Fig. 22). Figure 22 - Cypress trees and a diagram of their trunks and the nature of branching
 How to draw a palm tree
How to draw a tree like a palm tree is also of interest. Palms are different, but they are characterized by the absence of branching and the emergence of frond from approximately one point. The correct transfer of the shape and character of the palm tree primarily depends on the correct image of this frond exit from one point. The general appearance of the crown is rounded and often easily fits into a circle (Fig. 23). It should be remembered that the upper fronds are the youngest, they stick up, and the lower ones are the oldest, they hang down and die off. Figure 23 - Left: Drawing a coconut tree; On right: Drawing a date palm. The trunk of a palm tree is most often slightly curved in its upper part. The date palm has a slightly different character.
 How to draw a baobab tree with a pencil
Very interesting for drawing baobab tree... The baobab has a very characteristic trunk, branching and crown. A very thick and, in comparison with the height, short trunk is typical for the baobab. The height of the trunk before branching is usually only 2.5-3 times its thickness. At a certain height, the trunk immediately begins to divide into 5-7 (rarely more) thick branches. These main branches immediately begin to branch out and very quickly lose their thickness. Unlike a cylindrical barrel, they are tapered. The baobab has a dense and very wide crown (Fig. 24). Figure 24 - Baobab without leaves A similar crown shape, however, is typical for most savannah trees. Only in the latter, the trunks are usually thinner, and the crown is relatively even wider. Their crown resembles an umbrella in shape (Fig. 25).
  Figure 25 - Savanna acacia
 The image of native nature is an interesting and exciting experience.
The step-by-step method will help to correctly solve the question: "How to draw a tree, a lawn?"
1. On a sheet of paper you need to outline the general outline of the tree, symbolically designate the crown and trunk.
2. The next step is to draw a "skeleton": outline the outlines of the branches.

3. Each tree has a crown, so it should be marked in full.

4. The lower branches of large trees are always thick and powerful, so they should be shown in the picture.

5. How to draw a tree without many branches, which become thinner and shorter as they grow to the top? This is what should be done in the next step.

6. The trunk of the tree along its entire length must be covered with "clothing" - bark.

7. Branches without leaves are only in autumn, so if you draw a tree in summer, then we frame each branch in foliage.

8. To prevent the tree from hanging in the air, attach it to the ground with a powerful rhizome, and draw grass and flowers around it.

9. The bark of the tree has a rough texture, which can be shown using curved lines and dark shading.

10. With a lighter shading, we begin to gradually cover the left part of the crown.

11. Then proceed to the right side and draw leaves on it in the same way.

12. With the help of color, dark and light transitions, it is necessary to show that the tree has volume and shape.

13. It is not necessary to fanatically write out each sheet separately, it is enough to designate them symbolically. This will be enough for credibility.


15. The final touch will be the image of the highlights. They are designated with an elastic band. A simple task - and as a result, the tree seemed to sparkle with rays in the sun. It is worth showing patience and perseverance, and as a reward to receive the joy of creativity. Having mastered these simple steps in practice, the logical question arises not "how to draw a tree", but how many tree species still exist in nature.

Plants are some of the most interesting creatures on our planet, they can be studied endlessly and every time you discover amazing and entertaining details. Take an ordinary twig - it would seem, what's unusual about it? But the bottom line is that you see an ordinary branch with leaves swaying in the wind, but in fact at this moment there are many complex processes associated with the processing and accumulation of solar energy, moisture evaporation, and so on.
In this tutorial, I would like to tell you in detail how to draw a twig with a pencil step by step. We have already tried, and, but the question of how to draw exactly the branches did not touch.
In fact, I'm not a big fan of drawing nature - I like it better, but nature very often becomes the object of modular paintings that look just amazing - such a trick will not work with a drawing of a person. Therefore, we conclude - any novice and experienced artist should be able to draw nature, so let's study together.
So, let's start drawing a twig. We need paper, a pencil and an eraser, you can also add paints, felt-tip pens, colored pencils and crayons to this set, but they will only be needed at the final stage. I use a graphics tablet and an editor on my computer, and you can try too - for example, draw a twig in SAI with a mouse.
First of all, create a light sketch like this, which will determine the direction of the branch, its size and the number of branches. Draw light pencil lines so you can erase them later.
Now add shape and volume to the branches, making them thicker. Few trees can boast perfectly smooth twigs, so the surface doesn't need to be super flat.


Add leaves to the other part of the twig.

You can add flowers if you are drawing a flowering tree such as sakura or apple tree. And we got it like this.
Already painted +4 I want to draw +4 Thank you + 149
How to draw a deciduous tree in stages
- Step 1
On a sheet of paper, you need to outline the general outline of a deciduous tree, symbolically designate the crown and trunk.

- Step 2
The next step is to draw a "skeleton": outline the outlines of the branches.

- Step 3
Each has a crown, so it should be marked in full.

- Step 4
The lower branches of large trees are always thick and powerful, and this is how they need to be shown in the picture.

- Step 5
How to draw a tree without many branches, which become thinner and shorter as they grow towards the top? This is what should be done in the next step.

- Step 6
The entire length of the tree trunk must be covered with "clothing" - bark.

- Step 7
Branches without leaves occur only in autumn, so if you draw a tree in summer, then we frame each branch in foliage.

- Step 8
To prevent the tree from hanging in the air, we will attach it to the ground with a powerful rhizome, and draw grass and flowers around.

- Step 9
The bark of the tree has a rough texture, which can be shown using curved lines and dark shading.

- Step 10
With a lighter shading, we begin to gradually cover the left part of the crown.

- Step 11
Then we proceed to the right side and draw leaves on it in the same way.

- Step 12
With the help of color, dark and light transitions, it is necessary to show that the tree has volume and shape.

- Step 13
You should not fanatically write out each leaf separately, it is enough to designate them symbolically. This will be enough for credibility.

- Step 14

- Step 15
The final touch will be the image of the highlights. They are designated with an elastic band. That's all, now you can draw a deciduous tree with your own hands.
It may seem that trees are some of the easiest objects to draw. If you've never drawn before, the task may be too easy ...

... or too literal:

In none of the drawings do we see anything similar to real objects. The first is just a tree symbol, and the second hints at the definition of a tree. Your task as an artist is to paint what we see, not what we know. Drawing trees Is a great exercise for developing this skill!
In this tutorial I will show you how to draw oak, pine and weeping willow trees simple and realistic method.
What you need:
- Several pieces of paper;
- Hard pencil (HB);
- A medium soft pencil (2B);
- Soft pencil (5B or less);
- Sharpener.
Usually a pair of hard pencils (HB) is sufficient, but this set is not universal for all drawings. To get dark shadows, we need soft pencils. There is no need to choose expensive ones - I bought the most ordinary ones, and they perfectly fulfill their function. If you are in doubt whether you need to draw, then a set of pencils of different degrees of hardness will not be a big loss from the budget, and drawing like this is much easier!
You will also need a sharpener. A dull tip leaves lighter strokes and is not as expected. Keep your pencil sharp at all times and remember that soft pencils will wear off faster!
About paper: it can be anything. Plain printer paper is also fine. However, you shouldn't draw on the whole sheet - the smaller the drawing, the less details you will need to add. In reality, my drawings are about 9 cm high.

Soft pencils help darken shadows, but hard pencils cannot. Hard pencils are not so dark, even if you press hard on them!
- WE DRAW OAK
Step 1
The brain works in an unusual way: first it grasps the big picture and then pays attention to details. Therefore, you should not start drawing with details - you need to create a base first.
Draw a generalized tree shape with a few weak strokes and dots. To do this, use a hard (HB) pencil, do not press on it. These strokes will not be part of the finished image - they will not be visible in the finished drawing; the camera and scanner do not recognize them (I used Photoshop so you can see them!).

Step 2
Draw the trunk. Do not forget - the lower part should expand downward. The larger the tree, the shorter and thicker its trunk.

Step 3
Draw some forks at the top of the trunk.


Continue drawing the branches, gradually lowering the line as they extend.

Step 4
Add other branches to each branch (the longer, the lower they go). The strokes should be light.

Step 5
Use short, sharp strokes to draw the shape of the tree's crown. It doesn't have to be flat and neat.

Step 6
Draw small “clouds” of leaves inside the crown in the same way. Leave some areas blank so that parts of the branches are visible - this looks more interesting.

Step 7
Add thickness to the branches where they are not covered by leaves.

Step 8
Before you start applying shadows, determine which part of the tree will be bright and which parts will be shadowed. You can define them with simple shading.

Step 9
Take a soft (2B) pencil (make sure it's sharp) and create texture on the barrel. Remember to leave white areas as well - this is important for the texture.

Step 10
Take soft pencils (2B and 5B) and darken the barrel according to the original light distribution plan. Don't be afraid to press down on the soft pencil to get the shadow you want, but don't overdo it! The fewer black areas in the picture, the more impressive it looks.

Step 11
Take a hard pencil and sketch out the outlines of the leaves. Draw them in relaxed circles, quickly, with sharp movements.

Step 12
Each branch also has its own small crown (these are the "clouds" that you drew). You need to darken them in the same way as if they were separate trees.
First, take a soft (2B) pencil to draw darker circles on the darkened side. Do not press too hard at first so that mistakes can be corrected.

When you are sure that you have correctly defined the sides of the shade, add shadows and depths to them, and also paint the transition between the light and dark parts.

Step 13
Take a soft (2B) pencil to add some loose leaves all over the crown and "small crowns". This will create the effect of additional, barely visible branches.

Step 14
Take the softest pencil and add some dark accents in the darkest areas. The crown will be more contrasting. Also, make sure that all the leaves are darker than the "sky" background - the leaves cannot be transparent! You can go through the lightest areas again with a hard pencil.

- DRAWING A PINE
Step 1
Again, we start drawing from the general outline of the tree. Take a hard pencil and draw light lines.

Step 2
Draw the branches. Don't try to be precise, just sketch them.

Step 3
As with the oak tree, draw "clouds" on the branches. This time they should be narrower and even more uneven. Leave plenty of space between them.

Step 4
Draw the outline of the trunk - long and narrow.

Step 5
Take a soft (2B) pencil to darken the barrel ...

... and then a softer pencil to highlight the darkest side.

Step 6
This time, you do not need to fill the “clouds” with circles; fill them in with harsh and chaotic strokes instead.

Step 7
Take a soft (2B) pencil to draw the needles along the outline of the clouds. They should be thin and sharp.

Step 8
Draw some branches and darken them with two soft pencils.

Step 9
Draw even more needles inside the clouds with a soft (2B) pencil).

Step 10
Use the softest pencil to darken the clouds. If you want, you can just darken them completely - usually evergreen trees are dark in themselves.

Step 11
Finally, use your softest pencil to draw in the completely dark clouds between the branches.

- We draw a weeping willow
Step 1
We will paint in the same way. Let's draw a general outline of the willow - something like a fountain.

Step 2
Draw the outline of the trunk.

Step 3
Draw branches away from the trunk ...

... descending in proportion to length.

Step 4
Draw the outlines of the "clouds"; this time they will look more like curtains.

Step 5
Fill in the trunk and branches with shading with a soft (2B) pencil.

Step 6
Darken the trunk and branches with the softest pencil.

Step 7
Take a soft (2B) pencil and draw ribbon-like lines along the curtains. They should form an arc at the very beginning.

Step 8
Darken the "curtains" with darker and wider curling lines in between.

Step 9
Use the softest pencil to draw dark "curtains" on the other, darkened side of the tree. You can also add leaves to the branches for more detail.

Your trees are ready!
As you could see draw trees- a simple lesson; you just need to convey their appearance, not their definition. However, this is just the beginning of your training - if you want to become a true professional in drawing trees, take a notebook with you for a walk. Observe the trees as you pass and try to quickly sketch them. This will help you develop intuitive drawing. If you prefer to stay at home, look at pictures of trees on the Internet.
Translation of an article from design.tutsplus.com.