How to draw the leaves of different trees. How to draw a maple leaf with a pencil step by step
1. When drawing the leaves, notice that the vein goes into the stalk. Also notice that the midrib of some of the leaves cuts them exactly in half.
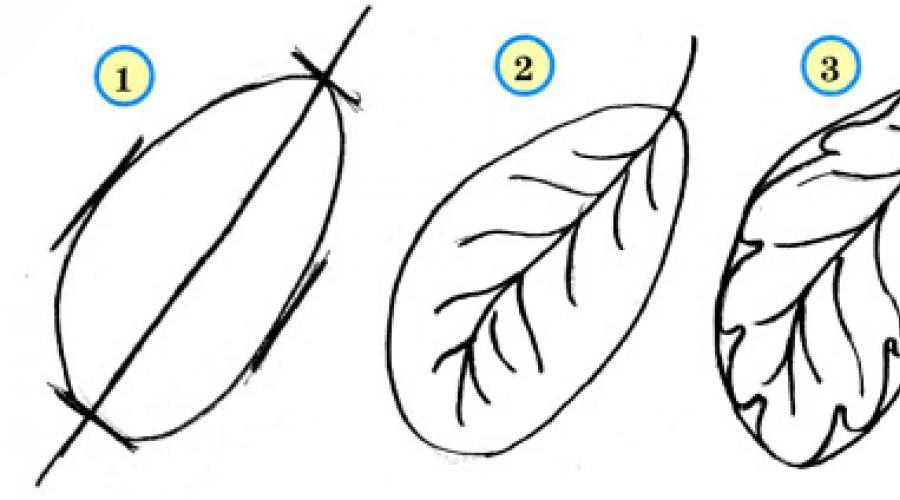
To draw a leaf, first draw an oval. Then draw a midline and lightly outline both halves. Check the accuracy of the drawing, and then draw the halves more clearly. Now add cloves around the edges of the leaf.
When coloring a leaf, remember that the veins are lighter than the leaf itself.
2. You can start drawing an oak leaf with an oval tapered downwards. In the middle of the oval there is a vein that turns into a leaf stalk. The edges of the oak leaf resemble waves. 
3. Drawing a maple leaf let's start by displaying its shape. Then you need to find the node of all the veins of the leaf (the maple leaf has five main veins, around each of which there is a separate leaf, as it were) and outline their direction. Then draw the jagged edges. 
4. Now let's try to draw a branch with leaves. First, consider it: how many leaves are on the branch, how are they located relative to the branch, what size are they, are they all visible, what is the shape of the leaves, which leaves seem darker, which are lighter, are the leaves the same color? Having answered these questions, proceed to the drawing according to the first scheme.
As you begin the second step, trace the direction of the veins and marginal notches on each leaf.
Painting over the drawing, show the volume and color of the leaves with light and shadow. 
5. Drawing a tree should be started from the trunk. The trunk is the thickest part of the tree. The trunk is thinner at the top and thicker at the bottom. The branches are located along the trunk and directed upwards. The closer to the top of the tree, the shorter the branches of the tree.
After the trunk, draw large tree branches. They are drawn in the same way as the trunk: thinner at the top, thicker closer to the trunk. The branches on the trunk are at different distances.
Then we draw small branches that branch off from the large ones. A lot of them. Small branches are drawn of the same thickness - they are thin, but also stretch upward in many trees. 
6. One of the most common trees in our country is birch. Before you draw it, take a close look at it. A feature of birch branches is that they are rather thin, bend, hang down, and thicker branches are divided into even thinner branches. In the wind, birch branches sway from side to side. 
7. The silhouette of the tree resembles a triangle. When drawing it, it should be remembered that instead of leaves, it has needles. 
8. When drawing trees in a landscape, it should be borne in mind that being far from the tree, we see only its general shape, which must be depicted. 

By the way, there is an interesting way of coloring using colored corrugated paper. You must first draw the leaves on paper in the same way with white wax crayon. After that, cut the corrugated paper of autumn colors (red, yellow, orange, brown) into small pieces and, wetting each piece well in water, stick them on the drawing. Make sure that there are no two pieces of paper of the same color next to each other. Let the paper dry a little (but not completely!), And then remove it from the drawing. You will have a wonderful colorful background. Leave the work to dry completely, then place it under the press.

Method 2.
An interesting autumn craft will turn out if you put a leaf under a thin foil. In this case, the foil must be placed with the shiny side up. After that, you need to gently smooth out the foil with your fingertips so that the pattern appears. Then it is necessary to cover it with a layer of black paint (it can be gouache, ink, tempera). When the paint is dry, very gently scrub the painting with a metal washcloth. At the same time, the protruding veins of the leaf will shine, and dark paint will remain in the recesses. Now you can glue the resulting relief onto a sheet of colored cardboard.

Autumn leaves. How to draw autumn
Method 3.
A very simple and at the same time effective technique is to print leaves on paper, on which paint is previously applied. Any paint can be used, only it must be applied on the side of the leaves where the veins appear.

Link
Here are the prints of the rowan leaves. And any kid can draw rowan berries - they are made using a cotton swab with red paint.

Link
You will get a beautiful autumn drawing if you print leaves with white paint on a sheet of dark cardboard. When the paint dries, you need to paint the leaves with colored pencils. It will turn out beautifully if some leaves are left white.


The background can be left as it is, or made in color by painting with paints with a sponge. In this case, it is necessary to leave a small unpainted space around the leaves.


If you choose to color the background, you can leave the leaves themselves white.

How to draw autumn leaves. Autumn crafts
Method 4.
To add volume to your drawings, you can use the following interesting technique. You will need white wrapping paper or corrugated paper.


Method 6.
Another original autumn drawing, made in warm and cold colors. The leaves themselves are painted in warm colors (yellow, red, orange), the background is in cold colors (green, blue, purple). To do this work, you need a compass.

1. Draw several differently shaped leaves on paper.
2. Now, using a compass, draw a circle with a small radius in the lower left corner of the sheet of paper. Further, adding about 1 cm each, draw circles of a larger and larger radius, as far as the compass will allow.
3. Now do the same in the upper right corner.
4. Finally, color the autumn leaves with felt-tip pens or pencils in warm colors (the colors should alternate sequentially), and the background in cold colors.
Maple Leaf. Maple leaf drawing
Method 7.
Help your child draw a maple leaf on a piece of paper. Divide it into sectors with veins. Let the child color each sector of the leaf with some special pattern.


You can combine two methods.


Autumn crafts for children
Method 8.
Another unusual autumn pattern.

1. Draw differently shaped leaves on paper. They should cover the entire sheet of paper, but not touch each other. Part of the leaves should start from the borders of the sheet of paper. Draw only the outlines of the leaves, without veins.
2. Now, using a simple pencil and ruler, draw two lines from left to right and two from top to bottom. The lines should cross the leaves, dividing them into sectors.
3. Choose two colors for the background and two colors for the leaves. Color them in the chosen colors as shown in the picture.
4. When the paint is dry, trace the outlines of the leaves and the drawn lines with a gold marker.
Drawings on the theme of autumn
Method 9.
To make this fall craft, you will need regular newspaper and paints (including white paint).
1. Draw a maple leaf on a newspaper sheet.

2. Paint it with paint and cut it out after the paint is dry.


3. Take another sheet of newspaper and paint with white paint and paint over a large square on it.

4. Apply your sheet to the paint and wait until it is completely dry.

5. This is what you should end up with!
Instructions
Now take a maple leaf in your hand and examine it carefully. Pay attention to the veins, color transitions, the location of the cutting.
Now take the colored ones and, looking at your model maple leaf, try to convey all the gentle color transitions that nature has endowed with maple. You probably use several. To get a smooth color transition, rub the transition points with a piece of paper.
Related Videos
Helpful advice
If you decide to learn how to draw leaves without aids, pay attention to the shape of the maple leaf. As you can see, this is a complex sheet, consisting of several simple ones. First, learn to draw one simple leaf and, after you master this technique, the whole leaf will be given to you without difficulty.
Sources:
- how to learn to draw trees in 2018
- how to draw a maple leaf with a pencil in 2018
By the leaves maple very beautiful and varied colors, from green to yellow-orange tones. Leaves maple have a complex shape. You need to learn how to draw a separate leaf, and then repeat the drawing, copying the technique of drawing leaves. Let's draw a maple leaf.
You will need
- - paper;
- - Maple Leaf;
- - leaves;
- - watercolor paints;
- - palette.
Instructions
First, make a print from. Take a sheet, clean paper, etc. Color the front side in yellow, orange, red colors. Flip the front on a clean sheet maple and press down with your hand. The result is a very beautiful, neat print. maple... Draw the edges of the leaf with brown watercolor paint and draw veins, lines. Add a stick.
Now proceed to the detailed drawing. Draw an open circle. Draw one, ending at the base of the open circle. Then place a point from the straight lines where the open circle ends and draw 6 lines (sectors) around the circle to make a shape. Count together with the first straight line - you should get 7 lines. Place dots in the middle of each sector, not necessarily in neat order. Now draw from the beginning of the bottom point a leaf shape maple... The top is in the shape of a triangle. Connect it to every point in the sector. Draw a straight line from the closed circle.
Now on the edges maple draw detailed, similar, differently shaped corners. Start in straight lines (sticks). You can stretch or constrict them and in different lengths. Then, on 7 lines, draw veins of different sizes, they should start from the bottom with small lines, gradually lengthening to the size of each. Erase the extra lines.
Color the maple tree. First, add yellow watercolor paint to the palette, dilute with a little water and paint over the entire maple. Take orange paint and mix with yellow. Apply this color without touching veins and lines from beginning to middle maple... Add some more orange to make the color a little darker than the original and paint over the beginning of the remaining at the edges. Then circle the yellow edges and lines with light orange maple to have outlines. The maple is ready.
Related Videos
Autumn, "the charm of the eyes" - the most picturesque time of the year, pleasing the eye with a variety of colors. Experienced and less experienced artists like to depict her in their paintings. And one of the mandatory attributes of a golden autumn is maple leaves.

You will need
- - Maple leaves;
- - paper;
- - pencils;
- - paints.
Instructions
Find maple leaves of the right size. They should not be too dry and brittle, as they may simply crumble during the drawing process. In addition, dried ones do not convey the full brightness of autumn colors. Don't pick leaves. You will need to touch them to the paper, it will get wet, and yours will be ruined.
Place the maple leaf against the canvas and redraw it, while holding it with your free hand so that the leaf does not slip and the drawing does not turn out to be uneven.
Once the outline of your leaf is ready, take a close look at the veins on your maple leaf model. You should not redraw all the interweaving of the veins, otherwise it will be difficult for the viewers to understand what kind of mesh you have in your drawing. Redraw the largest veins with simplest.
Now take colored pencils or paints and, looking at a real sheet, try to transfer on paper all the colors that you awarded. Pay special attention to the transitions of colors to one another. Achieve similarity to the original by mixing several colors that blend into each other. If you are coloring the drawing with pencils, rub the transition area with a piece of paper - the color blending will be smoother and more natural.
Take a couple of maple leaves and paint over them. One can be made red-green and the other bright orange. Now attach them to the paper with the colored side. Remove carefully, being careful not to smudge the paint. Your autumn leaf fall is ready!
If you want to be able to maple without using aids, pay attention to its structure. The maple leaf is complex and consists of repeating elements. As with other complex leaves, you just need to learn one element and duplicate it several times in your drawing.
Related Videos
Sources:
- maple leaf pencil drawing
Leaves different plants is a popular element of embroidered or woven ornament. They are constantly found in paintings, and not only in still lifes or landscapes. It is not so often that you come across pictures where there would be no twig or flower. Before drawing something large, you need to learn how to draw leaves. pencil.

You will need
- - paper;
- - pencil;
- - tree leaves or pictures.
Instructions
Consider several different leaves. Note that there is a noticeable thick vein in the center of almost all of them. Compare the shape of the leaves of different plants. Among them there are round, oval,. There are also carved ones. It may seem to a novice artist that the lines are too intricate. This is not entirely true. Looking closely at the maple leaf, you will see that it is also built around the central vein.
Start with a round leaf. For example, let's say it is an alder leaf. Put the paper as you like. Draw a center vein. She divides the round leaf strictly in half and does not reach the second edge a little.

Draw a circle, imagining that the vein is the axis of symmetry. It's good that the line is a little uneven. In nature, leaves rarely have perfectly even outlines. You can even make subtle denticles along the edge. Somewhat thinner ones extend from the central vein. Please note that from the side of the petiole, the angle between the main vein and the lateral ones will always be obtuse, and the thin lines themselves are almost symmetrical.
The maple leaf fits perfectly into the square. Sketch thin pencil this geometric figure or just imagine it. Draw a central vein perpendicular to the underside of the imaginary square.

Pay attention to how the lateral veins extend from the central one. The lower ones are located at right angles to it. Their total length is approximately equal to the side of your imaginary square. Between them and the central one there are 2 more lines, approximately at an angle of 45 °. Conduct them. From the midpoints of the oblique veins, 2 more, thinner and shorter, depart.

Mark the sharp ends of the maple leaf. Of course, it is not worth measuring the angles on the protractor, but they should be approximately the same and rather sharp.
Draw the outlines. It is most convenient to do this from the point where the central vein joins the two lower veins perpendicular to it. Note that the line starting from this point describes an uneven arc. Its convex part is directed downward. The line itself is uneven. It is not necessary to strictly observe symmetry in this case.
After learning how to draw simple leaves of different shapes, try to depict a complex one or even a twig. A complex sheet consists of several identical small ones. The role of the central vein is played by the petiole, to which single leaflets are attached. Arrange this line at random.

Mark the central veins of the single leaves. They depart from the main line at a slight acute angle. Like a single leaf, the obtuse angle is on the side closer to the branch.

Please note that a compound leaf must have one unpaired leaf. It is the same as the others, but its axis continues the central vein.

Drawing Lesson of Autumn Leaves
Master Class. Autumn leaf image
Lesson topic “Variety of color palette of autumn nature and three main colors of paints. Image of an autumn leaf "
Grade 2, Fine Arts Program, edited by B.M. Nemensky, 1 quarter, 1 lesson.
Target... This master class is intended for the formation of students of 2 classes of skills, independently or with partial help from a teacher, to perform an image of any shape of autumn leaves and convey their specific color.
Master class objectives: teaching: learn
The rules for depicting some plant forms of the surrounding world, having equal halves;
Master the primary painting skills; mix paints to obtain the desired color, using the three primary colors and their combinations;
Ability to analyze your work from an aesthetic and moral point of view.
developing: develop
Ideas about the concept of "symmetry";
Attention, observation in relation to color combinations in nature.
educating: bring up
Mutual respect, love of work;
Patience, accuracy, labor discipline.
Basic concepts: symmetry, wet painting, primary colors, complementary colors, color tone, color palette, variety, nature.
Interdisciplinary connections: literature, music.
Resources.
For teacher: presentation on the topic "Image of an autumn leaf", chalk, board, pencil, paints, brushes, napkin, water, paper, palette.
For students: paper, pencil, eraser, paints, brushes, napkin, water, palette.
Tutorial on the image of an autumn leaf
1. Organizational part.
To determine the topic and assignment of the lesson, I invite students to solve riddles. I accompany the students' answers with a slide show about autumn, about the different state of nature in autumn bad weather or on fine days, slides with the image of autumn leaves.
The fields are empty
The earth gets wet
The rain is pouring down.
When does this happen?
(in autumn)
I paint with yellow paint
Field, forest, valleys.
And I love the sound of the rain
Call me!
(autumn)
Trees change their outfit
The leaves are slowly losing.
It is clear to everyone, like twice two -
Came ...
(autumn time)
The branches in the park rustle
Throw off their outfit.
He is by the oak and birch
Multi-colored, bright, catchy.
(Leaf fall)
Red Egorka
Fell on the lake
I didn't drown myself
And the water did not stir.
(autumn leaf)
2. Motivation and goal setting.
After looking through even such a small number of slides, it becomes obvious: why autumn at different times inspired writers, poets, musicians and, of course, artists to create beautiful works that convey the variety of colors of the autumn palette. Nature is good at this time of the year: both the sky and the forest as a whole, and the reflection of the forest in the water, and each tree individually is unique and beautiful, and the earth is covered with a carpet of many different - different leaves, and each leaf from any tree is interesting and good in its own way. I just want to capture this beauty. We formulate the first part of the topic.
Nature. In everyday life, the word "nature" is often used in the meaning of natural habitat (everything that is not created by man).
Color palette (color palette) - a fixed set (range) of colors and shades.
Diversity is diversity, an abundance of something different.
Consider individual leaves. We observe a difference between leaves in shape and color, but between leaves from different trees, there is something in common. And this common is the identity of the halves of a leaf of a tree relative to an imaginary line dividing the leaf into two parts and passing along the petiole-stem. The halves of the leaf are the same and symmetrical. At the moment, we are observing the manifestation of symmetry in nature on the example of a tree leaf.
.jpg)
Symmetry, bilateral symmetry means that the right and left sides in relation to any plane look the same (axis of symmetry, center line, symmetrical halves).
Each leaf of a tree has a specific shape and, accordingly, structure. We will not depict a tree today, and if not a tree, what then ... Of course, a leaf and ... a leaf of a beautiful, not simple form, filled with different color spots ... that's right, it's a maple leaf. The title of the second part of the lesson topic sounds.
.jpg)
Consider a maple leaf. It has a complex shape, but if you follow certain rules in the image, the appearance of a maple leaf will not be difficult to convey. The leaf has an imaginary middle line, it passes in the middle of the leaf plate and passes into the petiole. And there is an imaginary point at the end of the leaf plate and the beginning of the petiole, from which the most prominent veins emerge, located to the right and left of the axis of symmetry of the leaf in the same way. Like this.
.jpg)
3. Updating basic knowledge and methods of action.
Let's take advantage of this fact in the image of the sheet. And so, the first thing we do is draw a vertical line in the center of the format with a simple pencil, which will be the middle line of the tree leaf. Next, mark the vanishing point of the veins on the given line and outline the veins located symmetrically relative to the center line. Like this.
.jpg)
.jpg)
.jpg)
.jpg)
Further, around the veins, we outline lines in shape resembling a crown, consisting of three pointed elements, smoothly through arcs connecting to each other. The middle element of each of the "crowns" is larger than the two side ones. There are three “crowns” in total, in our case (but it may be different). They are depicted around the central axis vein and two lateral veins next to the central axis and on either side of it. And near the remaining veins we draw lines like an arrowhead.
.jpg)
.jpg)
Then we gradually connect the crowns and arrows with each other with smooth deep arcs, draw different lines that convey the finished look to the shape of a leaf of a tree, and in general, a sketch for working with paints is ready.
.jpg)
.jpg)
.jpg)
.jpg)
Instructions
The maple leaf has a very unusual and interesting shape. It should start with an image of a circle, with a part of a triangular shape missing at the bottom. Inside the resulting shape, you need to draw 5 straight lines directed in different directions. From the junction of these lines downward, you need to draw another line (leaf stalk). Further, around each of the five lines, you need to draw figures sticking out in different directions, resembling the outlines of houses. Smooth triangular lines should be drawn around the bottom two stripes, connected at the base of the cutting. Now the outline of the maple leaf should be jagged, and veins should be drawn inside the sheet.
The oak leaf also has a very interesting shape. It is not difficult to draw an oak leaf. First you need to draw on an oval with a slightly elongated bottom. Then, wavy lines should show the unusual shape of the oak leaf. At the bottom of the resulting shape, you need to draw a short handle. Next, you need to draw veins on the plate.

Drawing a linden leaf will also not be difficult. The base of a linden leaf is a shape that resembles. So, first of all, you should draw just such a figure. Next, the sheet should be serrated and a handle should be drawn to it. It remains to draw thin veins inside the sheet. The linden leaf is ready.

The strawberry leaf consists of three small leaves. In order to draw it, first, you need to draw 2 intersecting perpendicular lines (cross) on paper. The top three lines should be the same, the bottom line should be slightly longer than the others, then draw three ovals connected to each other. The three originally drawn line segments should be their midlines; now the three resulting ones should be jagged using triangular lines. Then you need to finish drawing the stalk and veins to the sheet.

The rowan leaf, like the strawberry leaf, consists of several leaves. First you need to draw the main long line. From it you should draw a pair of medium-length segments directed in opposite directions. Now you need to draw oblong leaves with small ones along the edge. The stretches from the main stem should serve as midlines to the leaves. The lower part of the main line should be turned into a leaf stalk. The final stage of drawing a rowan leaf is the image of veins on it.

Related Videos
note
Helpful advice
Now you will learn how to draw a maple leaf. Step 1. To make it easier for us to draw the sheet, we will make a sketch of three lines. Step 2. Let's put four points, which will help later in drawing the sheet. The sheet is ready, it should look something like this. Watch the video below and you will learn how to draw leaves on a branch.
Sources:
- how to draw oak leaves
Each tree differs from another species in silhouette, bark structure, and leaf shape. Big variety trees distributed all over the world. Therefore, the variety of forms of their leaves is also great. To learn to draw leaves trees, take a simple birch or linden leaf without any complications. How to learn to draw such leaves, you can take their most complex forms.

You will need
- sheet of paper, pencil
Instructions
Prepare the necessary materials for drawing the leaves trees... Start drawing a birch leaf in a teardrop shape. Serve its edges using triangular lines. Thin and fine veins are needed on the sheet. Don't forget to add a stalk.
Draw a linden leaf. It also won't be difficult. His leaf looks like. Thus, on paper, you need to designate such a shape of the figure. Serve the leaf, draw veins inside and draw a stalk to it. Linden leaf turned out.
Draw a maple leaf. It has an interesting and unusual shape. Start it with the shape of a circle without the absence of a triangular part at the bottom of it. From this shape, draw five straight lines that point in opposite directions. Draw another line from the center of the connection of these lines - this will be a maple stalk. Then, around each of these lines, you need to draw shapes sticking out in different directions. They resemble the shapes of houses. Around the bottom 2 stripes, you need to draw triangular lines that connect at the base of the maple cutting. It remains to serrate the sheet and draw thin veins.
Learn to draw an oak leaf. This is not difficult. Draw an oval shape on paper with a slightly elongated part at the bottom. Use wavy lines to show the beautiful shape of the oak leaf. Draw a stalk at the bottom of this shape. Don't forget to draw the veins on the sheet.
Try drawing a leaf. It consists of three small leaves. Draw two perpendicularly intersecting lines on the paper. The three segments at the top should be the same length, and the bottom should be slightly longer than the others. Then draw 3 ovals. They must be connected to each other. It turned out three. Serve them using triangular lines. Draw veins and a stalk on the leaf.
Helpful advice
Use a simple pencil to draw tree leaves. This is the most common drawing tool, and you don't need to look for it for a long time.
Sources:
- How to learn to draw leaves, branches and other parts of a tree
There are a great many trees. All of them have a certain appearance and differ from each other in the shape of the trunk, structure and color of the crown and have different sizes and shapes of leaves. You can draw a single leaflet from nature or using a stencil.

You will need
- - paper;
- - a simple pencil;
- - eraser;
- - brush;
- - watercolor paints.
Instructions
Draw a birch or linden leaf. To do this, outline an oval with a thin line. Draw a vein in the middle and depict both halves. Make cloves around the edges. Draw the leaf more clearly.
To make the leaf look more natural, trace it around the outline with the thin tip of the brush. Paint over the entire sheet with smooth strokes. The veins should be lighter in color. To do this, draw a light strip with a brush dipped in water. To keep the lines thin, hold the brush vertically. Blot the drawing with a clean, soft cloth. The paper will absorb paint from places soaked in water. Light stripes form on the sheet.
Draw an oak leaf. To do this, also draw an oval, narrow it at the end. Draw the main vein in the middle. It will smoothly transition into the handle. Mark small strips from it in different directions. Draw the right and left sides of the leaf symmetrically. Make the edge of the sheet wavy.
Draw a strawberry or strawberry leaf. To do this, visually determine the ratio of the width of the sheet to its height. Draw a horizontal strip of the sheet with a thin line and mark its width. Draw the leaves, make the edges jagged.
Draw a branch with leaves. On a piece of paper, mentally outline the location of the branch, sketch it. See how many leaves there will be? Will the leaves be the same size or different? Consider that some of the leaves cover others. Look closely at the shape of the leaves, their color. Draw some leaves darker and others lighter.
Try drawing maple leaves. They can be green, yellow and red. Take a close look at the sheet. It has a complex polygon shape. Unlike the leaves of other trees, the maple leaf has five veins. The stripes diverge from the base in different directions. Draw a separate piece of paper around each line. Draw sharp teeth in the shape of a crown.
It is very difficult for artists to depict a maple leaf, so draw a leaf from nature. Take a sample, dry it, or make a stencil out of it on a thick sheet or cardboard. Take a blank sheet of paper and place it in the center. Use a pencil or marker to mark points at a short distance along the contour of the maple leaf. Remove the sheet, carefully trace the points along the contour.
Related Videos
note
When drawing leaves, note that the vein always turns into a stalk.
Helpful advice
When drawing leaves, take a close look at the fact that if some of the leaves are folded in half along the middle strip,
then both halves will be the same.
Sources:
- http://ceolte.com/view/631
Leaves of different tree species are ideal models for teaching drawing. Their form, on the one hand, is clear and symmetrical, and on the other, not too simple, consisting of several elementary forms. Drawing leaves allows you to hone not only the skills of constructing figures and their proportions, but also the ability to select and mix colors, convey the texture of the material and many others. Oak leaves have an interesting recognizable shape that fits into a simple oval.

You will need
- - drawing paper;
- - a simple pencil;
- - eraser;
- - paints, brush / colored pencils / pastels.
Instructions
Focusing on the drawn axis of symmetry, draw an oval that is elongated and narrowed at one end. To do this, mark approximately equal distances on both sides of the centerline, corresponding to half the width of the oak leaf. On the axis itself, mark the length of the sheet in proportion to its width. Connect the found points with smooth lines, forming an oval, one end of which make it narrower.
More specifically, draw a central vein inside the oval, passing at its narrow end into the "tail" of the leaf. Draw lateral, thinner ones from this vein - they are directed at an angle of about 45 degrees to the central one.
Now draw the characteristic wavy edges of the oak leaf. To do this, draw a small semi-oval above each side vein, and smoothly combine the gaps between them with small curves.
Gently erase the auxiliary lines of the outer oval. Add even finer lines on the side veins. Make the middle vein and the "tail" into which it goes thickened by drawing a line duplicating it next to it.
You can paint an oak leaf with different materials, but the principle will be approximately the same anyway. First, set the basic, relatively light and light tone of the leaf: leafy green in summer, or yellow-orange, ocher-brown in autumn.