How to draw a beautiful Christmas tree. How to draw a spruce: master class
Read also
In anticipation of the New Year, children often draw a Christmas tree, but they do not always come out beautiful.
You can easily teach your child how to draw a Christmas tree and decorate with balls.
Today I showed my granddaughters how to draw a Christmas tree in Photoshop, but it is very simple to draw such a Christmas tree on paper.
Take a piece of paper or sketchbook, pencil and eraser. Ask your child how he will decorate the hedgehog and prepare pencils, felt-tip pens or paints with a brush.
Tell your child the rules for how to work with paints.
Prepare and moisten the paints with clean water;
mix paints on a palette (white paper) without forgetting to rinse the brushes;
smoothly cover the surface of the background and characters in the composition;
at the end of work, wash the brush, do not leave it in a jar of water, but wipe it with a cloth;
at the end of the paint work, put the pencil in boxes or in a pencil case.
How to draw a Christmas tree


Step by step instructions "Step by step" how to draw a Christmas tree.

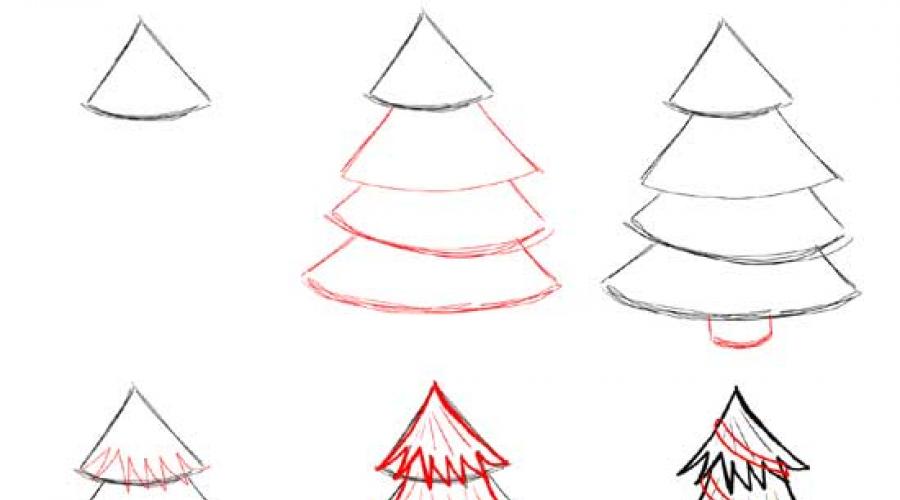
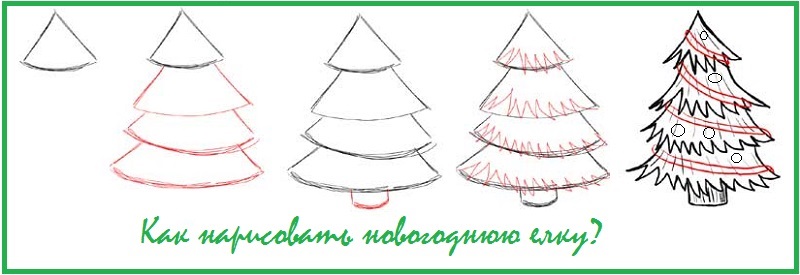
1. Draw a triangle. Now draw a star at the top of the triangle. Leave enough space to add the rest of the tree.

2. Draw the top part of the tree, which has three branches, as shown in the picture. Don't try to draw too precisely; not perfectly straight lines will look better. The ends of the branch lines should be attached to the star.

3. Now add two more rows of fir branches. Moreover, in each subsequent row of branches, one more is added. Thus, 1 row - three branches, 2 row - four branches, 3 row - five branches.

4. Then just draw a bucket under the tree and attach it to the tree using two lines that will be the trunk of the spruce. Add two lines down the center of the ribbon bucket as shown. Erase all construction lines.

5. Draw a bow on the ribbon and draw a ball on each branch. Give the star on top of the tree a sparkling effect. Our Christmas tree is ready! You are great!
6. Now you can start coloring.
Whatever your child draws, be sure to praise him and hang the resulting masterpiece on the wall so that the child feels like a real artist.
How to draw a Christmas tree
We offer a version of the Christmas tree, which you can decorate as you wish.

Draw with your child, he can easily repeat your drawing in parts.
Hope your little one was able to draw a Christmas tree that he likes.
We wish you every success!
Warning: file_get_contents (https://plusone.google.com/_/+1/fastbutton?.html): failed to open stream: HTTP request failed! HTTP / 1.0 404 Not Found in /home/site/public_html/wp-content/themes/npnl/framework/functions/posts_share.php on line 151
And an integral attribute of the holiday. It is installed in every house, in every apartment.
Today we will talk about how to draw a Christmas tree. There are many options, but we will show the simplest and most affordable. In addition, we want to show you how to draw a Christmas tree in stages. Even a small child can use this instruction.
How to draw a Christmas tree?
Option 1
This is probably the easiest way.
First, draw three triangles, superimposed on each other.
Then we make the sides of the triangles more curved.
We finish drawing the trunk.
We decorate the tree with garlands and balls.
Option 2
From this line, we outline how the tiers of the branches will be located.
We carefully draw each tier, depicting needles and branches.
Use the eraser to erase the extra lines.
We decorate the tree with Christmas balls.

Option 3
We draw a triangle.
Draw a small square at the bottom of the base, a rectangle under it. This will be a tree trunk and a tree stand.
To the sides of the triangle, we outline the lines going obliquely. These are tiers of branches.
We draw branches, connecting the tiers with a triangle.
Use the eraser to erase the extra lines.
We decorate the Christmas tree with New Year's toys, garlands.

Option 4
Draw an equilateral triangle with a base slightly smaller than the sides.
In the center of the base we mark the trunk.
Draw the outlines of the Christmas tree in the shape of a triangle.
With the help of the eraser, delete the auxiliary lines.
We decorate the tree with garlands, balls, bows, stars, candies.

Option 5
Draw a vertical line. This is how we designate the axis of symmetry.
We add several rows of triangles with teeth - this is how we will designate the branches.
We draw the branches, as shown in the picture, giving the tree a splendor.
We decorate the green beauty with toys, draw a stand.

Option 6
Draw a triangle with a rounded base.
Add three more triangles to it from below, slightly larger in size, also with a rounded base.
We finish drawing the trunk.
Draw branches along the contours of the triangles.
We decorate the Christmas tree with garlands and New Year's toys.
How to draw a Christmas tree in stages?
Option 7
Draw a corner as shown in the picture.
We form a triangle with a base in the form of a curved, wavy line. These will be branches.
We finish drawing two more rows of such branches.
We represent the trunk.
We decorate the Christmas tree with toys, garlands, balls, candies.

Option 8
It is also not difficult to draw a Christmas tree in this way.
We immediately begin to draw the outlines of the Christmas tree.
Add the trunk.
Draw a star at the top.
We decorate the Christmas tree with Christmas balls, garlands and other toys.

We told you how to draw a Christmas tree in stages. I think that such simple schemes will help even kids learn how to draw a Christmas tree.
To learn how to make beautiful paper snowflakes, see the video:
I have carefully selected several schemes for drawing a Christmas tree different difficulty levels. Choose the one you like best.
Some of the schemes are in this video!
Method 1
Although the method is the most difficult, but this Christmas tree pretty pretty. And given the fact that all kinds of gifts are conveniently arranged under it, it is generally wonderful. This diagram shows how to draw such a tree step by step.
Method 2
And this is real forest beauty, lush, luxurious and so beautiful! I hope the circuit is not too complicated for you.

Method 3
Here is another Christmas tree with big asterisk... You shouldn't forget about her either. Such decoration has already become traditional!


Method 4
This diagram shows in great detail the process of creating a small New Year's masterpiece. First you need to draw a triangle, and at its top a beautiful star.


The tree must somehow hold on. I propose to put it in a bucket.

It remains to add some decorations, toys, bows and, of course, color. Paint the tree diligently. That's all!


Method 5
This tree is based on a large triangle... Attached to it stand, branches, decorations.

Method 6
Another good scheme and again with gifts=)

Method 7
And this one is not bad, slender, lush, easy to perform. But it's up to you!)

Method 8
The last diagram will help you learn how to draw a Christmas tree in the most naturalistic way.

With the trees, it seems, we figured it out. If you don't really love paint, can be made of paper, cardboard or fabric. You can find interesting tips on how to do this in.
The long-awaited New Year can be imagined without sparklers, streamers and even without sweets. But it’s impossible to imagine a magical celebration without a magnificently decorated Christmas tree. Alas, in recent years, thousands of people refuse to buy a living tree, following humane motives, and they cannot afford an artificial beauty due to the high cost. We invite everyone to learn how to draw a Christmas tree with toys and garlands on a large canvas with pencils, watercolors and gouache. To beautifully decorate the whole house, a school class or a group in kindergarten with bright illustrations for the New Year 2018. We have collected the best step-by-step master classes for beginners on how to draw a Christmas tree easily and quickly in our own selection. Choose the one that suits you best and start creative fun.
How a child can draw a beautiful Christmas tree for the New Year 2018 in stages with a pencil and paints
Kids, no less than adults, are in a hurry to dress up the room for the onset of the holiday and the arrival of an important guest - Santa Claus. The guys are everywhere pasting tinsel, placing curly candles and figurines, hanging their own crafts. Thousands of kids are trying to find out how a child can draw a beautiful Christmas tree for the New Year 2018 in stages with a pencil and paints. To surprise your kind grandfather with a homemade gift after a short creative lesson. Let's help the kids learn a new useful lesson. It is easier to teach preschoolers such drawings using checkered paper, but even on an album sheet, the process will be easy and fun.
Necessary materials for drawing "Herringbone" in pencil and paints for the New Year 2018
- a sheet of landscape paper
- pencil
- eraser
- watercolors or gouache paints
Step-by-step instructions for creating a bright herringbone pattern for a child using paints and pencils
- Start your bright drawing with a picture of Santa Claus. On the left half of the horizontally placed sheet, draw the character's oval nose. Then add the mustache, eyes and face outlines.
- Place a fur-trimmed cap on your head. Don't forget your grandfather's long beard.
- Start the torso: draw a long-sleeved fur coat for the hero. Try not to make sharp and too straight lines. Let Santa Claus with his constant companion - the Christmas tree - be frivolous and partly cartoonish.
- Draw a scent line on the fur coat, draw a strip of the bottom fur trim. Draw similar details on the sleeves. Don't forget about felt boots and mittens.
- Slightly to the right of the head of Santa Claus, put the top point of the Christmas tree. From it, move to the left and right along one curved line representing the branches of a tree.
- Then, in the same way, draw a second tier of branches, exceeding the first in width. Finish the Christmas tree with the last widest tier of fir branches.
- Just below the tree, draw the outline of a gift bag. Give it a slightly sloppy shape.
- Erase all unnecessary lines. Draw slanting wavy garlands with round lights on the tree. Place several Christmas tree balls between the garlands.
- Draw all the folds on the gift bag, paint shadows on the face and outfit of Santa Claus. Use small parallel lines to shade the floor at the feet of the character and at the foot of the tree.
- Color the illustration with traditional New Year colors: red, green, white, gold, and more. Using this wonderful master class, any child will draw a beautiful Christmas tree for the New Year 2018 in stages with a pencil and paints.
How to draw a Christmas tree with toys and garlands for kindergarten and school
With the arrival of December, children in kindergarten and at school are given interesting New Year's tasks. And extracurricular drawing of thematic pictures is one of the most popular. After all, you can add ready-made children's illustrations to a thematic exhibition in an educational institution, decorate boring corridors and create a festive mood in bright classrooms and groups. In addition, drawings of a Christmas tree with toys and garlands in kindergarten and school are not just a decorative element created by the hands of children, but also part of a compulsory educational program.
Necessary materials for drawing a Christmas tree with toys and garlands for school and kindergarten
- thick sheet of white paper
- sharpened pencil
- ruler
- eraser
- colour pencils
Step-by-step instructions for drawing a Christmas tree with a garland and toys for school and kindergarten

How easy and beautiful to draw a Christmas tree with bullfinches with a pencil: a master class in stages for beginners
It's never too late to learn how to beautifully draw a Christmas tree with bullfinches with a pencil in our master class in stages for beginners. For both children and adults, such an activity will bring a lot of pleasure, and the finished result will be the best reward for their work. In addition, drawing perfectly calms the nerves, agitated and disturbed by the pre-holiday bustle.
Necessary materials for drawing a spruce branch with bullfinches with colored pencils
- a sheet of thick landscape paper
- regular soft pencil
- colour pencils
- eraser
Step-by-step master class on creating a drawing "Christmas tree with bullfinches" in pencil for beginners
- Place the landscape sheet horizontally on your work surface. Draw the location of the future spruce branches with thin soft lines.
- Using your imagination, draw out the outlines of the snow caps that cover the branches. Use small ovals to outline the locations for bullfinches, cones and other small objects.
- Start drawing the top bird: detail the head with eyes and beak, wings, tail and abdomen. Then do the same with the rest of the bullfinches.
- Draw large bumps and hatch them with a grid of crisscross lines.
- Take out the red and black pencils and paint over the bullfinches. Leave white highlights on the wings and tail, darken the barrel of the abdomen. Using a green pencil, draw the needles on the branches.
- Using a brown pencil, paint over the fir cones. With darker browns, give each bud the texture it needs.
- Use blues to darken the edges of the snow caps. Feather the transitions to make the cover appear more realistic. Supplement the needles with other tones of green so that the branches come out bright and lush.
- Shade the background with any color you like and place a bright congratulatory inscription "Happy New Year!" It's so easy and beautiful to draw a Christmas tree with bullfinches with a pencil according to the master class in stages for beginners.
How to draw a Christmas tree with paints in stages for beginners and experienced artists
As in any other fine art technique, in drawing a Christmas tree with paints in stages, it is important for beginners and experienced artists to correctly draw up a graphic frame. Contours and auxiliary details should be thin so that they can be easily removed at the end. The sketch may be sloppy and not entirely clear. But the final painting with gouache or watercolor should be started only after completing all the previous stages.
For some people, drawing objects on paper is a problem. If a person does not know how to draw a Christmas tree, this article will be of help. Detailed master classes will help solve this problem.
Herringbone from geometric shapes
For novice artists, there are many options for how to draw a Christmas tree. Most often, geometric shapes are used in symbolic drawings.
Several partially overlapping triangles arranged in a pyramid shape with a small brown rectangle at the bottom (trunk) perfectly symbolize the herringbone.
Since you can draw a Christmas tree in a more simplified version, you should consider the option of using one triangle in the image. The corners can also be smoothed or sharpened and stretched.
There is another option, how to draw a Christmas tree symbolically. Geometric shapes are not used for this image. It is enough to draw branches with straight line segments that are directed either downward at an angle or upward.
Symbolic Christmas tree for postcards, making home furnishings and decorating clothes
Here, the designer simply needs a way to depict a tree using geometric shapes. You can even smooth out the corners of the tree's contour, or, conversely, sharpen and slightly stretch, lift from above. Indeed, in any tree in the early period of growth, the twigs reach out to the sun.
The contours of such a Christmas tree can be used as appliqués for decorating clothes and making rugs, for developing patterns for making jacquard patterns on knitted products, for sewing cushions and creative Christmas trees from pillows, making patterns for wallpaper and in many other interesting options.
Master class for kids
Usually children easily cope with the task of drawing a Christmas tree. But if the difficulty still exists, you can also teach drawing to kids using this master class. He gives a clear idea of how to draw a Christmas tree with a pencil step by step.

- First, draw several triangles in such a way that each one located above is slightly smaller than the previous one. Usually three pieces are enough.
- For very tiny artists, the process of learning how to draw a Christmas tree outline can be completed here and start painting the object. If adults show how to draw a Christmas tree in stages, for older children, for example, kids 3-4 years old, then the task can be complicated. Have the child make the sides of the triangles concave inward and the base curved outward.
- The eraser removes auxiliary lines.
- A rectangle is drawn below, which represents the trunk of a tree.
- This is followed by a color overlay on the object. You can only use one shade of green and brown for the trunk. But you can make each upper triangle lighter than the previous one.
- If desired, the tree can be decorated with toys and beads. Then the drawing will be in the New Year's version.
Naturalistic image of spruce
To draw serious pencil paintings - like landscapes - you need to know how to draw a tree step by step. It is interesting that they begin to depict the object in the same way as in the children's master class, with an auxiliary triangle. Then, inside the main contour sketch, "rows" of branches are made - these are pyramidal, partially overlapping smaller triangles.

The bases of the triangles should be made "ragged", uneven. And the sides need to be transformed. Let them become not solid straight lines, but consisting of intermittent segments that have a slightly different angle of inclination. By imposing hatching on the spruce in this way, the artist creates the effect of tree thorns.
Special work should be done on the barrel. First, it is drawn in the form of a rectangle. Then the lower part is slightly widened, turning it into a trapezoid. The lower base of the trapezoid is made "torn".
Now you need to apply the final shading so that the tree is lighter in the middle than at the edges. Some twigs can "break out" from the main contour - these are young twigs that have not yet sagged under the weight of their weight, reaching towards the sun. A sharp little twig-top sticks out from above.
Winter landscape
Most often, conifers attract artists in winter. After all, everything around in the forest is bare, and only evergreens stand, as if cold and snow do not exist for them. Such landscapes look beautiful both in black and white and in color.

How to draw a Christmas tree with a pencil in stages was described in detail in the previous master class. Having mastered this algorithm, the artist can depict a winter landscape, where snow caps and collars lie on the branches of fir trees. Making the "garments" of trees is quite simple. You just need to make a contour of a snowdrift on a ready-made spruce, and then remove everything unnecessary with an eraser.

Sometimes a different version is used to depict firs. It is applicable for drawing large perennial trees. Fir trees are not drawn with continuous shading, but made more "transparent" by writing out each branch or group of branches separately.