How to draw a beautiful Christmas tree for the new year. How to draw a Christmas tree

A real Christmas tree with garlands and toys looks beautiful not only live, but also in children's drawings. Depicting her in class at school, garden or at home, children can not limit their imagination and decorate the tree in an original way with toys, balls, garlands. You just need to choose a simple instruction with a photo and video and follow the indicated steps when drawing a Christmas tree. For example, with the help of the master classes listed below, even novice artists will be able to easily and beautifully portray a New Year's beauty. They describe step by step how to draw a Christmas tree with pencils or paints, what techniques can be used to create the most realistic picture.
How to draw a Christmas tree with a pencil step by step is easy and beautiful - a master class for beginners

Simple drawing of a Christmas tree with pencils allows both children and novice artists to easily create cool drawings on the eve of the holiday. At the same time, coloring the picture can be carried out not only with pencils, but also with watercolors, gouache. The colorful drawing can be used to decorate the house for the New Year 2018 and will be a great gift for loved ones and friends. The following master class for beginners will help you learn how easily and beautifully you can draw a Christmas tree in stages using pencils.
Materials for drawing a beautiful Christmas tree by novice artists using pencils
- A4 sheet of paper;
- pencils;
- eraser;
- ruler.
Photo for a master class in drawing a beautiful Christmas tree with pencils for beginners
- Draw a pyramid on a piece of paper with a ruler. Mark its center with a vertical line. Add a small oval at the bottom.

- Draw an asterisk on the tree. Draw fir branches along one of the extreme lines of the pyramid and in its lower part.

- Finish the spruce branches on the opposite side. Draw garlands and balls. At the bottom, draw the trunk of the tree and the snow surrounding it.

- Remove auxiliary lines, color the Christmas tree and add a colored background.

How to draw a Christmas tree step by step with paints - video tutorial for beginner artists and children

Painting with paints is considered a rather difficult process, since paints can spread, mix when depicting shapes. To facilitate the task and easily draw a Christmas tree with garlands, you can use bright gouache. Thick paints will help you create an original drawing without much difficulty. To learn how such paints can be used to draw a Christmas tree in stages for a novice artist, the following video tutorial will tell you.
Master class with a video of step-by-step drawing of a Christmas tree using paints for a child and a novice artist
Using the instructions below, both novice artists and children of any age can easily draw a beautiful Christmas tree. You just need to follow the instructions and carefully listen to the advice and recommendations of the author.
How to draw a Christmas tree with toys in pencil - a step-by-step master class with a photo

Usually, on New Year's Eve, children are given the task to draw a thematic drawing for school or kindergarten. And in order to surprise all classmates and teachers, educators, the child only needs to portray an unusual and most realistic picture. For example, using the instructions below, you can learn how to draw a Christmas tree with toys and balls. If desired, such a picture can be colored with pencils or paints: gouache, watercolors.
List of materials for drawing with pencils of a Christmas tree with toys
- pencils;
- A4 sheet of paper;
- eraser.
Master class with step-by-step photos of a pencil image of a Christmas tree decorated with toys
- Conditionally depict a Christmas tree by drawing the edges of spruce branches. At the bottom, mark the ground line (for ease of drawing the background). Also, conventionally depict toys and gifts under the tree.

- Draw several layers of spruce branches, then remove the auxiliary lines. Draw toys, balls, a bow and an asterisk at the top on the tree. Clearly draw toys and gifts under the tree, wipe the auxiliary lines.

- Color in the picture and draw snow.

- Shade the left side of the picture to make the picture more realistic.

- Color in the background, and then with the help of light pencils select the balls, some areas of the spruce branches.

How to draw a Christmas tree in stages for a child with a pencil - a simple master class for children

It is quite possible to depict a beautiful Christmas tree with garlands and balls in just 20 minutes. And even kids in kindergarten and pupils in elementary school can do this kind of work. Using the proposed master class, each child can easily and quickly depict a real New Year's beauty. To do this, you just need to study a simple instruction and find out how, step by step, a child can draw a Christmas tree with festive decorations.
Materials for step-by-step pencil drawing of a Christmas tree by a child
- A4 paper;
- eraser;
- regular and colored pencils.
Photo for a master class for a step-by-step drawing of a Christmas tree by a child using pencils
- Draw a small herringbone triangle.

- Draw the trunk of the Christmas tree and the stand in the form of a bucket.

- Draw a star at the top of the tree.

- Draw balls and garlands in the Christmas tree triangle. Color in the picture with colored pencils.

Using the proposed master classes with photos and videos, both children and novice artists will be able to easily and beautifully draw an elegant Christmas tree for the New Year 2018. At the same time, children can work with both pencils and paints. Simple instructions will help you understand how to correctly depict the basis of the drawing, how to color it best. For example, according to the lessons above, you can learn how to draw a Christmas tree with colorful balls, garlands and toys. All that remains is to choose the appropriate instruction and get to work.
Spruce? It is very difficult to find a person who has never painted this tree in his life. But if you do not know how to do this, our article will teach you this simple matter.
Spruce is a symbol of the holiday!
Spruce is the one that everyone associates with the holiday, the New Year! This evergreen coniferous beauty for children becomes a real green fairy, delighting them on the morning of January 1 with gifts hidden under the branches. Does your child ask you to draw a Christmas tree? Or maybe you need to make some composition with her for a children's party or a matinee in the garden?
We will be happy to provide you with some simple master classes that will teach you how to draw a fir tree step by step.
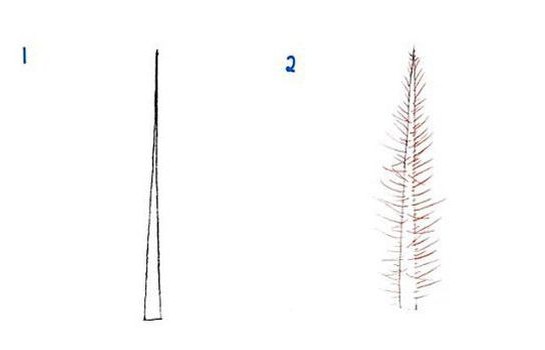
Method number 1: from top to bottom
The first method, which we will consider in our article, will be based on drawing a tree from its top. Learn to portray such a spruce. And then it will not be difficult for you to create a whole forest on a sheet of paper!
So how do you draw a fir tree starting from its top? Everything is very simple!

Method number 2: bottom to top
The first way to depict spruce is not bad, but, you see, it is much more convenient to draw from the bottom up, and not vice versa. This makes it much easier to adjust and plan the height of the tree.
How to draw a fir tree from bottom to top? Let's show you now!

Method number 3: as easy as shelling pears!
How to draw a fir tree in the simplest and most unpretentious way? We know it and will definitely share it with you. Even a small child can draw a Christmas tree using this method.
How to draw a spruce branch
But what if you do not need the whole tree, but, for example, only need one of its branches? Well, we'll tell you about that too. Arm yourself with pencil and paper, let's get started!

The drawing is ready!
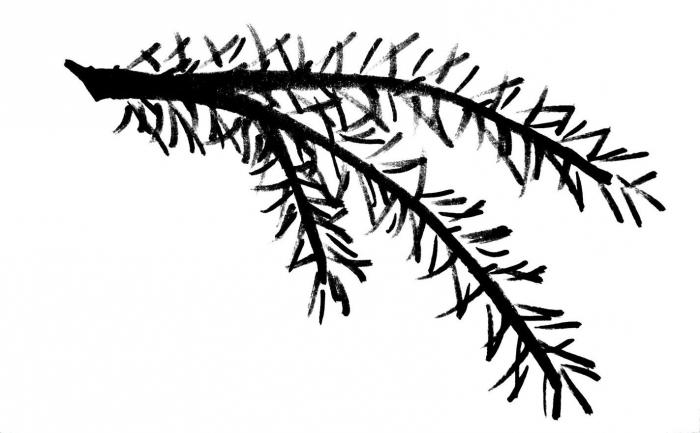
Now you know how to draw a spruce branch yourself. You can even teach this, for example, to your child.
Using the above methods, you can draw a branch of a coniferous tree or the spruce itself with a pencil, felt-tip pens and even paints. The tool in this case does not really matter. Draw, create yourself and with your children.
A little less than a month is left before the New Year, we prepare gifts and draw postcards. And you? If so, then two Christmas trees are waiting for you in this tutorial. Lovers of needlework before the holidays feel special inspiration, because their creative impulses can be directed to making gifts and postcards. Hand-made cards, even the simplest ones, evoke very warm feelings in loved ones. And how grandmothers admire the creations of their grandchildren!
I will not tell you how to make the postcard itself, but I will show you how to draw a Christmas tree for a postcard. More precisely, even 2 Christmas trees. They are both quite simple, they can be drawn by both adults and children.
In the first case, the design of the Christmas tree is simpler and more understandable for children, and the decorations can be complicated. You can decorate the Christmas trees in the newfangled doodling style, as I did, or somehow in your own way.
Herringbone silver
It is silvery because I drew on the postcard with silvery markers and an outline. But more on that later.
I did not use a pencil for drawing. Look at the diagram to understand how to draw a Christmas tree in stages. Before drawing on the card, you can practice drawing with a pencil or marker. In my case, the blue Christmas tree was made with a regular thin marker.
In the diagram, each new step is marked in red.
For four tiers, you need to outline 5 dividing points vertically in the middle of the future Christmas tree. Do not forget to leave free space above and below. If you plan to draw a high tip on the crown, then leave more space.

Imagine how the lines expand from the top point downwards, forming a triangle. By the way, if it is more convenient for you to make a preliminary border of the Christmas tree, then outline the triangle with a pencil. We draw the upper tier, but not with a triangle, but like a bell, slightly bending the corners of the base up and lowering the lower border in the center with an arc.

We draw the rest of the tiers as skirts, also raising the corners and lowering the lower border with an arc. It remains to draw a tip and a leg (optional).

So our form is ready, which can now be filled with different patterns. If desired, the herringbone can be continued to "lengthen" down in tiers.
My Christmas trees are filled with different doodles - circles, curls, flowers, free-form, asymmetrical. And around I drew curls and snowballs for more elegance.
Now you know how to draw a simple version of a Christmas tree.
Children are also happy to draw such a Christmas tree. They can be asked to draw a Christmas tree with colored markers or pencils. Of course, in this case, you need to draw all the "skirts" with a simple pencil, and only then start coloring. In the heading there are ready-made coloring pages of Christmas trees for children of different ages, as well as templates for coloring Christmas trees in the style of doodling.
Doodle Christmas card with silver herringbone
Now I'll tell you about the postcard. I took dark thick paper with a beautiful texture from the album. I mapped out the size of the postcard and cut it out. Dark paper is a little moody. Therefore, before drawing, I washed and dried my hands, so as not to leave prints from my hands, put a sheet under my hand. I marked the points with a pencil, and then with a white marker. I did not draw the borders of the Christmas tree, because erasing a pencil with an eraser leaves traces on the paper, which spoil the whole look.
Then I drew twigs with a white marker (here from ZIG). I filled them with silvery patterns made with a gel pen. And I added a few more special effects, which, unfortunately, are not very visible in the photo: I decorated some details with fine holographic sparkles, and also added dots and snowflakes with a silvery volumetric outline.

The postcard turned out to be stylish and elegant. Inside, I decorated the corner with a pattern in the same style, with a silver gel pen. I pasted a square of thick light paper - this is the place to write congratulations.
And now the promised second lesson - how to draw a Christmas tree in stages, but in a different version.
Herringbone green
This Christmas tree may seem a little more complicated, so I also advise you to start with a few times sketching with a pencil in a reduced version, so that later it is easy to draw on a postcard. After all, as you understood, on a postcard it is better to do as few wipes and markings as possible, then the paper does not deteriorate, and the drawing looks neater. But in this version, it is more difficult to do without a pencil. I put the contours on the pencil markings with a marker, and before painting the Christmas tree, I erased the visible parts of the pencil sketch.

Draw a cone with a pencil. Do you like using a ruler? Please use a corner ruler.

Draw stripes with a pencil.
Before drawing the Christmas tree itself, you can already draw a tip with a marker, it will cover the very top of the head.

Now we make the contours of the tiers of the Christmas tree with a marker, and erase the pencil sketch, where it is visible.

If you're drawing with a gel pen, let it dry before erasing your pencil.

We draw the lowest tier of branches to give the Christmas tree fluffiness

We draw the outlines of Christmas tree decorations, for example, with colored markers or pencils.

We fill the space between the toys with green, also with felt-tip pens, markers or pencils.

We do not paint the ribbons, this is a decorative effect. How to draw a Christmas tree so that it is festive and elegant?

Add shine! Draw highlights on the balls. Here's a Christmas tree with us.
We took a yellow one-sided cardboard, on which we painted Christmas trees, outlined some of the contours with silver and gold gel pens, so the decorations play beautifully in the light. Especially beautiful shimmer in artificial light. You can also use glitter gels for kids' creativity.
In the future, we cut out a rectangle with a herringbone and pasted it on a decorative paper card. By the way, a Christmas tree can be drawn on self-adhesive paper, so that later it can also be glued to a blank for a postcard.
Christmas tree templates
Do you want to make a postcard with your own hands for the New Year, but don't come up with anything at all? Do not despair. Keep a few Christmas tree templates.
Christmas tree pictures are big, just open them in a new tab

They can be used as in the example above - drawn on dark paper with an acrylic marker or transferred to film and circled with stained glass paint. In any case, it will turn out beautifully and stylish.

I have carefully selected several schemes for drawing a Christmas tree different difficulty levels. Choose the one you like best.
Some of the schemes are in this video!
Method 1
Although the method is the most difficult, but this Christmas tree pretty pretty. And given the fact that all kinds of gifts are conveniently settled under it, then it is generally wonderful. This diagram shows how to draw such a tree step by step.
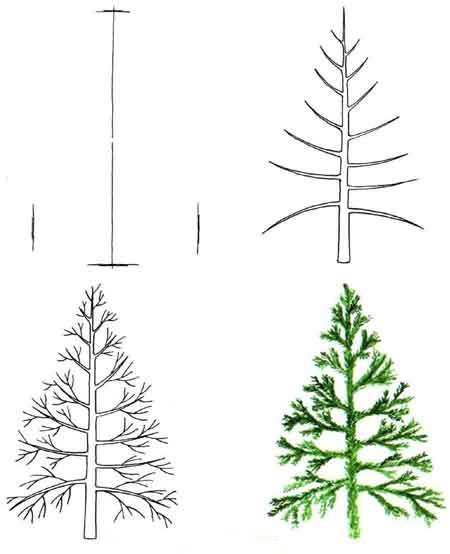
Method 2
And this is real forest beauty, lush, luxurious and so beautiful! I hope the circuit is not too complicated for you.

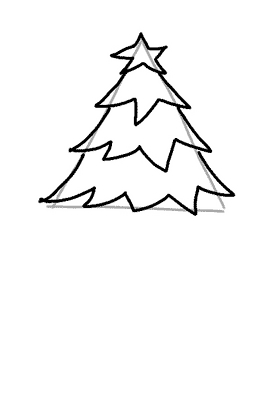
Method 3
Here is another Christmas tree with big asterisk... You shouldn't forget about her either. Such decoration has already become traditional!


Method 4
This diagram shows in great detail the process of creating a small New Year's masterpiece. First you need to draw a triangle, and at its top there is a beautiful star.


The tree must somehow hold on. I propose to put it in a bucket.

It remains to add some decorations, toys, bows and, of course, color. Paint the tree diligently. That's all!


Method 5
This tree is based on a large triangle... Attached to it stand, branches, decorations.

Method 6
Another good scheme and again with gifts=)

Method 7
And this one is not bad, slender, lush, easy to perform. But it's up to you!)

Method 8
The last diagram will help you learn how to draw a Christmas tree in the most naturalistic way.
With the trees, it seems, we figured it out. If you don't really love paint, can be made of paper, cardboard or fabric. You can find interesting tips on how to do this in.