How beautiful to draw with a pencil. How to learn to draw with a pencil for beginners
Read also
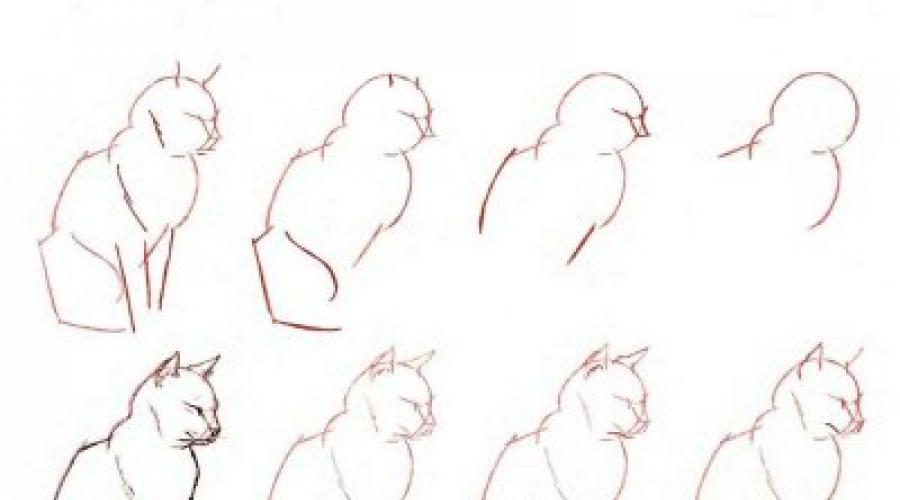
Step-by-step pencil drawing lessons provide an idea of a drawing technique that can be mastered by a person of any age and with different abilities. After such classes, it turns out that drawing is not at all difficult. Not everyone is confident in their capabilities and doubts that they can draw, and beautifully. Of course, only a true master can perform complex oil paintings, but everyone, even the youngest artist, after drawing lessons that can be found on our website, will be able to draw their favorite cartoon character. Any child will be interested in the opportunity to learn how to draw with a pencil. Yes, you need to start drawing with the simplest. And the simplest thing is to draw with a pencil. Starting with pencil sketches, you can then master more complex skills. And as a result of everything - this is a more complex drawing with paints. Interesting lessons will captivate children, introduce them to the interesting world of images and images. 

On our site, after completing pencil drawing lessons, you can get the basics of pencil drawing - such lessons are similar to the lessons that take place in an art school. Our lessons are successfully learned even by the smallest children. The drawing process is given in stages, in a very exciting and interesting presentation. 

Pencil drawing lessons.
At first, adults will have to help their children a little: for example, show how to hold a pencil correctly, move the baby's hand, draw lines with him. It is necessary for the child to understand what the degree of pressure on the pencil should be, how to correctly draw a line of the required thickness. After working together, the kid himself should try to draw something simple. After the basics, you can move on to a more complex one and draw a square or a circle. While drawing, the child's skills will be consolidated, and he will be able to draw more complex plots. It is better at first to depict simple objects, familiar images. For classes, you need to buy everything you need, the very first thing you need is a soft lead, thick in shape, which draws easily without much pressure on it. 

Step by step pencil drawing lessons for children.
Each person has some natural inclinations and abilities that are easier to discover and develop from childhood. The ability to translate images into images will be very helpful in the future. We want to tell you and show you how to draw easy pictures with a pencil for beginners in stages. Drawing lessons are very useful for children, very exciting. It is useful for children to develop fine motor skills, which in turn stimulates brain activity and has a beneficial effect on the psycho-emotional state. With the help of drawing, an aesthetic perception of reality is formed, an understanding of harmony arises, and also in the process of drawing children come to a balanced state, become calm. All this applies to the adult audience: drawing on them also has a beneficial effect, during the process anxiety goes away, nerves are put in order, stress resistance appears. Therefore, it will be good if children comprehend drawing lessons together with their parents. 

The task of adults is to help children master the first lessons, help them navigate the working area of the sheet, hold the pencil correctly, calculate its required pressure on the paper. Sometimes the child may start to place the drawing incorrectly, and it will not fit on the sheet, which will upset the artist. This is where an adult should help and organize the lesson correctly, then drawing will bring great pleasure. The lessons are designed so that the child learns to draw objects that are familiar to him.
Each lesson introduces him to something new, broadens his horizons. The lessons will help systematize the experience that the little person already has and form a new view of the world around him. 


Are you dreaming of learning to draw? And look for detailed step-by-step drawing lessons for aspiring artists? I will try to help you in this not an easy matter and will tell you about the many nuances when writing beautiful drawings and portraits in pencil and watercolors! With the help of my step-by-step lessons, not only adults, but also children will be able to master the basics of fine art!
In this heading I publish all my step-by-step drawing lessons, and separately, in the Drawing lessons for children heading, I collect simple drawing lessons for novice artists. Therefore, if you are just taking the first steps in drawing with pencil and watercolors, I recommend starting your training from this section. Be sure to check out all the drawing lessons and tips for artists collected on my blog!
Drawing a portrait for a novice artist it seems like an incredibly difficult undertaking. Often, beginners rush to create a portrait without having learned its basic principles and techniques. Each face drawing ends in disappointment, which can lead to an absolute loss of interest. Do not give up, because every portrait painter began by studying the basic rules, practicing them, making dozens of mistakes and eventually achieving positive results. Now we will analyze building a portrait with a pencil, its features and rules. They will help to achieve the correctness, and most importantly - the realism and high quality of the portrait.

Almost everyone wants to have their own portrait at home, which is considered one of the most difficult drawings that an artist can draw. It is not surprising that there is a great demand for this particular type of drawings. Therefore, the duty of a novice and experienced artist is to step by step improve their skills in drawing human facial features, because through the face you can convey not only gender and age, but also the character and temperament of a person. According to their characteristics, portraits are divided into three types: children, women and men. Today we will learn to draw the last view - male portrait in simple pencil... It has its own characteristics and secrets, which we will tell you about in this step-by-step tutorial.

Step-by-step lesson about how to draw a woman's portrait with a simple pencil. After going through just a few steps, you can understand the main features that are inherent in portrait of a woman and absent from the rest. The face will be in frontal view, hair pulled back. This is important to know before starting work. Now you can start.

Hands are part of the body that is personal and unique. Often they can tell about a person's life by their shape and size. For many years people have been studying their lines and structure, trying to read the future along the lines. Today we will learn draw hands with a simple pencil using a step-by-step lesson. Let's pay special attention to their construction and overlay of shadows so that the drawing comes out as realistic as possible.

Before starting a full-fledged portrait painting, you need to learn how to draw the details of the face. In today's lesson we will learn how to draw lips pencil, thanks to the step-by-step description. The lesson is not difficult and is designed for novice artists, but do not rush. To achieve the result, namely beautifully draw human lips, you need to carefully follow the rules of construction and shadow.

Many people dream of drawing a portrait of their relatives and friends. But before drawing the face as a whole, you need to learn how to draw the details of the face. This lesson for aspiring artists focuses on the question “ how to draw a nose". This task is not difficult, you just need to use the information on the construction and imposition of shadows. The shape and size of the nose may vary, but the basic outline remains the same. Let's find out soon how easy it is draw a nose with a pencil.

For many novice artists, one of the most difficult tasks is the question “ how to draw an ear? ". Due to the complex structure of the ear, it is often painted with hair, but this is not an option. There are situations when this approach is not appropriate, for example, if the person has a short haircut. So I will tell you how to draw an ear in stages.
All children love to draw. But sometimes the child does not turn out the way he wants. Or maybe he doesn't know enough ways to express himself? Then you can inspire him to experiment with different techniques, among which there will definitely be a favorite. After that, your child will probably want to invent something new.
Dot patterns

First, draw the simplest squiggle. Then, using a cotton swab and paints (gouache or acrylic), we make intricate patterns as the soul lies down. It is better to pre-mix the paints and slightly dilute with water on a palette.
Frottage

This technique is familiar and beloved by many since childhood. We put an object with a slightly protruding relief under a sheet of paper and paint over it with pastel, chalk or not sharpened pencil.
Foam rubber prints

Having dipped a sponge in thick gouache, the child can draw landscapes, bouquets of flowers, lilac branches or animals.
Blotography


One option is to drip paint onto a sheet and tilt it in different directions to get an image. Second: the child dips a brush in paint, then places a blot on a sheet of paper and folds the sheet in half so that the blot is imprinted on the second half of the sheet. Then he unfolds the sheet and tries to understand who or what the drawing looks like.
Other drawings by the method of blotting can be viewed
Hand and foot prints
It's simple: you need to dip your foot or palm in paint and make a print on paper. And then use your imagination and add a couple of details.

More details about the method of drawing with palms can be found
Paint patterns
For such an application, you need to apply a thick layer of paint on paper. Then, with the opposite end of the brush, scratch patterns on the still wet paint - various lines and curls. When dry, cut out the desired shapes and stick on a thick sheet.

Fingerprints
The name speaks for itself. You need to paint your finger with a thin layer and make a print. A couple of strokes with a felt-tip pen - and you're done!

Monotype

On a flat smooth surface (for example, glass), a drawing is applied with paint. Then a sheet of paper is applied, and the print is ready. To make it more blurred, the sheet of paper must first be wetted. When everything is dry, you can add details and outlines if you like.
Scratchboard

The highlight of the work is that the drawing needs to be scratched. A sheet of cardboard is densely shaded with spots of multi-colored oil pastels. Then black gouache must be mixed with soap on a palette and painted over the entire sketch. When the paint is completely dry, scratch the drawing with a toothpick.
Air paints

To prepare the paint, you need to mix a tablespoon of "self-rising" flour, a few drops of food coloring and a tablespoon of salt. Add a little water until the consistency of thick sour cream and mix well. The paint can be placed in a pastry syringe or in a small bag. Tie tight and notch corner. We draw on paper or plain cardboard. We place the finished drawing in the microwave for 10-30 seconds at the maximum setting.
"Marble" paper

Paint over a sheet of paper with yellow acrylic paint. When it is completely dry, paint over again with diluted pink paint and immediately cover with cling film. The film needs to be crumpled and gathered in folds, since it is they who will create the desired pattern for us. We wait until it dries completely and remove the film.
Painting with water

Draw a simple shape in watercolor and fill it with water. Until it's dry, we put colored blots on it so that they mix with each other and form such smooth transitions.
Vegetable and Fruit Prints

The vegetable or fruit must be cut in half. Then you can cut some kind of pattern on it or leave it as it is. We dip in paint and make prints on paper. For prints, you can use an apple, potato, carrot, or celery.
Leaf prints

The principle is the same. We smear the leaves with paint and make prints on paper.
Drawings with salt

If you sprinkle salt on the still wet watercolor painting, it will soak in the paint and, when dry, will create a grainy effect.
Brush instead of a brush

Sometimes it’s worth trying something unexpected as an experiment. For example, a household brush.
Ebru, or drawing on water

We need a container of water. The main requirement is that its area coincides with the area of a sheet of paper. You can use an oven roaster or a large tray. You will also need oil paints, a solvent for them and a brush. The point is to create patterns with paint on water, and then dip a sheet of paper in them. How it's done: www.youtube.com
Cracked wax effect

Draw an image on thin paper with wax pencils. In our case, a flower. The background must be completely shaded. Crumple well and then straighten the sheet with the drawing. We paint over it with dark paint so that it enters all the cracks. We wash the drawing under the tap and dry it. If required, smooth it with an iron.
You can see about drawing on crumpled paper
Cardboard offset prints

We cut the cardboard into small strips, about 1.5 × 3 cm. Dip the edge of a piece of cardboard in paint, press it vertically to the paper and evenly shift it to the side. Wide lines will be obtained from which the drawing is created.
Cam prints

For such a drawing, the child will have to clench his hands into fists. Then dip the back of your fingers in paint and make prints, creating the desired shape. Fish and crabs can be created using fingerprints.
I am glad to present you an improved and supplemented manual on howhow to learn to draw... I hope that it will cover most of the questions that I am regularly asked in the VKontakte group. For example such as:
- where should I start learning to draw if I have never drawn?
- how can I learn to draw people?
- how to learn to draw on a computer?
- What drawing books are worth studying?
- how can I learn to paint with acrylics, oils, pastels, and other materials?
I have collected the most useful tips from artists from the site www.quora.com , and it turned out great step by step guide, thanks to which no one will be able to hide behind excuses like “I don’t know where to start, I don’t succeed, I’m a mediocrity, etc.”, believe me,
you will finally know
how to learn to drawb!
Just follow this manual step by step and devote enough time to the practice, and you can come from this drawing level
to that

A bit of lyrics
PaintingIs a skill that develops with practice. You are not alone when you think you are terrible at drawing! All great artists started out by drawing stick figures like this:
The reason they went further from these so-called "stick figures "to something much more, is that they had insatiable desire to paint it gets better and better with every new touch of the pencil to the paper. This desire set them apart from the rest, and this is the only reason they have become successful.
First of all, the fact that you have decided to devote your time to improving your drawing skills is already a great achievement. Why do you ask? This is really important because there must be passion, interest, curiosity and dedication in art and creativity, without which the learning process will not be as effective.
So, in your case, the biggest hurdle is behind you and you can start painting while observing the things around you! How simple it is!
The next steps I'm going to suggest should help you acquire the drawing skills you want, as well as show you the path you will have to go through in order to become an artist.
But before you blindly follow the path below, always remember that you are free to choose your own unique path - the path that is right for you. The real challenge is to practice regularly with the intent to learn, so it doesn't matter where you start your drawing path.
note that each step mentioned below can take weeks, months or even years to achieve perfection in it. It all depends on how much you really want to improve your skills and how much effort you are willing to put in.
There is a lot of content available on the Internet for each step below, including YouTube. I recommend checking various sources, researching different styles, and practicing whichever style works best for you.
Let's start!
Step 1. Learning simple shapes
First, grab a paper and pencil (or pen), sit in a comfortable position, clear your mind of thoughts, and just focus on the task at hand.
Now try to create a simple form... For example, draw a circle and then keep practicing it.
Try to draw a perfect circle each time. If you really take this assignment seriously, it could take us days or even months. Drawing an even circle using only your hands is more difficult than you imagine.
Just start drawing circles and keep practicing these circles until you reach a stage where you can draw a perfect circle without using any auxiliary tools.
Your attempts will start with something like this:

After regular training, your hand-eye coordination will improve and you will begin to draw better:

This is a pretty good result. Now move on!
The same way, start working with other basic shapes such as triangle, square, cube, octagon, etc.
This should keep you busy again for a while. Remember this is a titanic task if your first drawing was the circle from this tutorial.
But after you've put in some amount of time (say 6 months or one year), once you've gotten past this rigorous exercise, and once you've become a champion at drawing any of the simple shapes you want, another interesting facet will emerge.
There are two approaches at this stage that you can follow:
Approach 1 - self-study
You can learn how to draw on your own using free articles on the Internet, YouTube videos, books and tutorials.

The easiest to learn drawing lessons for beginners I count Mark Kistler's lessons from the book.
After completing all the lessons, you will achieve significant success. However, although the author stated a period of 1 month, I would advise you not to rush and devote at least 1-2 hours for each lesson, completing all the practical exercises.
Approach 2 - enroll in art school or online courses
If you do not like self-study, then I advise you to sign up for paid courses, where they will tell you everything in detail and show you, and also make you work practically.
The highest quality and most interesting I count the courses and master classes at the painting school of Veronica Kalacheva.
This school has training both in the studio and online. There are also useful free materials, which .

This school often hosts free webinars or lessons open to study for a while.
Sign up so you don't miss them!
Drawing school of Veronica KalachevaAnother site with paid but cheaper drawing courses that I like is arttsapko.ru. On this site, you can also take some courses for free. There are one-time classes that take place in Moscow.
Drawing school arttsapkoThe following tips are more suitable for those who have chosen the first approach and decided to study art on their own. But your creative path can contain both approaches.
Step 2. Shadows and shading
Now that you know how to draw simple shapes perfectly, let's let's start shading these shapes.
I'll continue with the circle example.
So your first attempt at shading the circle, not understanding how to do it correctly, it would look something like this:

Notice, even though your image is not very realistic, you already subconsciously knew about the imaginary light source and placed it in the upper left corner and, given this source, you painted a shadow on the opposite side in the lower right corner.
That is, in order to shade objects you need common sense and nothing more.
Now keep practicing shading. It may take several months before you end up with something like this:

Now this circle looks like a volumetric sphere.
Next, you need to show that the sphere is not dangling in the air, but is on some surface, and you will begin to depict the shadows that the object casts on other surfaces. In this case, the picture should already look something like this:

Always remember one simple rule, which was demonstrated in the picture below:

Also, keep practicing shading and other forms that you have learned.
As you practice, notice how the shades vary depending on the presence of light. Look at the tonal scale with shading from light to dark below. You can focus on it when drawing the shape.

Keep practicing. It's an endless process!
Step 3. Perspective
The basic law of perspective is:when the object is closer, it looks larger and if it needs to be shown further, it will need to be drawn less. If you understand this, you understand the basic law of perspective.
Now let's deal with the so-calledvanishing point.
I will explain this concept with the example of a cube.
When we draw a cube, why is the length and width of this cube tapering towards the end or tilted towards the inside of the paper? Take a look at this picture below for reference and ask yourself why is this happening?

As you can see, the ribs taper both to the right and to the left, as if they are going into the inside of the sheet of paper. This is what gives the cube the illusion of "3D" on two-dimensional paper. And this is possible, based on the foundations of building perspective and such a concept asvanishing point.
Now let's look at the same cube again.
In the cube, we took the vanishing point somewhere far from our eyes to the right and left of the cube. This is why the sides have narrowed towards the inside of the paper on the right and left. The figure below clearly shows how the edges of a cube, if extended, converge at one point on both sides. These two points are called vanishing points:

Now look at the green dot in the following cube drawing:

This green dot is alsovanishing point.
Imagine what a cube would look like without this vanishing point concept. It will look more like a 2-D square.When we draw a cube, we should always remember about the vanishing point, since it is this point that gives us the opportunity to depict a three-dimensional figure.
So, I hope that the concept of vanishing point has become clearer to you, since for any good drawing that is drawn with space and distance between each object in mind, the concept of vanishing point should be followed by default.
Here are some more examples of the vanishing point concept for your understanding.
- Top view (or bird's eye view):

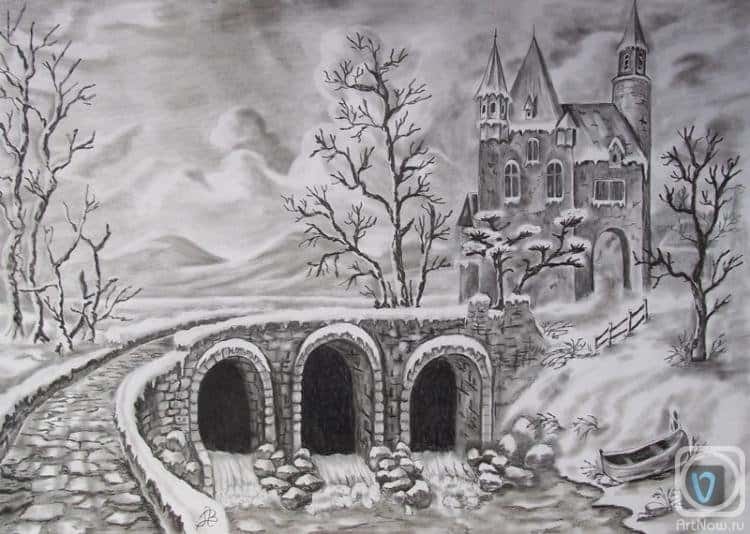
- Linear perspective (landscape):


- View with many vanishing points (any real story):


Thus, as shown in the third example, in real scenes there are usually several vanishing points, and these points give the picture the desired depth or 3-D effect, and a sense of space that separates it from 2-D.
Too hard? Just don't panic now, okay? At this stage, it is enough just to understand the vanishing point concept. Just try to show the vanishing point in your drawings without any drawings or measurements.
This "step 3" was just a prerequisite for learning the laws of perspective, just so you know its importance in drawing. Mark Kistler's Learn to Draw in 30 Days course has several step-by-step perspective-building lessons that you can start with.
Step 4. Draw complex shapes
Now, using your confidence in drawing and shading simple shapes, as well as your knowledge of the shadow effect and vanishing point, move on to the next level, that is, drawing various complex shapes.
The rules of the game remain the same:
- Keep practicing.
- Observe the nuances.
- Try to surpass yourself every time and not repeat previous mistakes.
So, first, how about an egg? It's not that much different from a circle, is it?
Let's just get started. Practice until you are perfect!

Ok, it looks like an egg. Now try different fruits. For example, strawberries.

Fine! This is a really good strawberry. And look at this detail.The strawberry in the last picture looks difficult enough to draw, but we already have the shading experience from “step 3”. This is the same, only at the micro level. Believe in yourself and everything will work out!
The same way, keep drawing different random shapes with shading. Place shadows on these drawings, considering effects such as reflection, refraction, transparency, etc. And just keep practicing.
There are many different items around. Learn to draw what you see. This is one of the most important steps to becoming a professional artist. Don't worry if you don't do well at first. Sometimes when you start sketching what you see, the beginning of the sketch can look pretty awful, but the end result can be amazing. So start doing it!
Try drawing two random objects a day. The drawing must be solid: painting + shading + drop shadow + any other special effect.
Something like what is shown below:


Just repeat this process every day. You are on the right track!
Step 5. Draw living creatures
Since we now know how to draw and shade various objects with relative precision, it's time to draw moving objects and living organisms. Now you need to include in your drawing the movement of objects, their posture and facial expressions, this is a real challenge!
The most important advice is to keep your eyes and mind wide open. You have to watch everything around.
So observe all the nuances - a walk of people, a flight of a bird, a pose of a dog, etc. And, when possible, create a quick sketch this particular position, movement, expression, etc. And work on the details later in your free time.
You should end up with something like this:

This is a quick sketch that can be completed in minutes. Get out to a park or cafe and just sketch the people you come across. In this case, the main thing is not quality, but quantity. You need to see and convey the pose of the subject.
Learn anatomy.Yes, the anatomy is the same as in biology class. It is necessary to study the bones of the skeleton and the location of the muscles. It may sound strange and creepy, but on the other hand, it means you can draw a skeleton and a skull for Halloween decoration 🙂 It will also help in studying human proportions and body movements. The same goes for animals - read books on animal anatomy. Almost all animal drawing fiction books will have an anatomy section.
Try starting with my article:
Then try to quickly draw a few different facial expressions:

Observe and remember the differences in the facial lines. Later, keep adding shadows and make them look even more realistic, like here:

Do the same with trees, flowers, animals, birds, etc.

Now that you already know quite a lot, using your acquired skills you should be able to draw something like this:

Perseverance, difficulty and pain will then bring you here:

And in the case of people (slightly better or worse):

Now it's time to pause and take a look at the image below, of this beautiful woman. She really looks very pretty, doesn't she?

And if you ask yourself, can you be confident enough to draw her as beautiful as she is? Most likely the answer will be a big “No,” right? If so, then you still have a lot to strive for!
So your drawing is still in its infancy and there is a lot of room for improvement.For example, you have to work on detailing the human eye and its movement, human hair, its shine, and so on. I think you understand what I'm trying to say, right?
So, basically, at this stage, you have to surround yourself with these complexities all the time in order to move forward and not get stuck at the middle level.No one will help you with this, except yourself!
Step 6. Trying different tools and materials
It is very good if you know how to draw with a pencil, but it will be much more interesting and useful if you also learn how to use ink, paints, markers, pastels, etc. You should try different materials, if only because you may come across something that you especially enjoy. Add color to your sketches!

Of course, art goods are not cheap now, so you shouldn't take professional materials right away, what if you don't like them and want something different? For a start, there will be enough tools from the middle price category. Now a very large selection of inexpensive art supplies can be found at AliExpress.
Do not use fancy art boards or moleskines. Buy a large notebook or scrapbook with white sheets. Your goal is to sketch as much and as quickly as possible without worrying about wasting expensive paper.
Also, if you decide to try your hand at digital-art, you do not have to immediately take up licensed Photoshop, when you can start with free editors, for example, MyPaint, SAI, GIMP.
 Author: TsaoShin
 Step 7. Landscapes
Now put it all together. You should start painting landscapes with people, plants and many animals. In this step, you will have a great opportunity to practice your knowledge. perspective laws.
To get started, you can try painting panoramas, such as a view from your window.Try painting the landscapes more “roughly” first, like this:
 After that, already detail the objects.
After prolonged training, your drawings will look something like this:
Step 8. Draw from imagination
Start with something simple like an apple. Just move your pencil onto the paper, just pretending you are drawing an apple before drawing it. Then make a quick preliminary sketch to get its shape and the shape of its shadow in proportion to the page. Then start shading and detailing.
Then try to draw something more difficult, for example, flowers, trees, a glass, a pen, etc. Try to choose more difficult objects each time. In this step, I can no longer give any recommendations other than practice regularly.
Step 9. Form your style
Now you know everything. At least enough to start developing your own artistic style.Make your style unique and you must continue to develop it with increased practice.
Note that I can't add anything else to this step because I don't know what your own unique style will be. I can only advise
The internet is full of resources to help you with inspiration and ideas, such as Pinterest, Instagram, Tumblr, YouTube. I recommend checking these sources regularly, exploring different styles, and practicing whichever style suits you best.
Step 10. Improving
This step is about perfecting it to a level where your drawing is indistinguishable from a photograph or real image. It's optional, of course. But if you do if you want to bring your art to hyperrealism, this also takes a lot of practice.
While drawings that are indistinguishable from photography are indications of the amazing craftsmanship of authors who have put in a lot of effort, there are equal examples of stunning work that not look like pictures. Therefore, you must also keep this in mind.
Here's an example of a hyperrealistic drawing:
Sensazioni by Diego CoyStep 11. Practice, practice, practice.
Artistic skills don't come with fancy sketches and pencils. This happens with practice. It is believed that in order to become a professional in your field, you need to devote a certain amount of time to it - from 2,000 to 10,000 hours!

Every time, when you have free time, sit down and paint something, or practice your shading, tone, etc. There are so many things to master - you always need to practice... Draw light objects and complex ones. Draw people in detail or rough lines. Master everything as best you can, constantly improve your skills.
Moreover, it is desirable that the practice is accompanied by feedback. It is only imperative that these viewers tell you the truth, so dad and mom are not suitable for this role.Alternatively, you can post your work in some art community or forum. Ours can serve as such a place.
- Pencil. The simplest and most intuitive drawing tool you will need anyway. Even if you want to learn how to draw with paints, you will need a simple pencil to sketch. Not all pencils are created equal. Some are for drawing, others for drawing, and still others for everyday tasks. It is better not to choose pencils that are too hard (3H, 4H and more): they can easily scratch and tear the paper.
- Watercolor. Water-borne paint is known for its lightness, transparency and wide range of shades. However, painting with watercolors is quite difficult: you need to learn how to use its properties and have a good idea of how the paint will behave on paper. On the other hand, if you put in enough effort, you will learn to paint in one of the most impressive techniques.
- Gouache. It is a dense matte paint that is diluted with water. It is perfect for the first steps in drawing. Due to the dense texture of gouache, dark tones can be easily overridden by darker ones. This is very important, because then all the flaws and shortcomings can be corrected. Another good news: gouache is inexpensive.
- Pastel (dry). These crayons are used to create drawings in soft colors. Due to its texture, pastels are very easy to blend, which allows you to create beautiful transitions between shades. You should immediately prepare yourself for the fact that your fingers and the table (at least) will be stained with dust and crumbs of pastels. The finished pastel drawing is easy to grease, so the pigments on the paper will need to be fixed with varnish or fixative.
- Markers ("copics"). We asked the illustrator and teacher Anna Rastorgueva to tell about this relatively unknown tool to most. Because she draws with markers and does it great. We are not talking about highlighters and not about simple felt-tip pens, but about alcohol markers, which, due to their basis, do not deform the paper and allow you to achieve smooth transitions between shades.
There are many manufacturers of such instruments, here are Japanese brands, German, Chinese, Korean and Russian. The price also varies - from 160 to 600 rubles apiece, so even a novice author can pick up a small kit for a start.
The palettes of this type of markers are unusually wide, with an average of 300 colors, therefore, in order not to get confused, you can purchase a ready-made set, selected, as a rule, on a specific topic: architecture, nature, manga.
What if I don't know what to draw?
If you don't know what to draw, but really want to - copy, sketch and repeat after others. There is nothing wrong with that. On the contrary, this is a normal process. Take a picture that you like, put it in front of you and start.
Video instructions help a lot. In contrast to the advice in the style of "draw a circle, finish the sticks, add details - you get a great canvas", these notes do not lie. You will see exactly how the drawing is created.
Remember: creativity is an international thing. Don't be afraid to check the YouTube channels of English-speaking bloggers, even if you don't understand what they are saying.
Try to start with these channels:
- Proko. An absolute must-have for anyone who wants to learn how to draw. The artist clearly, simply, clearly explains the most difficult thing - how to draw a person. This is the base and the base, so the channel will surely settle in your bookmarks.
- Mark crilley. The artist works in a cartoon style, so those who want to learn how to draw cute, cute drawings will find everything they need here. The artist shows different techniques and in detail, frame by frame, demonstrates the simplest techniques for creating a spectacular drawing.
- Sycra. The channel will appeal to everyone who loves Japanese cartoons and wants to learn how to draw anime. Video tutorials cover the topic inside and out: body structure, facial features, costumes and everything, everything, everything.
- Bob ross. Bob Ross is an American television legend. Perhaps the most inspiring program in the world was created by this man who taught people how to create miracles on canvas for 11 years. You may not understand what Bob is saying in a soft voice, but you cannot resist the artist's talent that penetrates you straight from the screen.
In general, the choice of topic is the second fundamental question after the choice of material. And here it is not at all necessary to be limited to traditional genres: portrait, still life or landscape. Nowadays, everyday household sketches are gaining more and more popularity. Like Instagram photos, artists fluently capture exciting topics in their notebooks, post them to social media, and learn and communicate together. Absolutely any object can become a subject of interest - from macro-sketches of insects to travel diaries detailed in all details.
Anna Rastorgueva, illustrator, teacher
“You Can Paint in 30 Days,” Mark Kistler. One of the most famous drawing books. As long-term observations show, after reading it and, what is important, following the instructions, everyone learned to draw.
Discover the Artist in You by Betty Edwards. Those who have doubts can be told right away: about 2 million of those who considered themselves "armless" have learned to draw from this book. For those who do not believe in their own strengths at all and think that all artists know some secret of beautiful paintings, we say: yes, there is a secret. It is hidden in this book.
“A sketchbook that teaches you to draw!” By Robin Landa. Since Robin is a teacher himself, he knows that students draw best on the pages of textbooks. This is where fantasy comes into play! Therefore, he created a book in which you can (and should) draw. And learn along the way.
I want to paint, but I have no time and money to spare
 Eugenio Marongiu / Shutterstock.com
 The first step can be done without much investment and effort. Download creative apps and get started now.
Tayasui Sketches. One of the most beautiful and simple applications with numerous tools will teach you how to draw in different techniques.
Bamboo Paper. Drawing tablet company Wacom has developed an app for artists. Sketches, sketches and full-fledged drawings - this program will be needed at every stage of training.
Zen Brush. This app will not help with learning, but will set you up for the right creative mood. With a brush, you can draw characteristic strokes, and the finished drawing looks like a work of art from some distant eastern country.
We have sorted out the materials, the sources of inspiration too, the books have been studied, and for the laziest there are applications. It's your move - it's time to get down to business.
The main thing is to find what you really like. Go for it!
Anna Rastorgueva, illustrator, teacher