How to make a drawing from a blot. Blotography
Encyclopedia of blots.
Blot-nature is thin, flexible and varied.
There are many ways to create a blot.
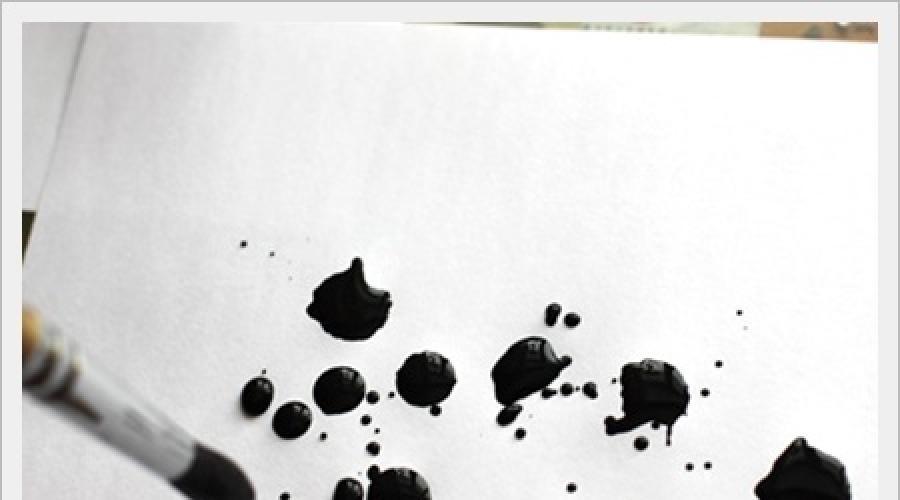
Classic round.
A drop drips from a brush placed vertically above the paper. If you lightly shake your hand in the vertical plane, the speed of falling of the ink on the paper will increase. From the blow, the blot will become delicate and welcoming. The larger the brush and the larger the drop, the more plump the stain.

Sweeping.
If we put ink on the brush and quickly wave it over the sheet, moving the hand in a horizontal plane, we get a very dynamic blot. The stronger the swing and the larger the leaf, the more vigorous the stain.

Leakage.
We do the smudge as follows: after applying a drop, we lift a sheet of paper vertically. The drop naturally grows paws and strives to escape from the leaf.

Shaggy.
A shaggy blot is made with a semi-dry brush. If you use a flat synthetic brush, you can get neat strands.

If squirrel, we get soft fluffs.

Symmetrical.
It is done like this: fold the sheet in half. Apply a blot to one of the halves. We close it with the other half and press it. Dry the resulting spot on the spread and put it into action.

Picturesque.
If you drop ink on glass or other smooth surface, and then press a sheet of smooth paper from above on top, we get a stain with a variety of natural landscapes. And they are usually very picturesque.


Ornate.
We lower the thread into the ink. Place it on one half of a folded sheet of paper. Leave one end of the thread outside. We close and move the thread inside, slowly pulling it out. We get a graceful crystal blot.


Spray.
We dip the toothbrush in mascara and drive it on any ribbed surface above a sheet of paper. The edge can be a ruler, a comb, or even a mascara cap. A huge number of small droplets fly from the brush onto the paper (including everything around us, including our face and hands).

Comet.
If wet spots from the spray are smeared with a dry brush
we get a flock of dynamically hurrying blots.

Branched.
If you start to blow vigorously on a classic blot, it will grow overgrown with twigs and eventually transforms either into a bush or into a sorcerer oak. Depends on the strength of our breath.

Wax.
If you put a wax drawing on a sheet of paper,
and go over with ink on top to get a combination of torn black and white spots.

Openwork.
On a damp gouache background, drop a drop of ink.
We get an openwork blot with many handles of legs and antennae.


Wet.
On the wet surface of a sheet moistened with water,
sprinkle with mascara and get blots with soft petals - tentacles.

Salt speckled.
If you sprinkle salt on a blot, it immediately turns into the sky, and there a crystal fell glee, an asterisk forms. Suitable for drawing galaxies.


Round with iridescence.
If you add shampoo to the mascara and blow a soap bubble from this solution onto a sheet of paper, we get an excellent round blot with a halo of small specks. It is in them that the bubble turns after it bursts. However, we will get it in all its glory.

Horned.
If you blow on this bursting bubble from the tube, we get a blot with horns.

Printed.
You can make a print with anything.
Dunk your finger in ink and press it against the paper. The fly wants to fly!

So it turned out to be a dozen and a half. I'm sure there are others as well.
I will replenish the encyclopedia as I learn the wonderful world of wild blots.
Hope someone gets inspired by my selection!
Master class on non-traditional drawing
Drawing master class.
Name. Blotography is common.Author. Gencheva Natalia Anatolyevna, teacher of additional education, MOU DO "Dniester Children and Youth Center", Pridnestrovskaia Moldavskaia Respublika.
This master class is designed to work in a children's creative association, drawing lessons with children aged 5 years and older, for teachers, educators, parents.
Purpose: making drawings in an unusual way.
Target. To acquaint with the unconventional drawing technique with the "usual blottography".
Tasks. Teach new ways of obtaining images, objectifying and "animating" unusual shapes (blots). Develop attention, thinking, artistic imagination from the abstract to the concrete. Cultivate accuracy when working.
Material: paper, paints, brushes, jars of water, wet wipes, pencils.
Presentation of the material... Guys, I received a letter from a colorful country, from our friend, artist Raskraskin. Listen to what he writes.
Hello guys! I want to tell you what happened to me.
Yesterday
My sister brought me as a gift
Bottle
Black-black ink.
I began to paint
But right from the pen
I dropped a huge blot.
And blurred
There is a stain on the sheet
It gradually began to grow:
On the left is the trunk, And on the right is the tail, Legs are like pedestals, High growth ...
I immediately
I added huge ears to the black ink,
And it turned out
Of course, he is - you guessed it - Indian ... (elephant).
(poem by D. Ciardi "About who turned out of the blot") I am sending you some of my new works, made in an unusual way of drawing with an ordinary blob. I hope you enjoy them. See you. Your Raskraskin.
Examining pictures


Discussion. Reasoning of children about the methods of obtaining an image.
Do you want to learn how to draw like that? Children's answers.
Demonstration of drawing methods by a teacher.
For work you will need: paper, paints, a brush, water, felt-tip pens or pencils.

Let's prepare paints - add a few drops of water to each color of the watercolor, fold a sheet of paper in half and unfold.

On one side, closer to the middle, drop a few greasy drops - a blot. You can use different colors of paint.

Then fold the sheet in half along the fold line and draw it up and down several times with the palm of your hand so that the paint spreads over the sheet. Let's say magic words to "transform" the blot.


Carefully unfold the sheet. You see a bizarre spot.

Think what it looks like? Imagine. "Revive" blots - turn them into living creatures or objects. Carefully examine the blots by turning the sheets of paper in different directions. You can paint on some details with a pencil.


Questions for children about the sequence of drawing.
How do we start working?
Where are we going to drip paint?
How many drops will we drip?
When we put the leaf together, what will we do?
What should be done next?
When they came up with what it looks like with pencils …… ..
Independent practical work of children.
Children master the usual blotography technique. The teacher works individually. Gives directions, helps to get an image in an unusual way. Encourages self-reliance. Advises to carefully consider the blots, turning the sheets of paper in different directions. Shows for example: this is my blot, if you look at it like that, it looks like a butterfly, only you need to finish drawing the antennae. And who will your blots turn into? The teacher quietly, in the ear asks each child about his plans and associations, helps indecisive children with advice or indirect questions. The teacher works with more active, capable children. Gives them additional tasks. Analysis of children's work. At the end of the lesson, a general exhibition of "live" blots is arranged.
We recently covered seven simple watercolor painting techniques, and if you have mastered them, then it's time to move on to something more complex and interesting. Today we will analyze six more interesting techniques that will help you create your own masterpiece.
Spray
We wet the bottom of the paper to see what happens.
This technique is pretty simple. Just put some paint on the brush and start tapping the bristles of the brush on your finger so that the spray scatters randomly.
If your brush is too wet, it will be difficult to control the spray. Therefore, shake off a few drops from it, and only then get to work.
If you don't like hitting your fingers with a brush, then you can use any tool at hand, a pen, for example.

Before we start sprinkling our paint, place the pieces of paper in the upper corner of our canvas.
We also wet the bottom edge of the leaf with clean water and tint it with a light purple color.
Search for an old toothbrush, rinse it out, and remove any remaining toothpaste. And get ready for a mess.

There are several ways to apply paint to your toothbrush. You can dip it in paint, which makes it very difficult to fill the bristles with paint. You can try filling your toothbrush with a brush. This way you can control the amount of paint.

Take your toothbrush and run your thumb over the bristles. You can also use the tools at hand. Choose a tool that is comfortable for you to spray paint from your bristles. Notice how the speed and distance of the brush from the paper affect the paint spray.

When you want to spray paint of a different color, rinse your toothbrush well and dry it with a towel.
Don't worry if you don't get this technique as well as you would like. Practice and you will succeed.

As you can see, the effect is quite interesting. Use whatever tools you have at your disposal, use your imagination and get creative with your drawing.

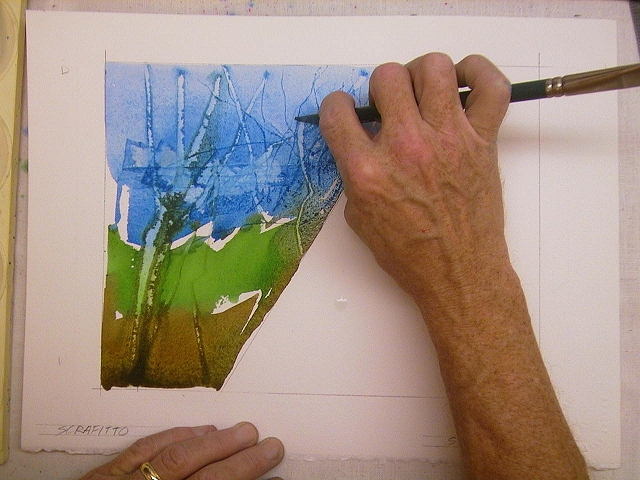
Sgraffito and stamps
Sgraffito is an Italian term for a scraping technique associated with rubbing off the top of a ceramic to expose the layers below it.
In the example, we scraped off paint with a penknife. If you scrape off the still wet paint that has soaked deep into the paper, you get dark lines.
Used wisely, this technique can create interesting landscapes by scraping out the shapes of trees and other flora.

You can use old credit cards to scrape off the paint. A smooth side card can sweep away the remaining paint.

Many brushes have a pointed edge. You can use these brushes to create fine lines.
It is very important to understand at what interval you need to start scraping. Practice on a separate sheet of the same paper and with the same colors.
A stamp is the application of paint by pressing other objects onto the paper. You can choose any material in order to create stamps. Try everything that comes to hand.
In this example, we are using facial wipes. Let's fill them with paint and put stamps on the top of the paper.

You can also use a sponge. With its help, we will depict the grass.
You can play with textures using different materials. Experiment!

Don't be afraid to use body parts for stamps. Everything can be used!

Washout
A relatively simple technique will help you create unusual and interesting textures.
First, paint over the top of the paper with blue paint.

Then quickly paint over the rest of the canvas in red. This is how our drawing will look at this stage.

Now rinse the brush well and refill it with clean water. Spray water droplets onto the still wet paint with light brush strokes.

Continue splashing water until you are satisfied with the result.
How much the paint has dried can be understood by the strength of the effect of water on it. Notice that the more water gets on the same area, the lighter the shade of the paint becomes.

Don't be discouraged if you can't control the blur. You, most likely, will not succeed, since it is quite difficult to influence this process.

Experiment with the amount of water, colors and dryness of the paint. This technique can help you create an interesting and textured background.

We use alcohol
You will need cotton swabs and rubbing alcohol.

Lightly paint your sheet with paint.

Create the background shade you want and get ready for the fun.

Dip a cotton swab in rubbing alcohol and start dripping it onto the paint.
Alcohol, getting on the paint, repels it, as it were, creating a light spot.

Try dripping rubbing alcohol onto the paint as it dries to see the effect.
It's pretty pretty, isn't it?

This interesting technique allows you to create unusual textures.

We use salt
Obviously we will need salt for this technique.

Let's draw the sky and the hill.

The second hill will be crimson in color, we will mix it a little with the first hill to get an interesting transition.

Now let's take salt and sprinkle it on our drawing. After a few minutes, add some more salt. She pushes the paint away from herself, creating an unusual texture.

Let's wait until all this is dry and see what happens next.

After the drawing has dried, the effect of the salt becomes more visible.
Shake the salt off the drawing and enjoy the result.

Better to use a sponge to brush off the salt. This way you will not damage the paint. Clean the drawing with light movements, try not to rub it.

The salt absorbed the paint, creating a huge number of star-like specks.
It is worth noting that coarse salt will leave larger specks, and fine, respectively, smaller ones.

In the good old days, when goose pens were used for writing, which had to be dipped in ink, putting a blot on paper was as easy as shelling pears. It was necessary to gape a little, not completely shake off the pen, or simply twitch the hand carelessly, and the letter was spoiled. There was a huge blot on it, indicating that the work would have to be rewritten again. Nowadays, only people who are keen on rarities write with a pen in order to feel the atmosphere of the past.
Fountain pens versus fountain pens
In Soviet times, there were those that needed to be refilled with ink on their own. Embarrassment with blots occurred less often, but were not completely eliminated. Fountain pens, like their predecessors, continued to spoil the scribble, forcing them to redo, rewrite and tear out the damaged sheets. Now, when the fountain pen rules the ball, it is almost impossible to see the blot. Such an event can happen only in emergency situations, for example, if a rod flows in hot weather. Children began to forget what a blot is, because a fountain pen is convenience and practicality.

Blot in cartoons about idle schoolchildren
In many of our beloved Soviet cartoons about would-be students, there are episodes when a student puts a blot in his notebook. Doing homework, which already seems difficult to him, the character becomes terribly angry at the incident that happened. Modern kids, looking at old cartoons, wonder what a blot is and where it comes from. It is difficult for them to understand the whole mechanism and history of the blot formation, because the fountain pens they use do not flow. Here, as always, parents come to the rescue, who can not only clearly explain everything, but also clearly show the child, using the example of paints, gouache or watercolors, how to draw a blot. Learning new things is much more interesting if you do it together.

Joint creativity
The blot shape resembles a blurry stain of paint or ink. The most accurate way to explain to a child about it is in several ways, for which you will need an album and paints for drawing, a brush and a simple pencil:
- The first method is with a brush and paints. Having dipped the brush in water, and then, having thickly smeared it with paint, you need to raise it above the album sheet and wait until the colored drop falls on the sheet. Under the power of its weight, it will acquire a unique shape. It's easy to draw a blot, even a one-year-old baby can handle it.
- The second way is using a simple pencil. How to draw a blot with a pencil? Simply, if you are not afraid and show a little creative abilities that are inherent in each of us. To do this, you just need to reproduce circles or ovals that are uneven in shape and proportion on paper. This should be done by including imagination in the work, because each blot is unique. Inexperienced artists may think that they are the same, but this is an absolute misconception.
- The third original way of drawing blots will be this: for a start, it is worth completely decorating a landscape sheet or any canvas intended for work with uniform paint. Then you should dip a clean brush in plain water and, without shaking it off, hold it over a sheet of paper painted in advance. A drop of water will certainly fall on the canvas and leave a trail in the form of a blurry place. This will be the blot. This method provides an answer to the question of how to draw a blot with clean water. Using it as a competition at events, you can captivate kids for a long time, and this, as you know, is very valuable.

How to draw a blot and turn it into a masterpiece?
This is not all. The resulting blurry spots can be easily turned into funny monsters or wonderful jellyfish. After visual explanations to the child about how to draw a blot, you can start this more exciting lesson. This is easy to do by adding a few original details: eyes, nose, mouth. You can draw whole families of similar monsters or make them all different. Everything is decided by imagination and fantasy. Drawing is easy when you are in a good mood and in a fun company. It is also good to carry out such interesting joint creative events in large children's companies, for example, at some holiday. Children will laugh at each other's original masterpieces with great pleasure.
Draw with your children, the whole family - it's fun and exciting.
Small children love to leave blots on paper. Parents, underestimating the "masterpieces" of their own children, get rid of incomprehensible drawings. But it turns out that you can create a unique pattern from the blots left behind. There is even such a drawing technique - blotography.
Blotography refers to silhouette art, but the history of figurative painting dates back to Ancient Greece. The images on the amphorae reveal scenes from mythology, the Olympic Games and the life of the gods of Olympus. But this art form became the most popular in the 18-19th century. Many artists started working in this technique and created a huge amount of work in this technique. Such was the history of the emergence of the technique of drawing - blotography.
Drawings made in the technique of blotting are a unique way to interest children in drawing, make them want to learn this type of fine art and remember their childhood time themselves. The method is absolutely not complicated, but very exciting, developing not only skills and abilities for drawing, but also imagination, ingenuity, perseverance. Blotography is perhaps one of the most unusual ways to draw. Moreover, it is considered to be an unconventional technique, as well as many others, where material unusual for this purpose is used.
With the help of blotography, a variety of plants, trees of different types and shrubs are well obtained.

Positive aspects of blotting
Recently, this type of drawing has become very popular. An accidental stain that appears on a paper sheet due to carelessness can have a unique structure. As much as you would like, such a pattern can no longer be repeated. By adding a little imagination and creativity of thinking, any blot can be turned into an animal or a fictional creature.

This type of activity has absolutely no age restrictions. That is, both children and adults can do it.
Blotography drawing technique
Required tool
To create a unique pattern, you must prepare the following material:
- Artistic brush. It is advisable to use hard brushes. Sometimes children, in order to depict a large blot, resort to using a toothbrush.
- Paints. In this art form, only liquid watercolor is used. If there are no suitable paints at hand, then you can simply dilute the existing watercolor with water. By the way, multi-colored ink has the consistency necessary for drawing. It can also be used while painting.
- Cardboard or sheet of white paper.
- Capacity for water.
- Cotton buds.
- A damp cloth. Used to remove dirt from hands.
Stages of the creative process
So, blotting is a drawing technique. Where to begin? If you are new to this area, then initially you should decide on the theme of the future drawing. It is extremely important here to direct mental activity in the right direction, in other words, to set the direction. Having made a blot on a piece of paper, turn on your imagination and try to see in it the outlines of an object or living creature. Maybe an amazing planet or a picturesque underwater world is in front of you.
There are several ways to create a drawing using blotting.
The most common is the drip method..
A wide, voluminous brush is required here. It should be thoroughly saturated with paint, and then, placing it over a piece of paper, begin to spray watercolor. If you want the drops to spray a small area, tap the brush on your finger or hand. When the brush is simply shaken, the spray area increases. For spot application of paint, use a pipette. By the way, with its help, you can create a large blot, thus depicting, for example, the sun. Most often, landscapes are created using this method of blotting.

In the second method of blotting, the spreading method is used.
To do this, a large blot is applied to the corner of the sheet with a brush. Importantly, the paint must be very liquid. Then, using a drinking straw, they begin to inflate the paint over the surface of the paper. It is advisable to direct the watercolor in different directions. Now you need to take a closer look at the resulting drawing and finish drawing the details.

Blotography will help kids experiment with colors and have fun. In the process of drawing a picture in which the blotography technique is used, in children:
- develops eye and hand coordination
- fantasy, creative vision and imagination develops,
- skills of working with paints, brushes,
- children are taught to convey the silhouettes of people, plants and animals,
- diligence, attentiveness, accuracy develops.