Prey code from the refrigerator. Residential section post office code
Read also
Prey 2017 passing
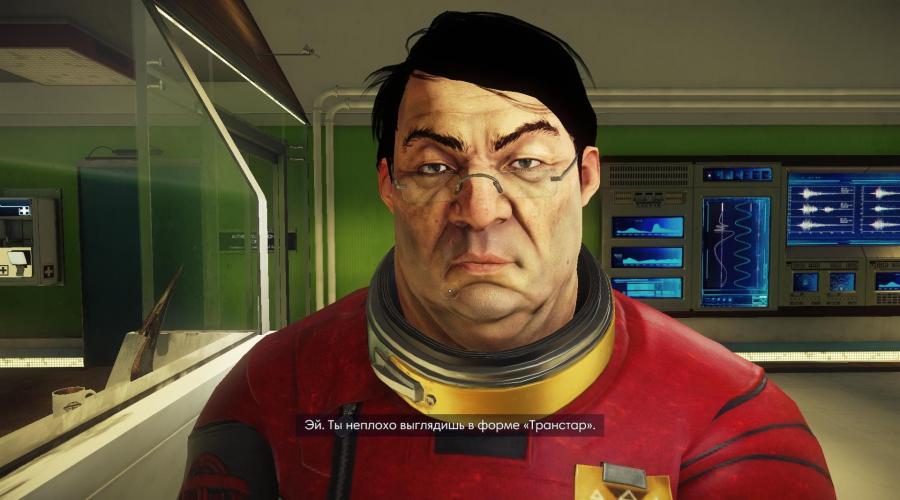
On the street on March 15, 2032. The protagonist is a man named Morgan Y. When he wakes up in his apartment, Alex Y. contacts the hero. As soon as control passes to you, put on the "Transtar" work uniform. The apartment will be able to read four books and three messages on the computer. If you rummage in closets, then you will find a couple of useful items for inventory.

You have to go to work anyway, so get out of your room. Follow the corridor and take the elevator up to the roof. On the roof, you can complete the hidden achievement "Absenteeism" (for this you need to die under the helicopter's propeller, so save before doing it). The helicopter, in turn, will deliver the hero to his workplace in a skyscraper. On the roof, the hero will be greeted by a flying drone, and only after that his brother himself. Go with them to the test room to chat with Dr. Bellamy and thus undergo a kind of training.
Test room "A": press the button, drag the three indicated objects out of the circle. Test room "B": Hide behind the chair by pressing the key - "C". Test room "C": press the button to jump over the obstacle, then press the button again. Test Room "D": Sit at the computer to answer specific questions in the test. When you reach the drawings at the computer, at that moment an unknown black mucus resembling an insect will attack the doctor behind the glass. The guards will begin to shoot back, and in the meantime the main character will be euthanized with gas.
Part - 2: "Department of Neuromods"
How to get Prey 2017? All secrets, codes and passes at the level "Department of Neuromods"
So, the main character wakes up at home again and the alarm clock once again says that today is March 15, 2032. The first step is to inspect your computer, where there will be six messages with the same content. Again collect all the useful items, put on the uniform and go out into the corridor. Instead of the previously seen worker, there will be a dead withered corpse in the corridor: search your pockets and get your first weapon - "Adjustable wrench". Shortly thereafter, a stranger comes in contact with Morgan under the curious pseudonym "January". He will tell you that in fact this is not a dream, so you need to get out of this place as soon as possible.
(?) Task: "Run"
Go back to the main character's apartment and beat the glass with an adjustable wrench, after which the exit will open. It turns out that there is not a balcony behind the glass, but a huge laboratory, so the image of the city is just a hologram. Examine the nearest computer, where you will find an interesting audio message in which you can hear familiar words (it was with them that Alex Yu met the hero).
There are corridors on the sides, so through them you pass by the scene with the helicopter. Also, along the way, go through the work corridors and test chambers. An audio recording of Alex Yu can be found near Room D.
Do not delay for a long time and go up to the second floor. If you wish, you can also go to the dead end on the left side ("Stage B"), where the main control area with the helicopter is located, but keep in mind that two monsters may attack you in that place, so be careful. In any case, go through the airlock, where along the way you can watch a scene in which a black monster kills a person, after which it multiplies into four other creatures. At the same time, "January" will tell you that these mysterious, cunning and strong creatures are called mimics: they are able to disguise themselves as ordinary objects, completely unexpectedly attack and absorb the energy of people.
Location: ""... So, go inside the department called "Research and Desing", where on the left side you can dig right into the computer. In addition, if you examine the corpse of Dr. Bellamy, then you will receive an additional task: "".
In any case, go to the room on the right side and take the important item "red pass to the Simulation Lab" on the table. A little further ahead there is a locked door, but it will now be possible to open it with the found access card, although there is another option to get inside: climb the cabinet on the right side and make your way further inside through the ventilation hatch.
No matter how you got inside, in the distance, the main character will still notice a full-sized black monster, which is called a phantom. When you stop looking at it, go down the corridor on the left side to examine the body of the guard and get a new weapon - the "GIPS-gun". Thanks to this weapon, it will be possible to immobilize enemies, and then calmly finish them off with a monkey wrench - use it. Although these are far from all the functions of this device.

Moving further, pay attention to the inclined wall - along it you can climb to the roof of the security post, where, in turn, the girl's corpse lies. As for the security point, so far it will not work to get into it. On the left side in the room, be sure to examine the corpse in the corner, where you will find an audio recording of Robert Greyge. In addition, in this place there are more rooms and two whole unexplored floors, but so far the way there is closed, so go further.
(?) Assignment: "Everything is about to change"
In the central hall, break the showcase first and get the "Neuromod" from the skull. This item can be spent on the instant learning of one specific skill from the profession branch: "Scientist", "Engineer" or "Guard". When you deal with the skills, exit through the white gate on the right side.

Part - 3: "Hall of Talos-1"
Prey 2017 passing of the game. All secrets, codes and passes on the "Main Hall" level
(?) Assignment: "An office with a great view"
Well, go out into a rather large room, from where it will be perfectly visible that the hero is on the Talos-1 space station. By the way, at this stage of the passage it will be possible to view the map of the location using the "M" key.

Location: ""... There is a broken elevator in the center. Near the elevator on the table there will be a "Pass to the emergency room". On the right side there is, in fact, the very room "Exhibition Transtar", where the second "Neuromod" is located, but there you will also have to fight a phantom for it. Also, if it is interesting, at the exhibition it will be possible to see an alternative history of the development of astronautics. There are turrets in the center, so if it becomes too difficult to fight enemies, then just run back to these defensive installations. On top of that, there are a couple of locked rooms.
Location: ""... On the west side there is a staircase, which must now be taken up to the third floor. And in the first room you come across you can find the "Pass to the emergency room." Nearby on the computer (in the same room), be sure to read the message where you will find volunteers cabin code - 3689.
You will learn the password to your office from a stranger - "0451". On the right side, behind the glass, inspect the cabinet and you will find the following things: "Shotgun", "implant" and "cartridges". There is a safe in the wall on the right side, and inside there are useful weapon upgrades. On the left there will be a recycler and a fabricator, where you can start creating items from a variety of things and ingredients that will be obtained during the passage. On the table on the left is the Morgan Yu Pass. And finally, pay attention to the computer, because next to it there will be "Neuromods" (in the amount of three pieces) and "Pass to the Teleconference Center".
Now you can start watching the video on your computer from yourself, but from the past. The essence of this message will be as follows: the main character lost his memory after the neuromod was removed, and the stranger under the pseudonym "January" is just a bot that performs the functions of an operator and thereby helps to restore the memory of the main character. In the middle, the video is interrupted by a brother who does not want you to be able to find out the whole truth.
(?) Quest: "Through Dim Glass"
It's time to get to Dr. Calvani's workshop, where, in turn, it will be possible to restore the video server. So go there.
Location: ""... Go down to the second floor. First of all, in this place, find the security computer (it is located at the entrance). The computer will have a map of all the floors in the hall. Plus, the map will indicate the location of all the dead and living people who are still at the station (so you will receive an additional task to find all the surviving people). And from the new message you will learn that the body of Dr. Bellamy is no longer here, so for the corpse you will have to go to a special compartment.
Move on: on the left side is the psychoanalyst's office, and on the computer is a test survey that you took at the very beginning of the game. But among other things, the message on the computer will contain other useful information: the code from the quarantine zone is "2184".
In the central hall of the hospital, the hero will stumble upon a couple of phantoms and a much more powerful monster. This "pack" of enemies can be both filled with oxygen tanks and blown up with a shotgun. In any case, an "EM Charge" can be found near the corpse (on the couch in the center). On the side there is an opportunity to activate the panel, thereby calling a medical bot, which will fully restore the health of the protagonist.
It's time to enter the quarantine room. In the same room, outside the window, Morgan will see a man named Trevor Young. There is a password for opening the doors - "2184". The only problem is that the person inside is zombified with typhons, which means that when the doors are opened, he will die. Therefore, if you want to save him, leave him for now - until there is a means for salvation. Inside the quarantine, on the wall to the left, a helpful hint "Devris 7324" is scrawled.
Location: ""... From the second floor from the landing it is possible to jump directly to the cornice and thus get to the central balcony. Once you reach the balcony, you can go directly to the lounge. However, keep in mind that there will be a couple of mimics inside. Having dealt with the monsters, pay attention to the bar counter, because behind it you need to find an audio recording in which the "Preflight Room Code" is indicated. After all, there are many useful food items you can collect in closets if you suddenly have an acute shortage of first aid kits.
It's time to go back to the main character's office. You have the option to shatter the glass for video communication. What for? There will be a tunnel behind the glass, but the only problem is that a locked door will appear on the way. Therefore, destroy the glass that leads to the central hall. Next, jump onto the path, which will be suspended in the center - go along it to the northern part of the third floor.
Location: ""... Enter the first room on the right side and quickly kill the phantom, which will stand in splendid isolation. Near the first computer in this room there is a new unique weapon - the Huntress dart launcher. There are four Neuromods in the workplace next door, so don't miss out.
Location: ""... Inside this place there will be only a couple of mimics and the corpse of an unknown person. Therefore, I recommend that you immediately go to the department next door, simultaneously breaking through the obstacles made of plaster. After the plaster is broken, it will be possible to exit the location.
Part - 4: "Hardware laboratory"
How to find all codes and gaps in Prey 2017
In the first rooms nothing interesting and curious to find will not work. So I recommend that you immediately go to the corridor on the left - there at the very beginning you can find the "Neuromod". In the auditorium, carefully examine the corpse, from which you must take the "Pass: Personnel Entrance". A little lower there is an opportunity to go down into the ventilation and there to examine another human corpse.
Location: "". Continue down the hallway. As soon as possible, open the doors with the found pass. Immediately at the entrance you will stumble upon another corpse - examine it. This will give you an audio recording and pre-flight preparation room code - "0854"... Now find the elevator in the center of the Atrium, thanks to which you will go up to the upper floor. Above, near the golden statue of a man, you can find a new weapon - "A pistol with a silencer". In addition, on the second floor there will be a corpse of one more young lady, and you can find an audio recording at her place.
Location: ""... In the corridor in the north lies another corpse, but to get to that part of the location, you must first plug the pipe from which the fire is coming out with plaster. The corpse will have a "Lab Pass". Therefore, taking the pass, immediately go inside. In the laboratory, the first thing you come across is a few recycling grenades - they turn everything around into compact small balls. Large boxes will be stacked in the corner of this room, with a secret behind them. So, in order to remove the boxes, throw the previously found utilized bombs into them (one is enough). A note can be found behind the boxes in the corner, which contains the code for the safe in this room (in the safe you can find other useful materials).
Location: ""... Go down to the scenes where earlier the hero saw through the window how a man was killed. In the very center of this scene there will be a suitcase, and inside - "Neuromod". From above, it will be possible to notice that it is possible to build a whole staircase from plaster, which will lead upstairs. So get creative and build some kind of staircase that will lead you upstairs. Upstairs, first of all, inspect the corpse and listen to the audio recording. After that climb into the ventilation shaft. Although there will be a dead end at the end, there will be a recycler at the bottom, in the central room there will be a Shock Absorber chip and a javelin.
Location: ""... In the test room, first hack the computer to get pantry code - "6627"... The next computer will have another code - "2104". Use the last code on the doors opposite to enter inside Dr. Thorstein's cabin. Plus, in the back room, you can see that the laboratory is completely weightless, so you need to enter it strictly in a spacesuit.
(?) Task: "Propulsion system for work in zero gravity"
Location: ""... There will be a rather dangerous breakdown at the entrance, which beats with electricity, so it needs to be nailed up with plaster, after which it will be possible to walk by completely calmly. Next, find the gateway to space and on the right side of the gateway on the computer, select the "Remove blocking" item. Now, to go into outer space, you will have to get a specially designed suit.
On the second floor, there is a recycler and a fabricator in one place. To get to them, take the boxes there or build a ladder from plaster (which is much easier to do). There will be a computer at the top, and in it there are two new blueprints. In addition, there will be a drawing of a suit on the table next to it. Therefore, throw all things with a gray background into the recycler to get useful resources. Now go to the fabricator, where from the resources obtained, create useful items, but first of all you should make a spacesuit called "Artax".
On the first floor of this building, the entrance will be littered with a bunch of heavy boxes, so in order to free it, you will have to have 3 levels of weight lifting. Although heavy loads can still be removed from the path thanks to recycling bombs. So use a bomb in this case. Behind the bars you can find a lot of useful things, including another "Neuromod" and a rather rare blueprint for improving weapons. In another corner there is a separate closed room, and it will be possible to get there thanks to a hatch on the ceiling, but there you can find two "Neuromods" (again, you can get there with the help of plaster). As for the machine shop, there are several hanging booths (they hang at the level of the second floor). Corpses will lie in the booths, and one of the corpses will have another "Neuromod".
Part - 5: "Plating of Talos-1"
Prey 2 (2017) walkthrough
It's time to go into outer space. Using the "Shift" key, you can accelerate. You can stop at the familiar key. However, this is not the most important thing, much more important is that a new angle of rotation will appear here, so you can rotate using the “Q” key and the “E” key. In space, try to always focus on key plot points. Therefore, as soon as you reach the destroyed room, take the "Pass to the Workshop of Dr. Lorenzo" near the corpse. In addition, two neuromods can be found in the pockets of the corpse.
Do not rush to move on, because there is an opportunity to examine a couple of other corpses, which absolutely also fly in space. Search them as early as possible, because the further you go along the storyline, the more enemies will appear around, which means that at this time there will be no time to collect things. Anyway, after this little adventure, head back to the hardware lab gateway.
Location: "Workshop of Dr. Lorenzo". Once on the ship, go inside the workshop. There will be a "mirror" terminal in the center of the room, but for now it will be disabled, so move along the cable until you come across a generator. It will be possible to turn on the generator using the button on the screen. After that, in the "mirror" enter a folder called "Network Utilities" and restore all the servers next.
There is an opportunity to watch a couple more videos on the local computer. In the second video, the doctor goes to the left side of the screen, so go to the right side to follow Lorenzo's further actions on the screen: there you will see how he puts his thermos on the scales. Plus, in one of the messages on the computer there is a mention, which says that the thermos has an exact weight - 170 grams. In general, the point is that by putting the thermos on the scales, a cache will open, which is located in the wall. Therefore, you need to find a thermos (it is on a red table under the stairs). Put the thermos on the electronic scales on another table and in the opened cache you will find "Pass to Lorenzo Calvino's Cabin" and neuromods in the amount of two pieces. And for solving the secret, get the achievement "Coffee Break".
Location: "Hall of Talos-1". You need to go back to the lobby to get to Morgan's apartment. There, in turn, you will need to watch the interrupted video. In it, the protagonist from the past proposes to activate the self-destruction of the station in order to prevent the spread of the created creatures - typhons.
(?) Quest: "Bypass"
Soon after the message, the same bot "January" will fly to the main character. He will tell you that you will have to get two keys, otherwise self-destruction will not be activated: the first key (which belongs to the main character) must be restored; the second one needs to be taken from a brother who is not going to die and is trying to solve the problem in a different way. From Morgan's desk take the "Pass to the General Entrance" and one neuromod that will bring "January".
Location: "IT department". When re-visiting the hall with a new pass received, it will be possible to inspect the remaining unverified rooms. In the office of the protagonist, it will be possible to break the mirror and thus pass through the hidden corridor. The next step in the corridor will be to break the glass floor and thus end up on the lower floor of the IT department. There is one neuromod and a "Death from Heaven" chip inside a wall cabinet, so I recommend that you take these things.
Location: "Human Resources Department". The entrance to this place will be blocked by a sofa and several heavy wardrobes. The easiest way to remove all obstacles is to use a recycling grenade. There will be another chip on the table inside, but this time a "V-amplifier". In any case, you will need to go to the lower floor of the hall. There you can now open a corner starting room, so you can go through this room to a new location.
(?) Additional task: "Who are you, December?"
Location: "Neuromod compartment (upper floors)". As soon as you, in the role of Morgan, get to a new compartment called "Psychotronics Laboratory", a new bot will be in touch - "December". He immediately invites the main character not to comply with the quarantine rules and leave the ship in a rescue capsule. The bot will make an appointment on the upper floors of the neuromod compartment. Therefore, if you want to see such a version of the development of the storyline, then you need to go back (and immediately) and go to the meeting place, because otherwise the hero simply will not have time.
Through the hall, return back to the main hall of the neuromod compartment. On the railing in this place there will be a corpse of a person who was not there before. Examine it and you will find a map and "code from the security booth 5344". There will be a computer in the security room. With the help of it, it will be possible to unblock the entrance to the previously locked room (although it actually could have been opened earlier, if you shot aiming darts from the window through the entire room several times).
Location: Skill Translator. In any case, enter the opened room, in the center of which is the piano. Go through this room to the room above, after breaking the glass. There will be a corpse under the landing, and one neuromod can be found near the corpse.
Location: "Volunteer Testing Department". In this place there is a red armchair, and on it is a man, from which it will be possible to extract all available neuromods. So remember this place.
Location: "Volunteers' Cabins". Before entering this room, you need to know that it is dark inside, so immediately go to the toilet, and then make your way into the ventilation hatch. Turn on the electricity inside. As a result, after this action, the floor is electrified in the shower, although this will not be too dangerous for Morgan. The main problem is that an invisible poltergeist will roam the room. Therefore, carefully make your way to the volunteers' cabin, where you need to further inspect the reception desk. After that, climb into the next ventilation hatch and wade through the ventilation ducts one floor higher.
Location: "Production". On the top floor in the first room you meet, examine the corpse, which will have a "Heavy Equipment Optimizer" chip. And in the same room, Morgan will find the destroyed December bot. Be sure to examine him, because he has a code from Alex's safe - an additional task "".
So, now be extremely careful, because a technopath and a couple of turrets will fly outside. There is a locked office on the top floor, but it can be opened by shooting darts through the window. Inside this room, the hero stumbles upon a murdered man named Holden Graves. Plus, there will be several audio recordings, and near the computer it will be possible to renew the license for creating neuromods - this concerns the additional task "" (after that the task will be completed). There is another corpse on the lower floor of this location and it will have a "Pass to Holdon Graves's Office". Below the table, if you look closely, you can see a fallen neuromod. After all these actions, it will be possible to return back to the passage of the current plot mission in the new open compartment of Talos-1.
Part - 6: "Laboratory of Psychotronics"
All codes and passes in Prey 2017
Location: Security Terminal. There is a locked security room on the side, but the doors can be opened by firing a dart gun several times at the buttons on the computer screen: the "Functions" button and the "Open door" button. Inside the room you can find improved weapons and a pair of turrets (two). Turrets can be placed in the central corridor.
A little further there will be a locked door that requires an unknown device. So go to the women's toilet and there, through the hole in the floor, go down one floor below. The hero will be in the luggage compartment with mimics, so kill them, inspect the corpse and find the "Psychoscope" - a device that was created to search and scan typhons. In addition, the corpse will have a Mimic Detection psychoscope chip. Therefore, now the first thing to do is scan a couple of monsters to gain access to the following skill trees: Energy, Transformation and Telepathy. From now on, you can add them to yourself as neuromods (but during the first playthrough of the game, I recommend not using them if you want to get the corresponding achievement). Go back to the floor to go to the elevator with the psychoscope.
Location: "Atrium". So, now the first thing you need to know in this place is that you can scan a couple of monsters in the tanks. On the side is Director Kelstrup's office, but it is solidly barricaded with plaster of paris. However, this is where you need to go now. When doing this, do not forget to neutralize the electrical device. After that, examine the body of Hans (the corpse is near the computer) to get the "Pass to the Hans Kelstrup's Cabin" and "Pass to the Director of Kelstrup's Office".
Having a pass, you can now open the back doors and go down to the room of the "Mirror" station. There, first of all, find the "Lift Control" chip and a new audio message. On the screen, you will have to click on the green button several times to turn on the mirror with the monster. And just at this moment a real monster will enter the room, which will have to be killed. So when you deal with him, get out of here.
At the exit from the office, the hero will call Alex Yu and give the code from Kelstup's safe - "3951". Moreover, the code will be random every time, so there is no way to know it in advance. In any case, inside the safe you can find two ready-made neuromods and a blueprint for a neuromod. However, if you try to create a neuromod using a fabricator, then it turns out that this possibility was blocked by one of the directors - this is how the hero receives an additional task "".
Through the round-shaped airlock, go straight into the huge room. Ahead behind the glass you can admire the new monster - "Weaver". It turns out that the first Soviet satellite of the Earth was in its web. At the very beginning, you can go up to the second floor and carefully examine the laboratory.
Location: "Laboratory - A". The staircase to the upper floor will be broken, but thanks to the walls, it will be possible to build a comfortable staircase using the GIPS cannon. There will also be a medical compartment at the top, in which the bot can heal you if desired. There is another room here, but it will again be firmly barricaded with plaster. There will be five Mimics inside the room and this will be a great opportunity to get the Mimic Massacre achievement. It is enough just to throw a recycling grenade there to kill the monsters. Inside the office there will be the corpse of Dr. Anna Gallegos, an audio recording and another neuromod. After listening to the audio recording, it will be possible to get an additional task "" - Dr. Anna was going to tell everyone about illegal experiments on humans, but did not have time, for that she hid the evidence in her cabin, which is located in the living compartment.
Location: "Laboratory - B". At this point, through the lattice window, first of all, take an audio message from a certain Mitsuko Tokaji. As for the room itself, it will again be possible to open it if you shoot a dart gun at the computer a couple of times. Inside is a weapon upgrade and a message about Test Subject 37. In the room next door, there are heaps of notes on things so that you can see, they say, they are real, not facial expressions. Moreover, there will be mimics in this room, and there are only two of them. Both facial expressions can be easily found with the help of a psychoscope. The last room will be Behavior Telemetry with several test rooms for null-wave testing and typhon bait. There will be two neuromods near the entrance to a small room with gold weaver threads.
Location: "Processing of raw materials". Walk around the Huge Round Weaver Pod. In the room to the east, behind the glass, a living volunteer bandit will be locked for now, from whom it will be possible to get an additional task: "A prisoner in the psychotronic laboratory." The prisoner can be both fed to mimics and released, just by opening the doors. And if he helps him, then he will give the code from the arsenal - "8741". The arsenal contains pistols, shotguns, cartridges and one neuromod. On the left side there are locked doors in the laboratory of exotic matter, but next to it there will be a corpse with a curious new audio recording. Therefore, when you listen to the transcriptor, you will receive one more additional task: "". To enter the laboratory, you will first have to patch up a hole in the compartment outside in space.
Location: "Inspection Department". The further path is blocked due to closed doors, so you will have to bypass the large capsule from the other side. In the next room on the table, be sure to take the Accelerated Scanning chip. In the center there will be a glass room, inside which there will be a button, and by pressing the button, the weaver will be released. After that, the weaver will fly up to the corpse and create an electrophantom from it, which will approach the main character. It can be scanned, but after that you have to fight. The best tactic in battle is to cover it up with plaster of paris and then toss a disposal grenade under your feet. You will have to kill the monster if you want to remove the quarantine from this room. For that, after the victory, you can go to the room, which is located in the southern part. In this room there is a passage to a new unexplored compartment - "Morgue". So it will be possible to go down the elevator from the observation compartment directly to this location. There will be locked doors at the bottom, but you can open them, as usual, with a dart gun through the glass into the door button. Inside, on the table, you can find two neuromods and a "Morgue Pass". Among the heap of corpses will be the corpse of Dr. Bellamy (optional task ""). In addition, after examining Bellamy's corpse, it will be possible to take the "Sylvain Bellamy's Cabin Pass".
Part - 7: "SAGITTA"
The location of all secrets in Prey 2017
A waste heat exchanger and a computer are located immediately below the entrance. So there is a great opportunity to recycle all the trash. In any case, go to the low-gravity zone and fly through the tunnel, examining all the corpses along the way.
"Pipe compartment No. 2". In this place, Morgan will stumble upon new monsters - a nest of cystoids. This "mixture" is a living radioactive mine, which is left by the weavers. So it is quite logical to destroy them from afar. However, this is not all: cystoids, in addition to everything, flock to the source of the sound, therefore, to attract their attention, I recommend using grenades, or drawing attention with shots, but closer to the gas pipes (which are located at the edges). You can also just throw objects in front of the hero.
“Pipe compartment No. 3”. It turns out that the airlock between the compartments is firmly locked. But if you are careful, then you can find a ventilation hatch nearby. Inside you will have to stop the fan with a gypsum cannon, after which you can get inside completely calmly.
"Pipe compartment No. 4". There will be a lot of cystoid nests in the next compartment, so even having full pockets of ammunition, there will still not be enough for everyone. So I recommend just flying past them by inertia, trying not to make sounds.
"Pipe compartment No. 5". And in the last part of this long pipe, the doors will be locked with a combination lock, so a pass will be required. There is also a side wall nearby with access to a zone with normal gravity (this path leads to the research floor).
Location: "Magnetosphere Management". First of all, in this place, you can notice a large capsule, inside which a movable no less large magnet works. Moreover, the corpse of an astronaut will be dangling inside in the same place. On the first floor in this place, go to the toilet and find there a book called “The Conqueror of the Stars. Volume 2 ", which will definitely come in handy for the achievement. Now examine the corpse from which you want to take the audio message. So the main character will receive an additional task: "" (to find out the details of the task, you will have to find Josh Dalton). But do not slow down at this moment and rise higher to enter the area of the electromagnet. Between the magnetic pulses, you need to catch the right moment in order to accurately fly inward. So as soon as you succeed in doing this trick, find the "Service Tunnel Pass" and the "Artx Drive" chip near the corpse.
Location: "Gas Tunnel". Return back to zero gravity to open the locked airlock with the previously found pass. Morgan will find himself in a compartment that is overflowing with the golden threads of the weaver. In addition, the hero will begin to hear the voices of the aliens in his head. A little further ahead in the tunnel there will be two weavers. The problem is that the weavers are killed for a long time and, in addition, they can stun the main character. So, as usual, it's best to just fly past them.
At the very beginning of the next part of the location, you can visit the dead end on the right side. At the end, another corpse will fly, and near it there is an entrance to the cargo compartment, but you don't need to visit it yet. On the way, you will definitely stumble upon the entrance to the intermediate floor of the "Fuel Storage", and there in turn there will be several mimics and a thermophant. But now you need to find the last fifth body of the employee in the SAGGIT location in order to pick up the "Pass to the Fuel Storage". Once the pass has been found, switch on the emergency power supply at the back of the large installation. Thanks to the pass, it will be possible to go through the side doors and pick up three Neuromods. Upstairs there is the possibility to open the doors that lead to the "Shuttle Compartment". There you will also find the number "1" on the wall - the treasure map will point to it. And when you finish your inspection and search, fly straight into the tunnel on the left to enter the arboretum airlock. In the same place, Morgan will hear the radio communications of two surviving girls: Catherine and Sarah.
Part - 8: "Arboretum"
Passing all tasks in Prey 2017
On the way, the doors will be locked, so you have to go through the hatch, from where the corpse of a person will fall out. Inside, get to the dead end, and then climb up to then be on the surface. Near the sprinkler, be sure to read the invention note for fast plant growth if you want to get the additional task: "Tips for gardening".
Location: "Greenhouse". The greenhouse is located a little higher. The greenhouse will be inhabited by the most real people-zombies, which will be controlled by a new typhon with telepathic skills. You can enter inside in two ways: the first - with the skill "Hacker", the second - by climbing through a high roof. Therefore, it is worth talking about the second version of the passage, because with the first everything is clear. So, near the computer, jump onto the installation on the right side, and from it further onto the lamp, which is located above the doors. Now from this place you need to construct a ladder all the way to the roof. The entire roof of this greenhouse will be entirely made of glass, but it's better not to jump down if you don't want to accidentally kill people. Therefore, I recommend luring the telepathic typhon to the hero in order to neutralize him further with a zero-wave and, in the end, kill him.
Inside the greenhouse, you can find the "High Temperature Booster" chip and the "Water Pressure Regulator" item, which is required for the task. In addition, many different fruits will grow on the trees inside. In addition, after the death of the telepath, one girl will not faint and therefore it will be possible to talk to her, having received an additional task: "". Nearby you will need to find the "AR01" warehouse, take a couple of turrets from there and install them on the road. While the hero is busy with the installation, Rani Chaudari will get to the cargo hold and the task will be completed.
Location: Central Lift. In the very center there is an underground tunnel that leads to the central elevator of the station, but in order to use this elevator, you first need to repair it in the course of an additional task: "". But in the entrance tunnel of the elevator lies the corpse of a girl, having listened to the audio recording of which, you can get the following additional task: "" (during which the hero will have to find six caches).
(?) Additional mission: "Smugglers on Talos"
Before searching, it is useful to know that all the caches will look like fire alarms, each of which is attached to the wall. There are many such devices and they are installed throughout the station, but the caches differ from them in that they will have a red light above the alarm. But to open the cache on the panel, you need to knock with a wrench three times. Location of all caches inPrey 2017 : the first cache is the Arboretum location, a tunnel leading to the hall, right next to the place where you can get the task; the second cache - location "Hall", exhibition on the first floor; the third cache - location "Hall", a corridor on the left side of the toilets; the fourth cache is the "Living Compartment" location, in the fitness center, in the corner on the right side of the entrance; the fifth cache is the "Hardware Laboratory" location, the second floor of the atrium, right behind the statue; the sixth cache is the "Cargo Bay" location, on the second floor of the shelter near the girl who is sitting.
When you are finished with the search for hiding places, go to the elevator platform, where there will be a technopath typhon, which will control bots and all other electronic devices / objects around. Whether you like it or not, you have to kill Typhon, because he controls the operation of the elevator. Be sure to also inspect the site - there will be a corpse. The corpse, in turn, will have a "Pass to Hendrik Dervis's Office" and an interesting audio recording. Thanks to the auditioned audio recording, the hero will receive an additional task: "" (this audio message can be deciphered in the lobby).
(?) Additional task: "Do no harm"
Location: "Hall. Emergency room". On the task "Do No Harm", enter Hendrik Dervis's previously locked room and download the decryption key from there to listen to the second part of the audio message. In the next room (the psychologist's room) on the main computer, turn on the test again to pass it, answering the questions as follows: "A", "C", "B", "A", "C". After you enter the correct combination, a secret safe will open under the picture, inside of which there will be three neuromods.
Continue to move further along the location, keeping to the right side, passing rocks and thickets along the way. On the left side in the forest there will be a large mirror screen - break it and you will find a first-aid kit with new monsters behind it. The new monsters will be the highest mimics. When you get to the round glade, on the bench you will find the next book “The Conqueror of the Stars. Volume 4 ". On the last site, the hero is now waiting for an ethereal phantom, which will move quickly, so when faced with him, try to slow him down as quickly as possible with the help of the GIPS cannon.
Nearby, on a side branch, there is a waterfall, but in fact it is not real, but just created with the help of a "mirror". So break the glass bottom of the waterfall and jump to the intermediate level where you will find the "Psychoactive Regenerator" chip. After that, take the elevator down to the data warehouse. Open the airlock that leads into space, but do not go out. In the corridor, examine the corpse, from which you will need to take the "Pass to the Residential Section" along with the paper drawing "Treasure Maps for Hordinbafl Flagdasterus".
(?) Task: "Collecting votes"
Ahead will be the next locked doors, but now with a voice code, so to open it you will have to find the voice of Danielle Shaw. Moreover, the audio recording of this person (20%) lies in the same place. Return back to the arboretum, go through the tunnel that leads to the living compartment. On the lower floor near the elevator, go to the checkpoint. If you break open the doors, then inside on the computer it will be possible to download an extremely useful map of the compartment and view the location of all the personnel who are at the station.
Part - 9: "Residential section"
How to get Prey 2017
Zombie people will roam throughout the location. If you get too close to them, then they will explode. Therefore, if you want to keep people alive, then you need to stun them with a zero-wave with a grenade, or just shoot with a shocker.
Location: "Reaction Center". A poltergeist will live in the leisure room. Since the monster will be invisible, you will have to take up the scanner to find it and notice it in time. At the top, on a large table, there will be sheets with characters from the board role-playing game Fatal Fortress. 6th edition ". In the same place, you can find another audio recording of the Show (this will already be 40%), "Pass to Abigail File's Cabin" and "Treasure Map for Mechetyk" figure "6").
(?) Additional task: "Coca's request"
Location: "Cafeteria". Well, first of all, in the cafeteria, the hero will stumble upon a telepath who will once again control the zombie people. I suggest staying away from him for the time being, and generally better to get around this place. The best tactic with minimal casualties: sneak up from behind, shoot with a shotgun - this will decrease more health. With the help of a zero-wave grenade, the monster can be temporarily deprived of all skills. So when you finish him off, the cook will contact Morgan, but he will not let him into the kitchen, but for that he will give "Will Mitchell's cabin pass."
Location: "Crew Cabins - A". In the corridor, the hero will stumble upon an electric phantom, which will have an advantage, because absolutely the entire floor will be flooded with water, so he will have to be lured out and only after that killed. As for the toilet, there will be a poltergeist. Now for the cabins: cabin "102 - J.Marks" - you can get inside only when you find the key in the Shuttle Compartment; cabin "105 - M.Ilyushin" - it will be possible to enter inside only if Morgan turns into some small object; cabin "106 - W. Mitchell" - Mitchell's cabin contains a chef's medal, but more importantly, his computer will have a code for the directors' quarters.
Location: "Kitchen". Go back to the cook to let Morgan go to the kitchen. There will be a shaper in the kitchen. The cook will ask you to repair the water supply, and there are two options for solving the problem: the first is to bring a whole new part from the arboretum greenhouse, or the second is to repair the broken part. After that, the cook will let the protagonist go into the refrigerator, which turns out to be a trap, so the fat man will close the doors. The first chamber will contain a piece of meat from the real Mitchell. In the other side chamber there will be a new weapon - the "Markgraf" laser cannon. In the far part of the chamber lies the corpse of a girl named Abigail, but she will have another part of Shaw's audio recording (after that it will already be 60%). There will also be ice blocks nearby, behind which the passage to the ventilation shaft will be hidden. Shoot at the gas pipes, which are located on the wall, and as a result, the fire will quickly melt the ice, after which you can safely get out of the trouble. Moreover, over the past time, of course, the cook managed to hide.
Location: Pool. On the concierge's computer, you can look at the location map and get an audio recording with a code from the Fitness Center, through which the pool actually passes. On the floor above, next to the treadmills, there will be another neuromod. A telepath will fly over the pool, and several people around him. One of the people will have Rosalyn Swift's Treasure Map.
At the corpse you can find a message from Danielle Shaw and thus get an additional task: "". It is enough to walk up to the pool window and tap the glass with an adjustable wrench three times. As a result, a live Danielle will fly up outside. After talking, she will ask for revenge on the cook who killed her beloved Abigail, and at the same time it will be possible to record another part of Shaw's voice.
Location: "Cinema". There is practically nothing of interest in this place. The only thing that can come in handy is another audio recording with Shaw's voice under the chairs.
Location: "Bar: Yellow Tulip". Behind the bar, the first thing to do is to inspect the broken bot, inside which you will find the "Pass to the Yellow Tulip Storeroom". In the pantry, in turn, there will be two corpses, a pistol and a drink. In the far part of the hall it will be possible to get into the ventilation and thus turn on the light in the bar. Near the place above the table, but slightly higher, there is another ventilation hatch, which in turn will lead to the fitness center, where Morgan will face wandering zombies. Next to the bar there will be a separate room with a utilizer inside - there will be a note, and on the note there will be a code from the gravilift - "2512". And do not rush to leave right away, because in the same room look at the number "6" on the wall - the treasure map will point to it.
Location: "Directors' Apartment". So, now, thanks to the code found in the note, you can use the gravity lift to climb to the floor with the directors' apartments. In his cabin, named "Morgan Yu", you will find two neuromods and a psychoscopic chip "Potentializer". The computer will be able to find audio recordings of all the important persons at the Talos-1 station. Brother Morgan's cabin will be locked, and a phantom will be in the guest cabin.
Location: "Crew Cabins - B". Cabin "107 - J. Thorstein" - here you can find the "Battery Optimizer" chip. Cabin "108 - S. Bellamy" - to get into this cabin, you will need a pass, which in turn can be obtained by the mission "Disappearing corpse" ". Cabin "111 - L. Calvino" - inside is a neuromod, a couple of curious notes (and one of them will have a code from Dr. Calvino's safe) and, in fact, a safe, hidden behind a glass mirror, inside which there will be three neuromods. Cabin "112 - D.Sho": Once you reach Danielle Shaw's cabin, you will find the book "The Conqueror of the Stars" inside. Volume 1 ”, neuromod, and next to the bed there will be another audio recording (80%), the only problem is that it will have to be repaired with the help of an engineer skill. Also, a small excerpt of Shaw's voice can be found on the computer (90%), and after reading the message, you can get an additional task: "".
Location: "Living Capsules". Inspect the capsules first, including those on the second floor. In one of the capsules it will be possible to find the code from the Post Office (there will be three neuromods near the concierge's computer), in the other capsule there will be an audio message with an additional task: "". Examine the first corpse of the concierge and get one more additional task: "". Find the capsule of Shaw's friend, where the last key audio recording with voice (100%) will lie. After that, you can finally leave this sector. Return back to the arboretum, although Morgan will encounter many ethereal and electrical phantoms along the way. The most important thing is to get to the data warehouse in order to go further, having previously recreated the full-fledged voice of Danielle Shaw.
Part - 10: "Data Warehouse"
All codes and passwords Prey 2017
(?) Task: "Restore from backup"
As soon as you enter this compartment, Morgan's brother will block the doors, so you will not be able to go back, but this is for now. Therefore, go to the first computer and get the code from the Exit to the stairs on it. There will be a neuromod next to the computer. In the second room, the protagonist is waiting for a technopath - a new monster that can hack all nearby technical devices and attack with large ball lightning.
After the battle, descend into zero gravity between the floors. A server computer will be located in front of the hero, but it turns out that the central hard disk has been removed from it. Therefore, now you have to fly down, bypassing the weaver and his mines, in order to get the disk from the bottom. After that, fly up to the server, the disk will be inserted automatically. You just have to download the information about the key.
Location: "Control Center". Go back now to the floor where normal gravity is present. From there climb up the cabinets to the security service floor. In the computer of the security chief, it will be possible to track personnel by the ID number of the bracelet. In addition, you can enter the number "3232" (the code is always random) to find Grand Lockwood on the additional task "" and "". Nearby on the table will be a "Security Pass" and neuromods in the amount of two pieces.
Soon, Danielle Shaw will call Morgan to advise him on how to get out of the locked compartment. To do this, download a file called "Key_activation_M_U" on her computer. By the way, the same files contain the Treasure Map for Melindra Shadowconer. On the next table is the "Optimizer (telepathy)" chip.
Location: "Confidential Records". Well, the doors inside, as usual, will be locked, but it will be possible to climb up. Inside, in turn, it will be possible to find data on experimental volunteers and a safe.
(?) Assignment: "The top is here!"
Location: "Data Modules". The entrance will turn out to be barricaded with heavy cabinets, but you can get rid of them either with a recycling grenade, or move them with the help of a skill, or even get rid of them with a balloon explosion. In any case, there will be a weaver inside, so you quickly run up and kill him. From this place, on the advice of Danielle Shaw, go into open space through the nearby airlock. Due to the fact that Alex Yu closed all the other locks from the inside, you will have to get through the cargo hold, where the locks, in turn, are semi-automatic.
(?) Additional Assignment: "Million Dollar Sealant"
Location: "Plating Talos-1". Along the way, you can complete the task that the hero received earlier. Find a long crack in the shell of Talos I, from which air will actively escape. The entire surface will have to be filled with a gypsum cannon so that air stops escaping through the damage. Immediately after this, access to a previously inaccessible depressurized room will open inside, but for now you should not rush there.
(?) Additional task: "A disgruntled employee"
If then, when the hero was in the data warehouse, you turned on the search by the ID number of the bracelet, then now you can see where Grand Lockwood is. It turns out that the man's corpse is far beyond the station's protective field. Therefore, when Morgan goes out of the field, solar radiation will slowly begin to kill him, so I recommend to hurry. When you find the corpse of the astronaut, you will find the Atrax 2 chip in the suitcase, which allows you to make a double jump.
(?) Additional task: "Doctor Igwe"
Get to the cargo area of Talos I station. In this place, Dr. Igwe will contact the hero. He will tell you that he hid in a container that is now drifting somewhere in space. You will be given seven minutes to complete this task. It is impossible to open the container, because otherwise the scientist will immediately die without air. You won't be able to push the container either. Find the container number "2312" on the input panel.
After that, fly into the recess in the cargo hold, where there will be many mines - clear this place. The cargo control panel will be located on the side of the wall, and on it you will need to enter the container number so that it will automatically dock to the ship. In this way, the scientist will be saved. Morgan, in turn, can now easily pass through the docked container to the station himself.
.
13. Power plant.
14. Space for the shuttle.
15. Endings.
Walkthrough
6. Laboratory of psychotronics
Codes and Passes in Prey 2017
Security terminal... On the side is a locked room of guards, we can open it by firing a dart gun at the buttons on the computer screen ("Functions" - "Open the door"). Inside there is a weapon upgrade and two turrets that we can place in the main corridor.
Ahead is a locked door requiring some kind of device. We pass into the women's toilet, there is a gap in the floor, we go down to the floor below. In the luggage department, we kill mimics, examine a person, find psychoscope- a device for searching and scanning typhons. As well as Mimic Detection psychoscope chip... Having scanned several monsters, we get access to their branches of abilities "Energy", "Transformation", "Telepathy". Now you can add them to yourself as neuromods (but on the first playthrough it is better not to use them in order to get the achievement). We return to the floor, with a psychoscope we are admitted to the elevator.
Atrium... In the center we can scan the monsters in the tanks. On the side there is director Kelstrup's office barricaded with plaster, we pass there, we neutralize the electrical device. We search the body of Hans near the computer, we find Passes Hans Kelstrup's Cabin, Director Kelstrup's Office.
With a pass, we can open the back door and go down to the room Station "Mirror". We find there Lift control chip and audio message. On the screen, we click on the green button several times, the mirror with the monster will turn on. Just at this moment, a real monster will enter the room behind, kill him and leave.
When we leave the office, Alex Yu will call us and give us the code from Kelstrup's safe - 3951 (random code). Inside we find 2 ready-made neuromods and a drawing of a neuromod. If we try to create a neuromod on the fabricator, it turns out that this possibility is blocked by one of the directors, and additional task "Copy protection".

We pass through a round airlock into a large room. Ahead behind the glass we see a new monster - a weaver, the first Soviet satellite of the Earth appeared in its web. First, we can go up to the second floor and inspect the laboratories.
Laboratory "A"... The staircase to the upper floor is broken, but ladders from GIPS can be made on the wall. There is a medical bay upstairs where a bot can heal us. There is a room blocked by plaster, 5 mimics inside, this is a good place to get Mimic Massacre achievements, just throw a recycling grenade there, and all the monsters will die. Inside the office, the corpse of Dr. Anna Gallegos, her audio recording and neuromod. From the audio recording we get add. task "Truth-lover"- Anna was going to tell everyone about illegal experiments on humans, she hid the evidence in her cabin in the living compartment.
Laboratory "B"... We take through the lattice window audio message from Mitsuko Tokaji... The room itself can be opened by firing a javelin at the computer. Inside, weapon upgrades and reports of a certain 37th test subject. In the next room there are a bunch of notes on things to show that they are real, not facial expressions. There are only two Mimics, both are easily found with a psychoscope. In the last room, "Behavior Telemetry", there are several test rooms where null-wave and typhon bait were tested. Near the entrance to a small room with golden threads of a weaver lie 2 neuromods.
Raw material processing... We pass around the large round capsule with the weaver. A live volunteer bandit is locked behind the glass in the eastern room, we get add. task "Prisoner in the laboratory of psychotronics"... We can feed him to mimics or release him by opening the door. If we help a person, he will say code 8741 from arsenal, inside there are pistols, shotguns, cartridges, neuromod.
On the left there is a locked door to the laboratory of exotic matter, next to it is a corpse with an audio recording. After listening to the transcriptor, we get add. the problem "Sealant for a million dollars"- it is necessary to close a hole in the compartment from outside from space, so that you can enter this laboratory.
Inspection department... Further the door is closed, so we go around the capsule from the other side. In the next room on the table we find chip "Accelerated Scanning"... There is a glass room in the center, at the push of a button you can release the weaver. He will fly up to the corpse and create an electrophantom out of it, which will come out to us. We scan a new monster. The best tactic against him is to cement with plaster of paris and toss a disposal grenade at his feet. It is imperative to kill the monster in order to remove the quarantine from the room. After the victory, we go to the southern room, there is a transition to a new compartment. Morgue... We can go down to the morgue by the elevator from the observation department. There is a locked door at the bottom, but it can be opened by firing a dart gun through the glass at the door button. Inside on the table there are 2 neuromods and a Morgue pass. Among the corpses we find the body of Dr. Bellamy ( add. task "Disappearing corpse"), we get Sylvain Bellamy's cabin pass.
7. SAGITTA
Location of all the secrets of Prey 2017

There is a utilizer and a computer under the entrance. Having processed all the unnecessary, we go out into the zone of low gravity, fly through the tunnel, examine the corpses on the way.
2 pipe compartment. We will meet new monsters - a nest of cystoids - a living radioactive mine left by a weaver. We destroy monsters from afar, they flock to the sound, so we can use grenades, attract them with shots to the gas pipes along the edges, or just throw objects in front of us.
3 compartments. The airlock between the compartments is closed. Nearby there is a ventilation hatch, we stop the fan blades with a gypsum gun, climb inside.
4 compartments. There are too many nests in the next compartment, there will not be enough cartridges for everyone, we just fly past them by inertia, without making any sounds.
5 compartment In the last part of the pipe, the door is locked with a combination lock, you need a pass. Nearby, in the side wall, there is an exit to the zone with normal gravity - to the research floor.
Magnetosphere control... We see a large capsule, in which a moving magnet is working, and a dead astronaut is dangling there. Here on the first floor we enter the toilet, we find a green book " Conqueror of the stars. Volume 2"required to achieve. Examine the corpse, take the audio message, get add. task "Project Blackbox"- you need to find Josh Dalton to find out the details.
We rise to the floor above, there you can enter the electromagnet zone. We catch the right moment between the impulses of the magnet, we fly inside, we search the human body, we find the necessary Service tunnel pass and chip "Drive Artks".
Cargo tunnel... We return to zero gravity, open the gateway with a pass. We fall into a compartment filled with golden threads of a weaver, we hear the voices of aliens in our heads. There are two weavers in the tunnels ahead, they are killed for a long time, and can stun us for a while. Better to just fly past them.
First, we can visit the dead end on the right. There, at the very end, a human corpse flies, next to it there is an entrance to the cargo compartment, where we do not need it yet. On the way, there is an entrance to the intermediate floor "Fuel Storage", there is a thermophant and a couple of mimics wandering around there. We find the last 5 body of an employee at the SAGGIT location, she has Fuel storage pass... We turn on the emergency power supply behind the large installation, with the pass we enter the side door, inside there are 3 neuromods. Upstairs we can open the door to the "Space for the shuttle". Here we find the number "1" on the wall
We fly into the left tunnel, we enter the arboretum sluice. We hear the radio communications of two surviving girls: Sarah and Catherine.
8. Arboretum
Game Prey 2017

The door on the way is locked, we go through the hatch, from where the man fell out. We reach a dead end, climb up, find ourselves on the surface. We read a note on the invention of rapid plant growth on the irrigation system - add. task "Tips for gardening".
Greenhouse... A little higher there is a greenhouse, where people-zombies, controlled by the "telepath" typhon, live, but you can enter inside only with the skill of a hacker or by climbing through a high roof. Near the computer, we jump onto the installation on the right, from it to the lamp above the door, and from here on the left we build a ladder to the roof. The entire roof of the greenhouse is glass, but it's better not to jump down, so as not to accidentally kill people. We lure the telepathic typhon to us, neutralize it with a zero-wave, and kill.
Inside the greenhouse we find high temperature amplifier chip, quest item " Water pressure regulator"and many fruits on the trees. One girl after the death of the telepath did not faint, we communicate with her, we get add. the task "Save Rani"... Nearby you need to enter the AR01 warehouse, take a couple of turrets from there and place them on the road. While we are doing this, Rani Chaudari will already get to the cargo bay, and the task will be completed.
Central lift... There is an underground tunnel in the center leading to the central elevator of the space station, but in order to use it, you first need to repair it - add. problem "Problems with the elevator"... In the entrance tunnel of the elevator we find the body of the girl, listen to her audio recording, we get add. quest "Smugglers on Talos"- find 6 caches.
Add. mission: Smugglers on Talos... All the caches look like a fire alarm on the wall, there are many of them throughout the station, but the caches differ in that they have a red light above the alarm. To open such a cache, we knock on the panel with a wrench 3 times. Location of all caches:
1. Arboretum, tunnel to the Hall. Right next to the quest pick-up location.
2. Hall. Exhibition on the 1st floor.
3. Hall. Corridor to the left of the toilets.
4. Living compartment. Fitness center, in the corner to the right of the entrance.
5. Hardware laboratory. Atrium, 2nd floor, behind the statue.
6. Cargo compartment. On the 2nd floor of the shelter next to a seated girl.
We go to the elevator platform, there we find the "technopath" typhon, controlling the bots and all the rest of the electronics around. After killing him, the elevator will work. We inspect the site, find a human body, he has pass Hendrik Dervis's office and audio recording. We get new audio on audio add. task "Do no harm"- decrypt this audio message in the lobby.
Hall. Emergency room... Add. task "Do no harm". We enter the previously locked office of Dervis, download the decryption key, listen to the second part of the audio message. In the next room of the psychologist on the main computer, we turn on the repeated test, we carry out it, answering the questions like this: A, C, B, A, C... After entering this combination, a safe will open under the picture, take 3 from it.
We go further along the arboretum on the right path, past rocks and thickets. On the left in the forest there will be a large mirror screen, we break it behind it a first-aid kit and new monsters - the highest mimics. There is a book on a bench in a round glade " Conqueror of the stars. Volume 4". At the last site, an ethereal phantom is waiting, it moves quickly, it is better to slow it down with a plaster at first.
There is a waterfall on the side branch, it is not real, but created with the help of a "mirror". We break the glass bottom of the waterfall, jump down to the intermediate floor, there we find "Psychoactive regenerator" chip.
We go down the elevator to the data warehouse. We open the gateway into space, but we do not go out. We examine the corpse in the corridor, take it from him pass Residential section and paper drawing " Treasure Map for Hordinbuffle Flagdasterus".
There is a checkpoint on the lower floor near the elevator, if we break open its door, inside on the computer you can download a map of the compartment and see the location of all personnel.
9. Residential section
Can't get past Prey 2017

Here, zombie people roam all over the location. If we get close to them, they will explode. To keep people alive, they need to be stunned with a zero-wave grenade or shot from a shocker.
Reaction center... A poltergeist lives in the leisure room. This is an invisible monster, so we put on the scanner to notice it. Upstairs on a large table are sheets of paper with characters from the board role-playing game "Fortress of Fate. 6th Edition", here we find audio recording of the Show (40%), Pass Cabin Abigail Faye and treasure map for Mechetyk(the map shows a local room with a utilizer, inside it we look along the arrow, we see the number "6" on the wall).
Add. task: Coca's request
Cafeteria... The cafeteria is inhabited by a telepathic monster that controls zombie people. It's better not to mess with him yet, and bypass this place. The best tactic against him is to sneak up from behind and shoot with a shotgun, so more health is saved. A null-wave grenade can temporarily deprive a monster of all abilities. When we kill the monster, the cook will contact us, he will not let us into his kitchen, but will pass Will Mitchell's cabin pass.
Crew cabins A... An electric phantom will meet in the corridor, here he has an advantage, because the whole floor is in water, we lure him out and kill him. There's a poltergeist in the toilet.
Cabin "101 - S. Elazar".
Cabin "102 - J. Marks". The key to the cabin is in the Shuttle Compartment.
Cabin "103 - H. Kelstrup".
Cabin "104 - D. Igwe".
Cabin "105 - M. Ilyushin". You can only enter if you turn into a small object.
Cabin "106 - W. Mitchell". In Mitchell's cabin we find the chef's medal, in his computer there is directors apartment code.
Kitchen... We return to the cook, he lets us into the kitchen, there is a shaper inside. The chef will ask us to fix the plumbing (you can bring a whole part from the arboretum greenhouse, or fix a broken local part). After that, the cook will let us into the refrigerator. But it will turn out to be a trap, it will ban us inside. In the first chamber, a piece of real Mitchell's meat. There's a new weapon in the side chamber - laser cannon "Markgraf"... In the far cell we find the corpse of the girl Abigail, she has audio recording of the Show (60%)... There are blocks of ice nearby that prevent you from entering the ventilation. We shoot at the gas pipes on the wall, the fire that appears will melt the ice, and we can get out. Kok had already disappeared during this time.
Pool... The concierge computer has a location map and audio from Fitness center code, through it we pass into the pool. There is a neuromod on the top floor near the treadmills. A telepath is flying over the pool, there are several people around him. Here one of the people has treasure map for Rosalyn Swift.
We find a message from a dead person from Danielle - we get add. Danielle Shaw problem... We just go to the pool window and knock three times with the key on the glass. Outside, a live Danielle will fly up, we communicate with her, she asks to take revenge on the cook who killed her beloved Abigail. At the same time we write down part of Shaw's voice.
Cinema hall... An audio recording of Shaw is hidden under the chairs in the back room.
Bar "Yellow Tulip"... Behind the bar, we examine the destroyed bot, it has Pantry pass "Yellow Tulip"... There are two corpses in the closet, pistols and booze. In the back room we can crawl into the ventilation and turn on the light in the bar. There is another hatch near this place above the table above, it leads to the fitness center, where zombies roam.
Near the bar there is a separate room with a utilizer, inside we find a note, on it code 2512 from gravilift... In the same room we look at the number "6" on the wall, the treasure map points to it.
Directors' apartments... We go up the gravity lift to the director's floor. In our cabin "Morgan Yu" we find 2 neuromods and psychoscope chip "Potentializer"... The computer contains audio recordings of all the significant characters at the station. Alex Yu's cabin is locked. A phantom lives in the guest cabin.
Crew cabins B.
Cabin "107 - J. Thorstein" is battery optimizer chip.
Cabin "108 - S. Bellamy". The cabin pass can be obtained by completing quest "Disappearing corpse"... When we go inside, the quest will be completed. Inside the reward: 3 neuromods and psychoscopic chip "Psi-amplifier".
Cabin "109 - A.Foy". Nothing interesting.
Cabin "110 - H. Devries".
Cabin "111 - L. Calvino". Inside the neuromod, several entries, on the note there is Dr. Calvino's safe code... The safe is hidden behind the glass of the mirror, inside there are 3 neuromods.
Cabin "112 - D.Sho". We reach Danielle's cabin, there is a book inside " Conqueror of the stars. Volume 1", neuromod, there is an audio recording near the bed (80%), but it still needs to be repaired with the skill of an engineer. There is a small recording of her voice (90%)... After reading the messages, we get add. the task "Treasure hunt".
Residential capsules... We examine all the capsules, including those on the second floor. In one of the capsules we find post office code(near the concierge's computer, inside 3 neuromods), in the other in the audio message we teach add. the task "Gift of the beloved"... Examining the dead body of the horsewoman for extra. quests "Truth-lover"... We find the capsule of Danielle's friend, there is the last audio recording (100%). We can leave the sector.
We return to the arboretum, there will be a lot of electrical and etheric phantoms on the way. We get to the entrance to the storage, imitate the voice of Danielle Shaw, and we pass.
10. Data warehouse
Prey 2, game of 2017
Task: Restore from backup

When we enter the compartment, Alex Yu will block the door behind us, and it will be temporarily impossible to return. On the computer we find staircase exit code, next to a neuromod. In the second room, the Technopat monster is waiting, he hacks into all nearby devices and attacks with ball lightning.
We descend into zero gravity between the floors. We see the server computer, but the central hard drive is removed from it. You need to fly down past the weaver and his mines, and get the disc from the bottom. We fly up to the server, the disk will be inserted automatically. Downloading information about the key.
Control center... We return to the floor with normal gravity, from here we climb the cabinets to the security service floor. The security chief's computer can track personnel by the ID number of the bracelet. We can enter the number 3232 (random code) to find an employee of Grand Lockwood ( add. task Truth-lover, Dissatisfied employee). Next to the table we find security pass and 2 neuromods.
Danielle Shaw calls us and tells us how to leave the locked compartment. On her computer, download the file Activation_Key_Yu_M. Here in the files we find treasure map for Melindra Shadowconer... On the next table there is chip "Optimizer (telepathy)".
Confidential records... The door is locked, but you can climb through the top. Inside data on experimental volunteers and safe.
Challenge: Top is here!
Data modules... The entrance is barricaded with heavy cabinets, we can move them with a skill, destroy them with a recycling grenade, or scatter them with a balloon explosion. Inside the room weaver, run or destroy it. From here, on the advice of Danielle, we go out into open space through the airlock. Alex Yu closed all other airlocks from the inside, but you can still get through the cargo hold, where the airlocks are semi-automatic.
Plating "Talos-1"
Add. Challenge: Million Dollar Sealant
Along the way, we can complete the previously received task. In the skin of Talos-1 we find a long crack, from which air comes out. We fill the entire surface with a GIPS gun so that the air stops coming out. After that, the inside will open access to the unhermitized room. We will come there later.
Add. task: disgruntled employee
If in the data warehouse we turned on the search by the bracelet ID number, now we see where Grand Lockwood is. He's far beyond the station's protective field. When we leave the field, solar radiation will slowly kill us, so we need to hurry. We find the corpse of an astronaut, in his suitcase there is a special chip "Atrax 2" allowing you to do a double jump.
Add. task: Dr. Igwe
We fly up to the cargo part of the Talos-1 skin. Here Dr. Igwe gets in touch with us, he hid in a container that is now drifting in space. You have 7 minutes to complete the task. You cannot open the container, otherwise the scientist will die without air, it is also impossible to push it. On the input panel, we find the container number 2312.
We fly into the deepening of the cargo compartment, there are many mines, we clean them. There is a cargo control panel on the side wall, on it we enter the container number, and it will automatically dock to the ship. This is how we will save the scientist. After that, we ourselves can go through the docked container to the station.
|
Achievement "Honorary reader of the site" Did you like the article? In gratitude, you can like it through any social network. For you, this is one click, for us - another step up in the ranking of gaming sites. ... 9. Residential section. 10. Data warehouse. 11. Cargo compartment. 12. Life support. 13. Power plant. 14. Shuttle. 15. Endings. Additional tasks (45 pieces). Achievements . Questions - answers. |
Using the collected scraps of Daniella Shaw's voice on the voice lock, you will be taken to the Data Warehouse. As soon as this happens, Alex will block the exit from this location - you will have to improvise, but later. Morgan's task now is to find the blueprint for his activator key in the central repository.
Zechariah West's computer has a drawing of darts for the "Huntress"
In the first room, on the table to the right of the entrance, you can find neuromod, notes with door code to the second floor and Ivy Song's computer, as well as the operator-engineer work distributor.
In the next room you will find: a phantom, a technopath, two "infected" robot assistants and a turret. It is best to deal with a smaller alien without leaving the starting room, and for a technopath, we advise you to save a couple of EM charges. If the situation gets out of hand, you can always hide and catch your breath in a small shaft between the foyer and the main hall. After clearing the area, collect all the valuable items.
To access the central archive, you need to go to the security room next to the giant door. This can be done in three ways:

- Finding the key card on Danielle Shaw's desk in her office on the second floor;
- using the Huntress javelin;

- using the ventilation duct to the right of the locked door.
Once inside, unlock the door to the central archive and boldly step through the magnetic gate. It turns out that the main repository is a space with almost zero gravity and a bunch of cystoid nests inside. All you need to do here is to use a computer near the entry point, but you are missing one hard drive for that.

Move towards the sign, simultaneously destroying cystoids and filling up explosive pipes with the help of the GIPS cannon. When you get to the disk, bring it to your computer - it will snap into place automatically - and load key drawing to Danielle Shaw's computer, after which you can return to the main hall.
Upon arrival upstairs you will be greeted by another phantom, having dealt with which, go up to the second floor (you already have the code for the door there) and proceed to Danielle Shaw's office on the right hand. Inside, the hero is waiting for a thermophant with several mimics as a support group.

Having dealt with them, take advantage of all the advantages of a recycler and fabricator nearby. In addition, indoors you can find two recycling grenades, a pair of neuromods and a safe (code found in the note on the back of the Shaw terminal monitor) level 4 with weapon set and battery drawing for K-ray gun inside.
Download from the Shaw terminal a file called " Key_activation_Y_M”And create a key (you can do this, however, later) using a fabricator nearby. Now you need to get Alex's key.

At the Shaw terminal, unblock " Data module B»In the Data Warehouse itself. There are two ways to get there:
- through the main entrance - for this you will need either the third level of the "Climb" skill, or something explosive (a balloon or a grenade);
- bypass - climb onto the cabinet to the left of the terminal and follow the wires to the wall of the Data Warehouse. Use the GIPS cannon to jump over to the other side.

Inside, the weaver and the phantom are waiting. If you look at them from above, then nothing prevents you from simply throwing grenades out of there, in other cases we advise you to deal with the phantom first. After defeating both, pick up the neuromod near the corpse of Akande Benin and climb into the data module B. Open the service hatch and press the button - now you are in space.
As you play Prey, you will constantly bump into doors and safes locked with digital locks. And here you have several options. You can very carefully ransack the station around, reading all the letters, papers, books and listening to every audio recording. This is, of course, insanely interesting, but there is a chance to miss something important. You can also upgrade the Hacker skill in the Scientist branch, but you can attach neuromods with greater benefit. So we recommend that you just read our guide and get all the information you need in one place. For convenience, we have divided all codes in Prey by location name. Enjoy!
Department of neuromods
- Security booth- you can get this code only after you advance further in the plot and return to the neuromods department again. In the lobby you will find the corpse of Divia Neaaz, near which there will be a note with the code. On the map, we marked where exactly to look for the corpse.

- Safe in the postoperative examination room- the code of this safe is 5150, it never changes. The safe itself is inside the room with the Simulation Debriefing sign.
- Volunteers' cabin- you will have to look for this code yourself, everyone has their own numbers. Go to level three of the Talos-1 halls, to the directors' offices. The exact location is shown on the map. There you need to find Bianca Goodwin's computer and read the letter titled Volunteer Behavior.


Hall "Talos-1"
- Morgan Yu's office- in fact, January will give you the code for this door anyway during the story, but if you don't want to wait at all, just enter the numbers 0451. This password is the same for all playthroughs.
- Interrogation room- to get into this room, it is enough to enter the code 1129 on the door. Honestly, I don’t remember where we found it. The main thing is that it doesn't change either.
- Mathias Kohl's hidden safe- in the office of Matthias Kohl there is a hidden safe that does not require a password. We will go to him as part of the additional task Do No Harm. Run the behavioral test on the computer, and then select the answers in the following order: A, C, B, A, C. After that, the picture on the opposite wall will go up and open the safe for you.


- Henrik Devries' safe- the doctor's office is located in the emergency room. To get inside, you will have to find a pass (you will find it on the doctor's corpse, completing the quest to repair the elevator) or pump the transformation skill and climb through the window. Safe code 7324.
- Quarantine zone- the code for this door is 6474. You can get it by reading the letter Subject for quarantine on Matthias Kohl's computer at the emergency room. The exact location is shown on the map. On the wall in the quarantine area, you will see the code from the previous safe.


- Security safe- a very useful safe next to the shotgun. In it you can find a blueprint of cartridges, so do not pass by. The numbers are always the same - 0526. You can see them right next to it, in the ICU green book on the table.
- IT department- the password for this door is always the same - 0913. Unfortunately, we did not remember at all at what moment we got it, so we cannot tell you where to find it. You just have to trust us.
Space for the shuttle
- Pre-flight preparation room- located on the second level of the shuttle compartment. The door code will again have to be searched for. Go to the Staff Lounge on the second level of the Talos I Hall. The exact location is marked on the screen. There you will find the corpse of Octavia Figgs. Take her transcript and listen to the audio recording. This is not a drill.


- Mia Bayer's safe- unfortunately, we could not find the code for this safe. Having searched the entire compartment for the shuttle, we still did not understand where the enterprising young lady wrote down her password. Perhaps we will come across it in the future and we will update the guide. In the meantime, we just hacked it. There is nothing particularly interesting inside, except perhaps a neuromod.
Hardware laboratory
- Director Thorstein's office- this code is different for each player, so you have to walk a little. Head to the Atrium on level two, the exact location is marked on the map. You need to find Thaddeus York's computer and read a letter on it with the name You are now in charge.


- Dr. Thorstein's Safe- the code for this safe is 9954. You can get it by decrypting the note attached next to it with the designation of two chemical elements. Their numbers together will give the code.
Ballistics Department Safe- you can find this code in the same room. Walk along the wall and soon in one of the corners you will stumble upon a grate leaning against the wall. Behind it is a bunch of pieces of paper, one of which has a code written on it. To move the grate, you need the Level 1 Climb skill.


- Mechanical shop storage room- to get this code you will have to go to the Atrium on the second level. Find a computer there called Prototype Trials (its location is marked in the screenshot below) and read the letter titled If you need supplies.


Plating "Talos"
- Mechanical shop storage room - there is another storage room on the outside of the station. To get the door code, you need to find Dr. Calvino's transcriptor (we will get it from the plot) and listen to the recording there Tomorrow morning, first of all.
- Dr. Igwe's Cargo Container- You will come across this container outside the station as part of a story mission. The reference point for the search is the cargo hold. Code 2312 is written on the container itself, but it must be entered into the docking terminal at the station opposite the container.
Psychotronic laboratory
- Arsenal- you can find out the code for the arsenal door by releasing the experimental Aaron Ingram from the glass chamber right next to it. Code 8714, never changes.


SAGITTA
Safe in the magnetosphere control room- the code for this safe can be found in the magnetosphere control toilet. The exact location is shown on the screenshot. There are several rolls of toilet paper in the cabinet. Move it and see a note with a code.


Living section
- Fitness center- you can get the code from this door in two ways. First, you can go to the security terminal and read the New Code letter from the gym. The desired place is marked on the first screen. Secondly, you can go to the toilet belonging to the crew cabins B. In the center on the ottoman there will be a note with the code. The exact location is shown on the second screen.


- Postal office- to get the code for this door, you will have to find Andres Klein's living capsule. Its location is marked on the map. Inside there will be a note on which the code is written.


- Refrigerator- just watch the chef enter the code by opening the refrigerator. The password is different for each player.
- Directors' apartments- To get the code for this door, go to the fitness center and find Emma Beatty's computer there. On it, you need to read a letter called Personal Training Session. This is where the password will be. The exact location is indicated on the map.


- Dr. Calvino's Safe- This safe is located inside Dr. Calvino's room in the Living Compartment. Its code does not change - 0523. You can find it out by listening to the audio recording on the computer right here in the room.
- Jada Marks' safe- a very useful safe where you can pick up the golden pistol "Artemis". Find the body of Marietta Kirkos in the Arboretum (the location is shown in the screenshot below). She has a key card to Jada Marks' room and a transcriptor. Listen to the recording and find out the code.


Data store
- Stairs- to get the code from the entrance to the stairs, you need to find the computer of Zechariah West. It stands practically next to the entrance to the data warehouse. The exact location is shown on the map. There is a note on the table next to it, where the code is written. Here you will also find a note with a code from Ivy Song's work computer.


- Safe in data warehouse- in this department you can find two whole safes and their codes are the same. To get this password, find Danielle Shaw's computer. A note with a password is attached to the back of the screen, which is what we need.


Power station
- Reactor compartment- this compartment is located inside the power plant. Its code is always unchanged, just enter the numbers 3845. Honestly, I don't remember where we got it from. Perhaps as part of a story mission.
- Reactor security room- this room is at the very bottom, not far from the reactor control room. Unfortunately, we never managed to find her code, so we just hacked the door. If we come across this password later, we will definitely add this information to the guide.
- Parts warehouse- in order to get the code from this door, you will have to find the transcriptor of Duncan Krasikov. He lies, as one might expect, near the corpse of Duncan, and a dangerous poltergeist hangs around nearby. Be careful when walking through the water as it can shock you. Your goal is marked in the screenshot below. You need to listen to a recording called Code Change: Parts Warehouse
At the Talos-1 station in most cases, all codes from locks are randomly generated, therefore it is necessary to find either notes or access cards. Nevertheless, there are also some digital locks (similar to Deus Ex), the codes for which are already predefined by the developers and never change. You can find such codes in e-mail messages, notes, and more. But in the rush of the game, constantly hiding or running away from the Mimics, clues are often skipped.
Below we will tell about all the digital codes for the locks in Prey and where to find them, where there are hints and which ones are permanent and which ones are random.
Prey 2017 All codes for digital locks
In total, there are 11 codes for digital locks in the game, and all the others are different for each player. We will simply mark such codes as random, and, of course, we will write constant ones as they are 🙂
However, there is always a Hacker skill that will allow you to break codes and computers.
Code 1. Department of neuromods, code 5150
Where to get: according to the plot in the hall of Talos-1, you will find yourself in Morgan Yu's office. Activate the video and come close to the screen. Look to the left, on the wall in the back and there will be a code.
Where to activate: return to the Neuromods department, to your apartment, where the whole game began. Break the glass of the panoramic window and look to the right. In the back there will be a small room with an armchair and a computer. There is a safe in the corner.
Code 3. Hall Talos-1, code 0451
Where to activate: the plot code that January will tell you from the door of Morgan Yu's office
Where to find: it will be reported by "January" or you can read the mail on the computer near the door.
Code 4. Hall Talos-1, 1129
Where to get: The code is on a note near Sarah Elazar's computer in her office.
Where to activate: First you need the Huntress Javelin Crossbow. It is located under the table in the "Sales Department" section on the 3rd floor. You can get there after watching the video in Morgan Y.'s office. From there you will go to the Teleconference Center and then go straight to the sales offices.
Code 8. Hall Talos-1, random
Where to find: in the "Staff Lounge" zone on the 2nd floor, under the bar counter, there is the body of Octavia. Pick up an audio recording and listen. An entry about the code will appear in the Diary.
Where to activate: pilots' lounge
Code 9. Hall Talos-1, random
Where to find: third floor, "Office of directors" zone. You will need to examine the mail on Bianca Goodwin's computer.
Where to activate: volunteer rooms
Code 10. Hardware laboratory, 9954
Where to find: in Dr. Thorstein's office there will be a note on the wall of the safe with the names of the chemical elements Es and Xe. Their numbers are 99 and 54 on the table that hangs on the wall.
To get to the office, you have to go to the second floor of the Control Room and reach the offices and computer of Thaddeus York. This code is already different. At the same time, next to the computer there is a second door to this office.
Where to activate: in Dr. Thorstein's office. From the entrance to the Hardware Lab from the Hall side, turn immediately to the left. There is a safe in the office.
Code 11. Laboratory of Psychotronics, 8714
Where to find: this is during one of the side missions. You will find a man in the cell (Aaron Ingram), you can free him or kill him and get more materials. The code is permanent, so the choice is yours, because from.
Where to activate: access to the Arsenal area on the second floor, on the right side of the map, next to the camera itself.
Code 12. Residential section, 0523
Where to activate: Dr. Calvino's safe in the room
Code 13. Plating "Talos-1", 2312
Where to activate: Dr. Igwe's cargo container
Code 14. Power plant, 3845
Where to activate: access to the door to Reactornaya.
Code 15. Department of neuromods, random
Where to find: there will be a note next to Divya Naaz's body (will have to come back here later)
Where to activate: security booth
Code 16. Hardware laboratory, random
Where to find: there is a computer in the small test lab. Email password.
Where to activate: pantry of the shop of mechanisms
Code 17. Plating Talos-1, random
Where to find: listen to Dr. Calvino's recording "First thing tomorrow morning"
Where to activate: room in the shop of mechanisms
Code 18. SAGITTA (G.U.T.S.), random
Where to find: body of Kimberly Bomo, flies to the right among the nests (if the door is behind)
Where to activate: open the door to the service tunnel to move further along the story
Code 19. SAGITTA (G.U.T.S.), random
Where to find: Toilet rolls on the racks on the right will contain rolls of toilet paper with a note underneath.
Where to activate: safe in the G.U.T.S. control room under the stairs, here you will arrive to find the pass
Code 20. Residential Section, random
Where to find: e-mail on the security computer (reception to the left of the entrance to the area)
Where to activate: entrance to the fitness center
Code 21. Residential Section, random
Where to find: an audio recording of Calvino's Notes 3 on his desktop.
Where to activate: safe in the same room.
Code 22. Residential Section, Wing B, random.
Where to find: note in the toilet
Where to activate: entrance to the fitness center.
Code 23. Residential Section, random
Where to find: hide and watch the cook. He will enter the code for the freezer, and remember it.
Where to activate: kitchen, freezer.
Code 24. Residential Section, random
Where to find: Will Mitchell's computer will have an email requesting products for Alex Y.
Where to activate: offices of directors in this area.
Code 25. Residential Section, random
Where to find: note on the table in the recycling room
Where to activate: director's office
Code 26. Residential section, random
Where to find: email on Emma Biatti's computer.
Where to activate: director's office
Code 27. Data warehouse, random
Where to find: a note at Zachary West's computer.
Where to activate: access to staircases
Code 28. Data warehouse, random
Where to find: near Danielle Shaw's computer in the command center
Where to activate: two safes in the location
Code 29. Life support, random
Where to find: note in air control room
Where to activate: pantry in the location
Code 30. Life support, random
Where to find: find Erica Teague's body in the area of the main elevator and read the note.
Where to activate: safe in the security room
Code 31. Bridge "Talos-1", random
Where to find: on the table in the captain's cabin, pick up the book from the computer, there will be a note under it.
Where to activate: safe in the meeting room below
Code 32. Cargo compartment, random
Where to find: chat with Sarah Elazar
Where to activate: safe in cargo hold A