Digitization by photographing the image from the screen. How to digitize real photos
Read also
Getting started with digitization usually starts with photographs. It takes a long time to create large collections, so first of all, clean up your photo archives, putting aside blurry, fuzzy and generally meaningless pictures. Before starting the process, gently wipe the photos with a slightly damp microfiber cloth. Blow open dusty photo boxes first with compressed air to remove coarse debris, and then brush away smaller dirt with a dusting brush.
The best way is to scan

The best result in the digitizing process can be obtained with a scanner. For this special equipment is not required at all - it will be enough to use the scanning module of an inexpensive MFP. Be sure to clean the glass surface of the scanner before starting work.
The minimum required resolution for scanning a photo is 300 dpi, but in reality a good combination of quality, scan time and memory footprint represents a resolution of up to 600 dpi. If you plan to print images in large format in the future, you can set the scanner to the maximum resolution for individual photos on paper. If you intend to further process your photos, save them in the TIFF format, which provides lossless compression.
 Photographs on paper are easiest to digitize with a scanner - an MFP will suffice
 If your photos are for screen viewing or social media sharing, JPEG and PNG are also fine. The default color is 24-bit (8 bits per channel). Many scanners also support 48-bit - sounds more impressive, but for display or printing, this difference does not matter. However, if large-scale processing is planned, it is better to use 48-bit depth, even if your image editor does not support 48-bit color. Photoshop can do it, of course, but Photoshop Elements only partially.
 For rich slide collections, we recommend using a film scanner such as Reflecta's DigitDia 6000
We recommend using the programs preinstalled in Windows and OS X for scanning rather conditionally - they are inconvenient. It is not necessary to spend money on special scanning software - you can usually find it on the websites of scanner manufacturers for free. With the help of such software, for example, you can scan many photos in one fell swoop, then the program recognizes different images, automatically separates them, straightens and saves the result in separate files, so that later you can easily and simply create archives of scanned images. You can then process the photos, for example, using the Paint.NET editor.

If you don't have the time, desire, or equipment to scan yourself, contact photo scanning services - they are usually found in supermarkets and also on the Internet.
Slides and negatives
 Slides and negatives can be scanned by the CanoScan 9000F Mark II at 4800 dpi
 To digitize transparencies and negatives, you will need a scanner with a slide module with a resolution of 2800 dpi or more. If the pictures are large, the resolution should even be 4800 dpi. For the foreseeable number of slides, so-called slide copy adapters for digital cameras are also suitable - an affordable alternative if the rest of the camera equipment is already available. The third option is special scanners for digitizing slides and negatives, which can be purchased for up to 7,000 rubles.
 Nikon ES-1 is an adapter
 for lenses designed
for digitizing slides
Large collections can contain several thousand slides, and their scanning will take more than one month. If you don't want to mess with old photos for so long, contact a specialized service or get a film scanner that feeds frames with frames one by one, like a projector. The photo on the right shows one such device - Reflecta's DigitDia 6000. The nominal resolution of 5000 dpi will hardly seduce anyone, but for a picture in A5 format and displaying the quality of a digitized photo is quite enough. The RUR 115,000 price tag is daunting, but used devices are offered at a lower price on eBay.com. In addition, after completing the digitization of your collection, the scanner can also be sold on eBay or Avito's classifieds.
PHOTO: Juliane Weber; Hewlett Packard; Fujitsu; Sony; manufacturing companies
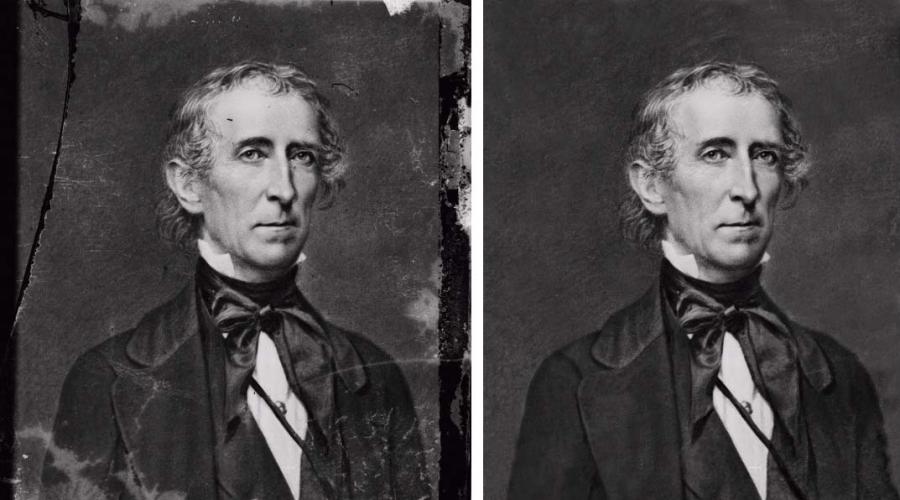
Many of us have old photographs gathering dust at home, taken in the last century and keeping the memory of numerous relatives and family celebrations, as well as capturing significant events. And, as a rule, they exist in a single copy, at the risk of being lost or accidentally destroyed. Digitizing photos is what will help save them and transfer them to a more modern medium. As such, they can be easily printed either in a digital printing center or on a color printer at home. In addition, digitized photos can be easily sent to friends and acquaintances, posted on all kinds of forums and social networks. But not always old photos can be of proper quality. Various age-related damage to photographic paper often leads to the fact that the image becomes unusable. But do not despair and throw away such photos. Digitization of old photographs is exactly what is needed in order to retouch and correct damage in the future with the help of special programs. In addition, digitizing a photo allows you to print a large image from small images in the future.
Where can i order the digitization of old photos?

You can contact any photo studio, photo studio or center of operative printing on this issue, but if you need a truly professional digitization of old photos in Moscow, contact the Kopimaster scanning center! The modern equipment, on which we digitize, allows us to get rid of the graininess of images, which cannot be achieved with standard scanners and printers. In addition, the hardware defect reduction capability can significantly improve the image compared to the original, and the digitized images will be available for viewing not only on a PC, but also on DVD-players or TVs, as well as on modern phones. By the way, we are not only dealing with small-format images, we also offer digitization of drawings, archives or books. Naturally, we also have a designer who will always help with retouching and processing old photos.
Have you wanted to digitize that dusty shoebox with old photographs for a long time? At the same time, you have already been interested in how much it costs in the darkroom. The prices for digitizing photos are incredibly overpriced. In this article, we will show you how to digitize a photo yourself using a mobile phone. Naturally, the better the camera of a smartphone or tablet, the higher the quality of digitizing old photos will be. Due to the high quality of modern cameras of mobile devices, you can count on fairly good digitization results.
Cooking software
The first thing to do is open Google Play or Apple App Store and install PhotoScan app.
Digitizing photos using your phone
Launch PhotoScan. You will see a short animated tutorial on how to use PhotoScan. Basically, you take four photos of each photo, moving one by one to the corners, guided by the prompts of the application. PhotoScan then creates one image of the old photo.
Click the Start Scan button at the bottom of the screen to get started
PhotoScan will ask for permission to access the camera, okay.
To scan a photo, make sure the entire image is in the camera area and then press the shutter button.
Then you will see four large dots and a large, empty circle that moves as you tilt the camera. Place a circle over each point until it disappears and then move to the next. When all the dots have disappeared, the photo has been scanned.

Next to the shutter button, you will see a thumbnail of your photo. Click on it to open the editing screen. Here you can crop, unfold and save the photo.

When you are happy with the results, click the back arrow in the upper left corner, a screen will open showing the previewed images. If everything is in order, click the "Save All" button at the top of the screen or click the three dots in the upper right corner, click "Select", tap the images you want to save, then click "Save"

PhotoScan will save the image to your device
Digitizing photos is a good chance to breathe a little youth into old and shabby photographs. If you have old photographs that you would like to transfer to your hard drive or CD, then digitizing the photographs will be the most rational way out.
Where can I scan photos
If, nevertheless, a decision is made to digitize the photos, then there are several places where it will not be difficult to scan photos:
- Self-scanning with a scanner. Such scanning can be performed if you have a conventional non-film scanner. Before starting scanning, you need to decide what resolution you need to set. Typically 200dpi is the smallest suitable resolution for a photo. This is due to the fact that at a lower resolution of the scanner, the details of the photo will not be clearly visible and often it will be impossible to make out some small details. If the photo is small, then it is recommended to set the resolution to 400dpi. After deciding on the resolution, you should pay attention to such parameters as contrast, color depth, color rendition. These parameters directly affect the quality of the scanned photo, and if you select them correctly, the resulting digital copy will not require post-processing.
- Photographic laboratory specialists will help you to scan photos professionally and with high quality. Here, the optimal scanning settings, color depth and more will be set for you. As a rule, photographic laboratories digitize and clean photographs using special algorithms:
- Standard algorithm. Scanning and processing according to this algorithm makes it possible to get rid of small scratches and hairs in the photo. As a rule, the cost of such a service is not very high.
- Advanced post-processing algorithm. Using an advanced algorithm, large scratches are removed. In addition, you can remove small gaps in the photo. This processing method is usually expensive.
The main disadvantage of photo laboratories is the high cost of services. Payment is charged not only for scanning photos, but also for subsequent processing, retouching and other tricks in a graphic editor.
- Another answer to the question "where to digitize photos" is the Yudu service. On the Youdo platform, specialists will help you scan photos professionally and with high quality with optimal settings and all kinds of cleaning methods. In addition, if additional retouching or other post-processing is required, the service specialists will be happy to provide such services.
How much does it cost to digitize photos
Depending on the number of photos, scanning parameters, retouching, post-processing and other parameters, the prices for digitizing photos may vary. So, the cost in different establishments will be different:
- If you order a digitizing service in a regular darkroom, then you will have to pay about fifty rubles or more for a standard frame without further processing and retouching. Also, in photo laboratories, additional fees are paid for retouching, post-processing and cleaning of defects from a photograph. These prices do not suit everyone.
- You can order digitization at the Yuda service, where specialists will perform scanning with suitable parameters, retouching, post-processing, digital cleaning of dust, hair and defects much cheaper than in a darkroom. All you need to do is order a service, choose a master, discuss the details and enjoy high-quality scanned images with your family and friends on your PC.
Today, almost every family has a digital camera. Five-year-old children probably do not even know that once their grandparents captured their lives on film cameras, and then developed photographs on their own using special light-sensitive materials and chemicals. Starting somewhere in 1990, such equipment gradually lost ground, making room for digital devices. However, in the attics of our parents' homes, you can still find priceless deposits of developed photographic films and 35-mm transparent slides in neat plastic cases, which they used to love to demonstrate at noisy home dinners, projecting images onto a white sheet.
The film has its advantages and disadvantages. The most important of these is the gradual loss of quality, although this happens much more slowly than many people imagine. Fortunately for us, special devices have been invented today that allow us to convert photographic films and slides into digital format, thereby preserving precious memories forever. Old tapes today can be easily digitized and even restored by software, bringing back the brilliance of a bygone life.
So, to digitize films and slides, you will need:
1. Scanning device.
2. Software.
Scanners
Most so-called MFP devices that allow you to print, copy and scan documents, such as the Canon Pixma MG8120, Epson Artisan 725 or Artisan 835, come with an integrated flatbed scanner that is quite suitable for scanning photos. However, as a rule, such embedded devices have low performance. Therefore, it is better to prefer a flatbed scanner that has a special external module for scanning 35mm films. Among the most popular models, we will advise you to stop, for example, on Canon's CanoScan 9000F... This flatbed scanner provides high resolution scanning of film and slides at a good speed. So if you have a ton of slides, then you will save yourself time and hassle.

The main advantage of scanners like the CanoScan 9000F is that they can scan several slides at the same time, while the software of the device automatically crops individual frames. True, this slightly increases the processing time for each scan, but it is not at all critical. Keep in mind that scanning multiple slides will only be effective if you have a dedicated film tray. If not, the amount of time you spend editing and splitting images into separate files will eat up the time saved in the scanning process.
There are also so-called professional film slide scanners, for example, from Nikon, but their prices are quite high, but the quality of the resulting digital image is incomparably better. Slide scanners are designed to scan films of various formats, not only 35 mm, in addition, they allow you to work with both positives and negatives, providing a very significant productivity. At the same time, the company guarantees accurate color reproduction, and high-quality software allows you to automatically adjust the quality of the resulting image.

All scanners come with utilities that provide basic image editing functions - removing distortion, noise, cropping, adjusting color, contrast and brightness. Generally, these options work well. But in order to correct such imperfections of the film as water damage, cuts, tears and stains, you will have to work on the resulting digital image using special software.
Save images
Scanned images can be saved in any format. The most common and commonly used is JPEG, however this format has drawbacks. The most important is "compression", which is characterized by the loss of nuance and detail. If this matters to you, then it is better to save scanned digital images as TIFF files. TIFF files take up more space than JPEG files and can save photos either uncompressed or compressed, but without losing image quality. In addition, TIFF files are great for further editing with specialized programs. Remember one more rule: never compress the image several times, this degrades its quality many times over.
Choosing a resolution
Most drivers and utilities of modern scanners independently select the best image resolution depending on the type of environment, the balance between file size and image quality. If you are going to print ordinary 10 x 15 photos, then you will only need to set the resolution from 150 to 200 dpi. If you are going to turn your old photographs into real works of art, then choose the highest possible resolution - up to 600 or even 1200-1600 pixels per inch. In this case, you can work on every detail, save every little thing of your past. Before choosing a resolution, experiment with the settings and choose the quality that suits you.
Software
Naturally, professionals will choose the level of software that is currently in the CS5 version. The cost of the program is $ 599, so it is unlikely to suit ordinary users. A simpler and, most importantly, cheaper option is, which will cost you only $ 99. Photoshop Elements 9 provides the same tools for removing imperfections in images, including spots and scratches, as well as many more sophisticated tools that will delight any user ... Many experts consider this program to be one of the best for home use.
If you do not intend to shell out money for licensed software, pay attention to the free raster image editor - Gnu Image Manipulation Program or in short. Despite the unfortunate name and somewhat awkward interface, this is a fairly powerful program that has almost the same set of tools as the famous Photoshop, gives good results and at the same time, as already mentioned, absolutely for free.
It is not enough to have a good flatbed scanner to get high quality digital images. It is important that it is in excellent condition, otherwise additional imperfections may appear on your scans in the form of white dust crumbs, dark grease spots, and more. Therefore, before starting scanning, we recommend that you clean the device (if it is not new). To do this, you can use special Defender wipes or a soft, lint-free cloth dampened with:
In glass cleaner;
... in a liquid for cleaning optics (ordinary glasses);
... liquid to remove dirt from LCD screens.
After removing dirt and dust, wipe the scanner glass dry using no materials that could scratch or damage it. Never use alcohol, water, or any kind of solvent.
The better the quality of the slides, the less time you will spend fixing the flaws. Therefore, films and slides should be cleaned of dirt and dust before scanning. Special non-abrasive wipes and safe cleaning products for photo materials can be found in specialized photo shops. There are several ways to care for films:
Dust removal with compressed air can. Do not heat or shake the container so that it does not spray the films with water, in which case you will have to wash and dry the films. For effective cleaning, stock up on white cotton gloves and patience. Press the cylinder button gently, hold the slides by the edges so that the compressed air jet is directed at them from the side at a distance of about 8 cm.
... Cleaning with antistatic wipes. When using napkins, take the film or slide by the edges, wrap the napkin delicately so that it adjoins on both sides, without pressing, run the napkin along the entire length of the film or slide.
... Cleaning films with water. The most difficult and longest way. Attach the uncut films to the clothesline in the bathroom with clothespins, and if the films are cut into separate slides, unfold the paperclip, thread the slide through the perforation window and also hang it on the string. Carefully, so that the films and slides do not touch or scratch each other, pour them with cold water at a temperature of 5 - 10 degrees from the shower for 20 - 30 minutes. Blow off water droplets with cold air, blot them with dry Defender wipes.
Attention: Handle all photographic materials with extreme caution! Handle transparencies and slides by the edges only. Never touch the photosensitive emulsion applied to one side of the films with your fingers. Even if you feel like your hands are completely clean and dry, a small amount of salt and grease from our skin will leave imprints on the film.
It's good if you have a special tray that holds the film on the scanner. Otherwise, you will have to take care of how to attach it to the glass. Never use household tape or duct tape for this purpose. The problem is that they leave traces on the photographic materials and the scanner glass, which are practically not washed off. It is best to use special pH neutral art tapes that are used for decorating work. At the same time, they should still be attached not to the glass, but only to the frame around it.