How to draw a lush Christmas tree with a pencil step by step. How to draw a Christmas tree with toys and Christmas garlands in stages is easy and beautiful: master classes for children
Take a piece of paper or sketchbook, pencil and eraser. Ask your child how he will decorate the hedgehog and prepare pencils, felt-tip pens or paints with a brush.
Tell your child the rules for how to work with paints.
- Prepare and moisten the paints with clean water;
- mix paints on a palette (white paper) without forgetting to rinse the brushes;
- smoothly cover the surface of the background and characters in the composition;
- at the end of work, wash the brush, do not leave it in a jar of water, but wipe it with a cloth;
- at the end of the paint work, put the pencil in boxes or in a pencil case.
How to draw a Christmas tree


Step-by-step instruction "Step by step" how to draw a Christmas tree.

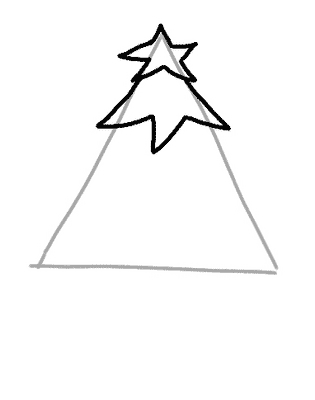
1. Draw a triangle. Now draw a star at the top of the triangle. Leave enough space to add the rest of the tree.

2. Draw the top part of the tree, which has three branches, as shown in the picture. Don't try to draw too precisely; not perfectly straight lines will look better. The ends of the branch lines should be attached to the star.

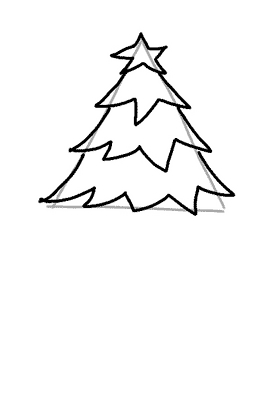
3. Now add two more rows of fir branches. Moreover, in each subsequent row of branches, one more is added. Thus, 1 row - three branches, 2 row - four branches, 3 row - five branches.

4. Then just draw a bucket under the tree and attach it to the tree using two lines that will be the trunk of the spruce. Add two lines down the center of the ribbon bucket as shown. Erase all construction lines.

5. Draw a bow on the ribbon and draw a ball on each branch. Give the star on top of the tree a sparkling effect. Our Christmas tree is ready! You are great!

6. Now you can start coloring.
Whatever your child draws, be sure to praise him and hang the resulting masterpiece on the wall so that the child feels like a real artist.
How to draw a Christmas tree
We offer a version of the Christmas tree, which you can decorate as you wish.

Send us the resulting picture by e-mail. Indicate I.F. child, age, city, country where you live and your baby will become a little famous! We wish you every success!
Less than a week is left until the most important holiday of the year, so more and more people are engaged in creativity and create a New Year's mood for themselves. And it is for such people that several master classes are presented below on how to draw a Christmas tree step by step for novice artists with a pencil.
Before starting work, you should get the following things in advance:
- A4 white sheet or even more;
- simple soft pencil;
- eraser;
- sharpener (just in case);
- colored pencils or paints as desired.
And here are the main stages of work:
A large triangle is drawn on the sheet - it depends on its size what the future Christmas tree will be at the very end. If necessary, you can use a ruler to keep the lines as straight as possible.

After that, the top of the future tree is drawn in the form of wavy lines, as shown in the figure below.

Now it's worth drawing the branches below in exactly the same way. They do not have to be a single whole, but as if they go scattered.

At the next stage, the most lush part of the tree is drawn and the auxiliary triangle is erased. This should be done as carefully as possible so as not to erase too many necessary details. Of course, after they will need to be finished again.

A short but reliable tree trunk is drawn with straight lines. Since the tree is New Year's, it is not on the street, but transplanted into a pot that appears on paper at the same stage.

Now comes the fun part. The tree needs to be decorated with garlands, as shown in the example below. But you can also turn on your imagination and decorate the Christmas tree at your discretion.

At the last stage, New Year's toys, snowflakes and any other New Year's attributes are drawn at the discretion of the artist.

It remains only to decorate the resulting drawing so that it becomes "alive" and looks more interesting in a frame on the wall.
Now you know how you can draw a Christmas tree with a pencil in stages, but this is not the only lesson for beginners in our article today.
Little herringbone
The next option is a little lighter than the previous one, and the holiday tree looks very cute and attractive. Even children can cope with such a pattern.
So, in order to show all your possibilities in drawing, it is enough to go through the following steps:
A4 sheet is placed vertically and a straight vertical line is drawn in the middle of it. Its size will correspond to the height of the future Christmas tree, so this point should be thought out in advance. In the same way, you can draw several small Christmas trees on one sheet.

At the very top, just where the depicted line ends, a Christmas star is drawn. It will become the main decoration and should be quite large. You can also draw eyes or a funny face on it for fun.
If I may say so, the tree will have three tiers that complement each other. At this stage, he begins to draw on paper the top level in the form of a mountain with jagged ends.

After that, the next part of the Christmas tree is drawn. Everything is done in the same way as in the previous step, only this time the "mountain" should be slightly larger.

The penultimate stage is a detailed drawing of the lower part of the tree. Of course, it will be bigger and more magnificent than all the previous ones. Now you need to finish drawing the visible trunk and the horizon line at the bottom so that the tree does not "hang in the air".

At the very end, all kinds of New Year's decorations and garlands are drawn, which will sparkle with multi-colored lights.
Most often, for novice artists, it is important not only how to draw a Christmas tree step by step with a pencil, but also what colors it will be presented in. So it's time to pick up pencils and trust your inner voice.
Christmas tree from the cartoon
In Soviet times, many holiday cartoons dedicated to the New Year were released. And we all probably liked the festive spruce, whose branches were crushed by snow and decorated to such an extent that they sometimes dazzled in our eyes.
It is very easy to draw a similar Christmas tree yourself. And this can be done in just 4 steps:
In a familiar pattern, a triangle is drawn on a piece of paper. An auxiliary horizontal line is neatly drawn from its very top. With its help, it will be possible to harmoniously finish the tree trunk, stars and a stand for the spruce.

It's time to start drawing the left side. To do this, smooth lines with pointed tips are drawn on paper. Sometimes they bifurcate, sometimes they remain fused. This will make the branches look more harmonious. At the same stage, a pointed star is drawn on the top of the tree and its lower branches.

In the same way, the right side of the Christmas tree appears on paper and both sides are connected with wavy lines. It remains only to finish drawing the trunk and stand, as well as New Year's toys or a small amount of snow.

After the step-by-step principle of drawing a Christmas tree with a pencil for beginners has become clear, all that remains is to erase additional lines and paint the resulting masterpiece with paints or pencils.

Such a drawing can be a good basis for a homemade New Year's card or for a gift to parents. You can also hang it in a frame on the wall or send it to a creative competition for young talents.
The last holiday version of the picture
So that it does not seem there at the very beginning, but there is nothing difficult in drawing a Christmas tree on your own with a pencil. How to do this in stages will be shown below for novice artists.
All you need is a pencil, paper, an eraser, a little time and self-confidence. And even if it does not work out the first time, this is not a reason to quit creative pursuits.

So, let's start with the simplest:
- A flat horizontal line is drawn in the middle of A4 or A1 sheet. To do this, you can use the ruler.
- Based on the example below, an asterisk is neatly drawn, which will become the main decoration on the festive Christmas tree. It can be supplemented with interesting elements.
- Now two arc-shaped lines are drawn from the star - they should smoothly diverge to the sides and connect with each other in a zigzag strip. You shouldn't rush at this stage.
- A similar element is drawn below, which should start from the second zigzag on the right, and then on the left.
- The third part of the tree is drawn according to the same principle, but differs in size. After that, a trunk visible from under the branches is drawn.
- It remains only to decorate the New Year's beauty with green paint and the drawing will be complete. For harmony and an "interesting look", it is recommended to paint the upper part of the tree with light shades, and everything else with dark colors.
- As soon as the paint dries, you can paint festive toys on the branches of a tree with multi-colored paint, as well as depict a beautiful background with snow.
Now everyone can draw a Christmas tree and even use different variations for this. But don't stop there - use your imagination and don't be afraid to be original.
Christmas tree
On the eve of the New Year holidays, the question of how to draw a Christmas tree becomes especially relevant. After all, it is she, the green beauty, the center of the holiday. Round dances are performed around her, she is decorated, gifts are hidden under her lower spreading paws. And what a winter landscape could be without its thick and fluffy branches under the snow. We offer some interesting lessons on how to beautifully and unusually depict a popular winter tree.
Step by step example
First of all, let's take a look at how to draw a Christmas tree in stages. To do this, let's try to draw a festive tree with decorations and garlands.
Stage 1
Let's prepare the basis for the future drawing. To do this, draw an equilateral triangle with a base, slightly fewer sides. In the center of the base, we designate the trunk or place of installation of our spruce.

Stage 2
Let's give the appropriate shape to the contour, as shown in the figure.

Stage 3
We outline the decorations with light lines: a garland, balls and a star.


Stage 4
With auxiliary lines, we will depict gifts lying under the lower branches. The sketch is ready.

Stage 5
We draw more saturated lines with a pencil (or a felt-tip pen, or a pen): first the outline, then decorations and gifts. For a more voluminous drawing, add details: the threads of the balls, additional touches of the twigs and ribbons on the gift boxes.


Stage 6
Removing construction lines.

Stage 7
The finished drawing can be colored, or you can leave it in black and white. In the second case, it makes sense to add shadows under the balls, on gifts, to depict the glow of a garland and a star.
Pencil

The method below for how to draw a Christmas tree with a pencil is quite simple. To execute it, you only need a good pencil of medium softness and a little patience for drawing the needles: in this case, the spruce will turn out to be the most realistic.
First of all, we will draw a trunk and a piece of land from which the tree grows.

Then start filling it with twigs and needles, starting at the top of the head.

You should not try to do it very evenly, since in nature trees do not have perfect symmetry. Let some branches be a little shorter, some longer. It is more important to carefully and tightly fill them with needles.

Draw branches with needles all the way to the base.

Now you need to add volume to the drawing by adding shadows on the trunk, below the branches and near the grass on the ground. The drawing is ready.
Beautiful tree

The proposed way to beautifully draw a Christmas tree under the snow is very unusual, but at the same time uncomplicated.
We depict the triangular contour of the Christmas tree.

This path, starting from the top, is filled with unusual shapes, as shown in the picture. This is snow lying on the branches. Fill it not symmetrically, but as evenly as possible.


After that, you can add snow on the ground and snowflakes for the atmosphere.

Now we need to draw the branches themselves. To do this, under the white specks of snow, shade tightly small areas, as shown in the figure.


The remaining unfilled areas are worked through with lighter shading to indicate soft shadows.

The result is very good and unusual.
A simple example of a Christmas tree

This method of how easy it is to draw a Christmas tree will suit even young and not very experienced artists. The resulting tree can be painted, and decorated with Christmas decorations, and "powdered" the snow in the winter forest.
Let's see how beautifully to draw a Christmas tree in stages.
Step 1
We draw the visible part of the trunk with the root system.


Stage 2
We start from the bottom to fill the tree with twigs and needles. The smaller and more detailed the needles depicted, the fluffier the spruce will turn out.


Stage 3
Gradually narrow the outline of the tree towards the crown. The Christmas tree is ready.

Christmas tree

This is another easy way to draw a Christmas tree.
First of all, draw an auxiliary contour - a triangle on the leg.

Along this contour, use rounded lines to mark the Christmas tree branches, as shown in the figure.

We connect them into a general shape and add a visible trunk.


Remove the auxiliary lines and decorate with a star on the top of the head, Christmas balls, a garland and candy canes.


The Christmas tree is ready!
An example of a Christmas tree in pencil

The sequence proposed below on how to beautifully draw a Christmas tree with a pencil will be useful for both the New Year's version and for an ordinary Christmas tree. A complex and beautiful result is achieved not so much by special skills as by accuracy and patience. Be sure to try to portray such a tree!
You should start with the auxiliary contour lines of the tree itself, the trunk and the stand.

Along the spruce triangle, mark the position of the branches, first the main ones, then filling the small ones.


The sketch is ready. Now we refine the drawing with a darker pencil or felt-tip pen. Let's start with the decorations. On the Christmas tree balls, we imitate a glossy shine with light specks.


It's time to get down to the twigs. We begin to apply needles along the auxiliary lines. First along the contour, then - inside.


Select the trunk, branches peeking through the needles and decorations and draw a stand.

Fill the whole tree with needles to make it look fluffy.

The finished Christmas tree can be supplemented with bright colors.

Useful video tutorial
Be sure to take a look at this video tutorial. It depicts 10 different ways to draw a Christmas tree.
I have carefully selected several schemes for drawing a Christmas tree different difficulty levels. Choose the one you like best.
Some of the schemes are in this video!
Method 1
Although the method is the most difficult, but this Christmas tree pretty pretty. And given the fact that all kinds of gifts are conveniently arranged under it, it is generally wonderful. This diagram shows how to draw such a tree step by step.
Method 2
And this is real forest beauty, lush, luxurious and so beautiful! I hope the circuit is not too complicated for you.

Method 3
Here is another Christmas tree with big asterisk... You shouldn't forget about her either. Such decoration has already become traditional!


Method 4
This diagram shows in great detail the process of creating a small New Year's masterpiece. First you need to draw a triangle, and at its top a beautiful star.

The tree must somehow hold on. I propose to put it in a bucket.

It remains to add some decorations, toys, bows and, of course, color. Paint the tree diligently. That's all!


Method 5
This tree is based on a large triangle... Attached to it stand, branches, decorations.

Method 6
Another good scheme and again with gifts=)

Method 7
And this one is not bad, slender, lush, easy to perform. But it's up to you!)

Method 8
The last diagram will help you learn how to draw a Christmas tree in the most naturalistic way.

With the trees, it seems, we figured it out. If you don't really love draw, can be made of paper, cardboard or fabric. You can find interesting tips on how to do this in.
What could be easier than drawing a Christmas tree with a pencil in stages, probably just a snowman or an icicle :)
Here is a simple step-by-step diagram for drawing an elegant Christmas tree for the new year.
This video master class shows in detail how to draw a Christmas tree with a pencil in stages, even if this tree is not quite real, but also very beautiful :)
Christmas tree with gifts
Another video tutorial on drawing a Christmas tree with a pencil in stages, as well as an idea of how you can paint a Christmas tree with colored pencils:
The image below shows a diagram of how to draw a Christmas tree for primary and secondary school children. The drawing looks simple, but it requires accuracy, the smoother the needles are, the more beautiful the drawing will be.
Draw slightly curved lines from the vertical main line, which depicts the pillar of the tree.
At the top we draw small ones, towards the middle we draw longer and the lowest ones are long.
Draw small needles on each branch. On the branches, you can draw balls, stars, the lower plan can be decorated with beads.
The video shows another option for how to draw a Christmas tree.

There are many options for how to draw a Christmas tree with a pencil step by step. You can start with skeleton skeleton trees, and then finish painting the branches, which become wider and more luxuriant towards the base.
You can start as the tree looks like - a triangle, gradually adding branches, making the tree more and more lush, and then New Year's garlands, toys, gifts under the tree, as it seems.
The first way. Starting with the frame and then finishing the tree:

Second way.
First, imagine a triangle that will become a tree.

Then we draw cloves on the sides and bottom of the tree.

Let's outline it more clearly with a pencil (marker, pen).

Then decorations appear on the tree. At first, draw only the outlines. We also draw gifts under the tree arbitrarily as much as you like, as you like, of any shape and quantity, as you like.

We outline the contours of jewelry and gifts with a pencil (marker, pen).

Paint the tree green by drawing the needles in one direction. Let a small unpainted space remain under the toys on the tree, we also depict the backlight.

Add a little dark green color to the whole tree. This helps to achieve volume. Let the white space be clearer under the toys on the tree. The toys on the tree are decorated with different colors.

Gifts in different colors.


A fluffy forest guest, who pleases us with her appearance every year in our homes, seems to be easy to draw if there are detailed step-by-step sketches. First, we determine the size of the Christmas tree on a sheet of paper. Then, how lush it will be, how many levels, for this we draw parallel lines on both sides along the trunk. To make it easier, you can imagine the Christmas tree in the form of a triangle, just ignore the very top of the tree, leave it for the star:

I think that it will be quite easy to draw a New Year's bow, following the step-by-step scheme below, alone or together with the child.
So let's get started:
Step 1:

Step 2:

Step 3:

Step 4:

The result is such a New Year's tree. Now e can be colored, for example:

New Year is the most favorite holiday of the majority. And what a holiday without Santa Claus, Snow Maiden and, of course, a Christmas tree.
It is not so difficult to draw a mandatory attribute of the New Year's holiday - a New Year tree. The main thing is to follow the tips in the figures below.
For example, as an option


well, the third version of the Christmas tree.

Well, the option is more complicated:


Drawing a Christmas tree is not difficult. In the visual arts, many objects are depicted by means of an initial schematic drawing. For a Christmas tree, a simple geometric triangle shape is suitable. As you know, the branches of the Christmas tree look down, they are shorter at the crown, much longer at the base, which gives the tree a triangular shape.


Taking this as a basis, we draw our Christmas tree:

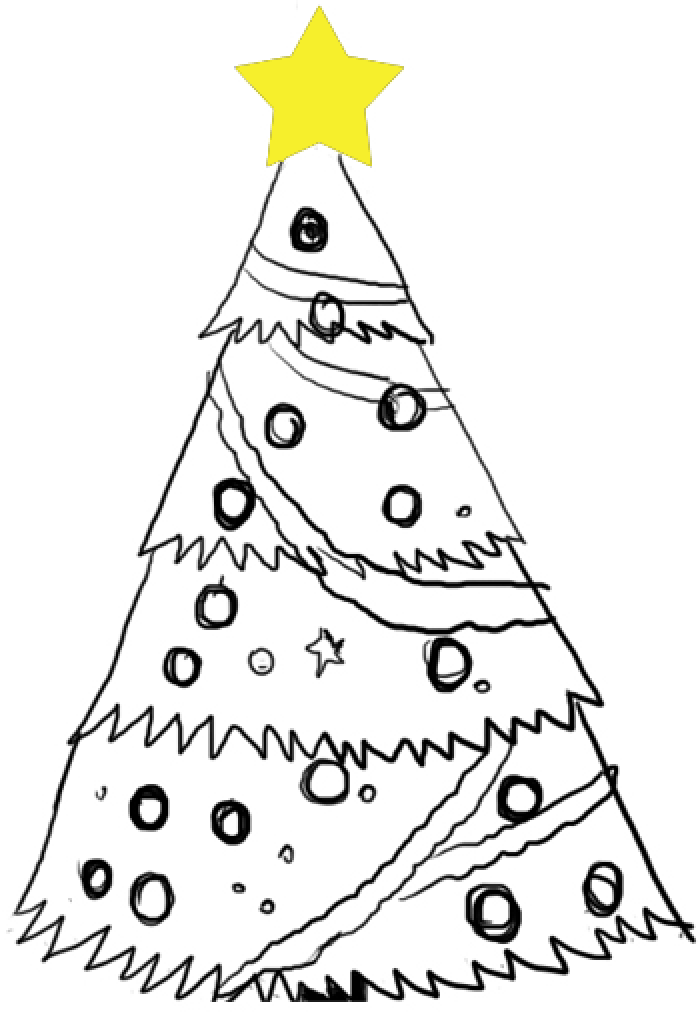
It remains to add decorations (balls, bumps, lanterns, bows, etc.) and our tree is ready. even a child can handle such a pattern:

you can try to draw a Christmas tree in a different way. Namely, to depict the trunk and branches of a tree diverging in different directions:


If you add New Year's toys to such a Christmas tree, you get a real festive beauty.
The most popular pattern in the winter season is the Christmas tree. It is a pleasure to draw it, since during the drawing process, as soon as imagination does not play. The Christmas tree can be drawn with paints, as well as with a pencil. The most important thing is to find a drawing for inspiration.
The smallest can use this scheme:

More experienced ones can try to sketch such variants of Christmas trees with a pencil. The main thing here is to draw the frame of the Christmas tree, the base (trunk and branches), and then finish drawing the needles, Christmas decorations, gifts under the Christmas tree.


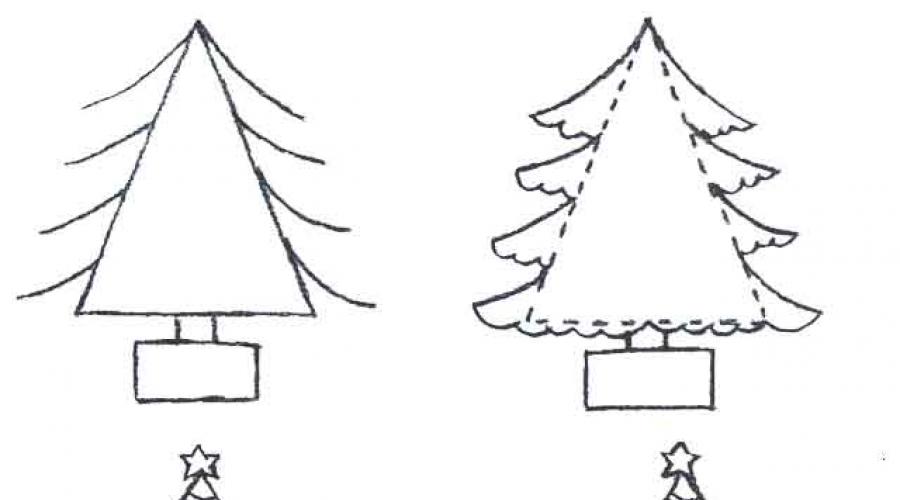
Draw New Year's bow in stages will not be difficult if you follow the instructions below. First we draw a large triangle, this will be the base of the tree itself and the square is the lower part of the trunk of the loch. Next, we draw three levels of branches, an asterisk at the very top of the loch and begin to gradually draw toys. After that, we color the line and the drawing is ready.

On this site, you can not only look at pictures of how to draw a Christmas tree in stages, but even watch several videos where everything is explained in a very accessible form, after which even a child can draw a festive tree on his own.

And here is also a completely uncomplicated image of a Christmas tree, which we will draw in stages.