How to scale the drawing on paper. Drawings, measurements and marking
Quite often to increase (or reduce) several times any drawing, drawing or scheme. For example, in the magazine you liked patterns for burning. But in the magazine, they are usually given in a reduced form, so they have to increase them to the desired dimensions on their own either by hand "cell method" or using instruments: epidiascop, or pantograph (copier).
Pantograph (the name comes from two Greek words (Pantos) - all and Qrapho - I write) - the device in the form of a sliding hinge parallelogram for redrawing patterns, drawings, circuits in another (enlarged or reduced scale). The main advantages of this instrument are simplicity of design and high enough "accuracy" of the copied image. Unfortunately, Pantograph has not yet found proper recognition from amateur artists and other hand tools for decorative and applied arts.
On sale now find pantographs (copiers) of industrial production is very difficult. In addition, the line of such pantographs is relatively small, and they are made of metal, which does not make the device quite convenient. So God himself ordered to make a pantograph (copier) with wooden long rules.
Pantograph is quite high quality can make anyone who wants with their own hands, subject to the exact dimensions of all parts.
.
The design of the homemade pantograph (copier), which we want to offer to your attention, consists of four lynch levers (three long and one short), in which holes for fixing the axes are drilled in a certain order. Brass sleeves are inserted into the lines holes.
The axis of the mechanism of pantograph of various designs, two central axes are a stud with a hat. The axis for fastening the griffel (copier) and the tracking rod are made like the device for the clamping of the griffel in the feet of the circulation. As a tracking rod, it is desirable to use a plastic tip. Such a tip does not spoil the original and provides good sliding softness. One axis (extreme) with a heel, which relies the mechanism of pantograph, and, finally, the axis fixing the entire mechanism at the base of the base.
All axles have an annular groove in the upper part that serves to fix the wire clip-clip.
The bobbish is metallic. The bottom in the bug was realized by three sting (pathamnel needles), allowing you to easily fix the base on the drawing board.
The line is best to make plastic, for example, from plexiglas (plexiglass), 5 mm thick. The most responsible operation is the markup and drilling of holes in the rules, so it needs to be related to particular attention. To ensure high accuracy and alights of the holes, it is enough to mark on the same lineup, fold all the rules in the package and drill along the hole layer in all rules per reception. Tear diameter Try to do so that the sleeves entered them tightly, with a little tension.
The bushings are pulled out of brass in size data in Fig. 2. Axis - steel. The length of the axes is directly dependent on the length of the sleeve. Wire Studs Clamps Bend from steel wire with a diameter of 1.2-1.5 mm.
The base base can be made from an aluminum block with a thickness of 39 mm. In the lower plastic of the bobbies in the deaf holes, close the three needles with a core (can be from a pottefone), so that their tip is 2-3 mm.
Specification of details of the homemade pantograph
| Concrete designation details | the name of detail | number | Dimensions in mm | ||
|---|---|---|---|---|---|
| Length | Width | Thickness | |||
| BUT | Line Big | 3 | 406 | 20 | 5 |
| B. | Line Malaya | 1 | 220 | 20 | 5 |
| IN | Base (boss) | 1 | 60 | 40 | 30 |
| G. | Busheka | 12 | 8 | - | Ø8. |
| D. | The axis is fixed | 1 | - | - | - |
| E. | The axis-support with a heel | 1 | - | - | - |
| J. | Copier axis (original) | 2 | - | - | - |
| Z. | The axis is average | 2 | - | - | - |
| AND | Stud-clamp | 6 | - | - | 1,2-1,5 |
 When all the details are ready, collect a pantograph mechanism. When assembling and fitting parts, try to achieve the ease of movement of all the mechanism links, for which their rubbing surfaces can be slightly lubricated.
The final operation of making a self-made pantograph is your own hands marking holes on a ruler, according to which it will easily choose the scale of the increase (decrease) of the copy.
Matching the labeling with the resulting dimensions must be valid by experimental.
How do you work with pantograph (copier)?
 First of all, the table is fixed at some point pole (needle) pantograph. The drawing from which you want to shoot a copy are placed where the spire is located, and the blank sheet of paper is under the pencil. Next, spend on all lines of the drawing, while the pencil automatically draws an enlarged pattern on paper. And if you need to portray a drawing in a reduced form, we will have to use spiers and pencils, which in the presence of the sleeves is absolutely difficult.
Usually when working with a pantograph, the hand draws the spire along the pattern lines. In this case, on the lineup next to the pencil will have to strengthen the cargo (nut, lead plate) so that the pencil is pressed against the paper. But you can copy and differently. Namely, it is not a spire to keep a hand, but a pencil, after this, at the right side of the mark on the pattern lines. In this case, the load on the line is understandable, you will not need.
And a few more practical advice.
If the original with which the copy is removed is too large and walk on the spire on all its lines, it is not possible at once, simply stop the needle to a new place and continue to work.
With increasing (or decrease), the pattern or drawing straight lines and circles are usually replenished with poor quality. Therefore, it will have to fix a similar marriage using a ruler and a circulation.
It is known that quite good accuracy of the copy is ensured by increasing the original no more than 2 ... 3 times. Therefore, if necessary, increase the drawing 4 times better to first consolidate the original 2 times, and then the received copy again increased by 2 times.
The dimensions of the pantograph of the pantograph is not rebeling to change, making less, for example. In this case, the method of calculating the positions of the positions of the holes on the rules remains the same, that is, the length of the working part of the line will have to be divided into the zoom coefficient.
Drawing - language of technology. According to the drawings, the engineer, technician, a qualified worker is disassembled in the device of any mechanism; According to drawings, simple and complex details of each machine are manufactured. The members of the mug "skillful hands" are not yet engaged in school draw. They will begin to draw only in the 6th grade in the lessons of geometry, and the technical draw will get acquainted later - starting from the 7th grade. However, in the circle they will have to often use simplified drawings and technical drawings (sketches) of various products. Many of these drawings and drawings are printed in this book. That is why the members of the circle need to learn how to read simplified drawings and understand the conditional designations on them.
How to read drawings
On any drawing of fatty, contour lines indicate the contours of the subject. Sometimes there are intermittent lines in the drawing - dottedconsisting of separate drops. Such lines indicate the contours of the item that are not visible when looking at it outside or from some one side, as they are hidden inside the subject or closed from the eyes, for example, its front wall.
The thinnest lines in the drawing are called Dimensional: They show the size of the subject. At the ends of such a line there are arrows. They are connected by dotted dashes with a subject circuit. The dimension line is usually bursting in the middle, and the figure is put in the gap. According to the rules of the drawing, all sizes in the drawings are indicated in millimeters, so there are not stagnant with the numbers. The digit on the dimensional line shows how many millimeters from the island of one arrow to the island of another.
Very small distances are denoted without dimensional line, and sometimes two arrows with a number between them. Next to the designation of the diameter (thickness) of the round rod or the holes often put the icon similar to the letter "f": a circle, crossed by oblique line. This icon shows that the drawing shows a round item.
Fig. 61. Designations in drawings and sketches. |
Sometimes, especially on paper and cardboard products, instead of drawing a finished thing is given to sweep it. Such a scan on the specified sizes is drawn on paper or cardboard, then cut and bend. The folds of the sweeps on the scan show also dotted lines - the same as invisible contours of objects in the drawings.
Next to the general view of the subject in the drawing or figure, individual parts (parts) are often depicted in an enlarged form. Where these parts are placed on a general drawing, indicate in two ways: arrows and identical letters or numbers.
Letters (alphabetically) or sequence figures sometimes denote, in what order should be collected from individual parts the product or process some part. In order not to confuse these numbers with the designations of the sizes, they are usually affixed in circles.
Very long details that can not be placed on the drawing or picture, draw abrupt by one end or torn in the middle. The sizes are full.
In the figure of products, the dimensions are not always indicated, they are often given only in the text of the description. In this case, abbreviated dimensions are used. For example, the designation of 40 × 15 mm denotes that the part is in length 40 and in a width of 15 millimeters. The designation 40 × 15 × 10 mm shows that three dimensions are given: length, width and height (thickness). If you want to specify the width and thickness of the rail (then-there is sizes in the context), they write, for example, as follows: Rake with a cross section of 8 × 5 mm.
Abbreviated names of measures in product descriptions are used as in school textbooks: M - meter, dtsm - decimeter, cm - centimeter, mm - millimeter, kg - kilogram, g - gram.
Increase drawings and drawings
In books, drawings and drawings are printed small. Often they have to be crossed into full (natural) magnitude. Straight lines of the desired size of the young technique on the line is not difficult. It is much more difficult to accurately depict the complex winding contours in an enlarged form. In these cases, the drawings are given on the grid.
To enlarge the drawing, you need to draw as many large squares on a sheet of paper as small in the figure. The required sizes of squares are indicated in the text of the description. According to these squares, the drawing is applied. The grid breaks it on short lines that are much easier to draw correctly, referring to the pattern.
Increase drawings and drawings can also be using epidiascop. It is quite suitable for this homemade epidiascop described in this book on the page. Figure or drawing that need to be enlarged, put into the epidiascop and design on a sheet of clean paper, fixed with buttons on the board or on a sheet of plywood. The screen and epidiascop are installed so that the desired increase is obtained, and the image was clearer.
The contours of the image will be reduced on paper with a pencil - it turns out an enlarged pattern, in which all the details are accurate.
Finally, it is possible to increase or decrease the drawings and drawings in another way - with the help of a special device called pantograph.
Homemade pantograph
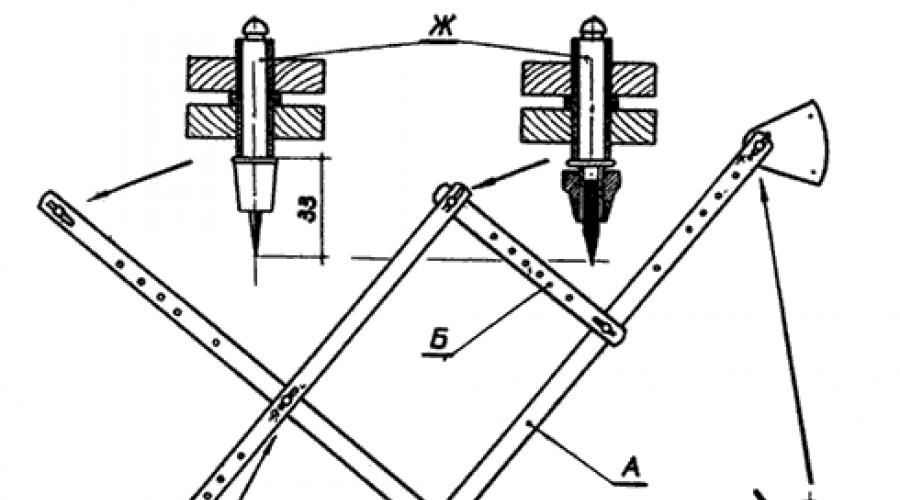
For a pantograph of plywood, four plans 610 millimeters long and 12 millimeters wide. The width of the planks can be increased or decreased, the thickness of them does not matter. But the already thinner the planks are made, the more convenient to use Pantograph. Each bar is drilled by 11 holes at such a distance from each other, as indicated in Figure 64. All holes must be the same diameter - approximately 4 millimeters. Holes other than two extremes are marked with numbers: 1.5; 2; 3; four; five; 6; 7; eight; 10. These figures are indicated by how many times the drawing increases or decreases. We agree, "that the end of the plank, where the number 10 is worth, will be considered the bottom, and the opposite end is the top. The distance between the extreme holes is 600 millimeters.
Five pins of such a size are cut out with a wooden rail with a knife or a suitable sticks so that they enter the holes of the planks and could make two strips imposed on each other. Three pins are made with semicircular ends, the fourth - with a pointed and the end of the fifth insert a patephone needle with the tip down.
Of the two slats collect the square. In the lower end of the first strip, the pin with a patephone needle is inserted, and the second strap is a piece of a pencil with a pointed soft blade. The free ends of both planks are applied to each other and connect a pin with a semicircular end. So that the pencil is better pressed against the paper, the end of the rack near it is weighting: they attach the metallic (best lead) plate.
Of the two other slats, the second square is collected by connecting the lower end of one plank with the top end of another. The opposite ends of these slats remain free.
The remaining pins connect both squares together. This is done before using a pantograph for work. Suppose you need to increase some drawing four times. Sliding the free ends of the squares, they are superimposed on each other so that the rails disaster in those places where the holes with the digit "4" are located. Pins in these holes and insert pins. If the drawing should be increased twice, then the squares are connected to the pins inserted into the holes "2", and so on.
All pins are well cleaned, make them smooth. They must enter the hole tightly, but not too tight so that the pantograph strips can turn freely around the pin. Use a pantograph simply.
 |
Fig. 64. Pantograph. |
On a piece of plywood or on a smooth board, a drawing is put, which want to zoom, and next to it is a sheet of clean paper. The top of the pantograph is superimposed. To secure it, the needle one of the pins stick into the board. The pointed pin is installed in the figure, and the pencil is on a sheet of clean paper. The sharp pin is cast along the contours of the pattern or drawing. Pantograph's planks move, and the pencil draws the same contours on paper, but in an enlarged form. The rail with a pencil is slightly sticking with his left hand, not interfering with it.
With the help of a pantograph, you can, on the contrary, reduce a large drawing. To do this, you must swap a sharp pin and pencil. How are the holes on the planks?
The length of the bar between two extreme holes for pins is 600 millimeters (the remaining 10 millimeters at the ends of the plank is not accepted). Dividing 600 millimeters to a number indicating the degree of increase, obtain in millimeters the distance of the corresponding opening from the lower end of the plank. For example, to increase three times, the hole should be positioned at a distance of 200 millimeters from the extreme hole of the lower end (600: 3 \u003d 200) or at a distance of 400 millimeters from the upper end.
Using this simple calculation, the same pantograph can be accommodated for other zooms. For example, to increase in two and a half times it is necessary to drill an additional hole at a distance of 240 millimeters from the extreme hole of the lower end of the plank (600: 2.5 \u003d 240), and to increase nine times - at a distance of 66.5 millimeters (600 : 9 \u003d approximately 66.5).
The manufacture of a pantograph will be easily adjusted if you adapt it for few zooms: for example, only two and a half and ten times. Holes in this case will have to drill less.
Pantograph is convenient when it comes from, for example, to increase the drinking patterns.
Simple measurements
In the manufacture of various things, the members of the circle should firmly assimilate the basic rule that ensures neat and accurate performance: do nothing on the eye. Before cutting some detail of the product from any material - whether paper, cardboard, plywood or tin, you must definitely make the markup of this part according to the drawing, drawing or by the description. Available item Be sure to check: exactly it matches the required dimensions. One piece of irregular shape or incorrect size can spoil all the product.
And in order to correctly place the material and check the dimensions of the parts, you need to learn how to use the simplest measuring instruments. With some of them, the members of the mug already met in school lessons.
All pioneers are familiar Large line With divisions on centimeters and millimeters. To measure the line on a sheet of paper or on a blackboard, for example, 10 centimeters, you need to take two marks: against division "0" and against division "10". The distance between these two marks is equal to 10 centimeters. The guys sometimes measured otherwise: from dividing "1" to "10". The result, of course, it turns out wrong. Sometimes the guys and other errors are allowed: Measuring, for example, the width of the board, the ruler is not perpendicular to its edge (so-there is exactly across the board), and osos. As a result, the measured width is more valid. On the division of the line sometimes look incorrectly, directing the look at the right angle, and on the side. And in this case, the result is distorted.
The most accurate measurement is obtained when the scale line does not put onto the board or on a sheet of paper, and they put the edge, divide down. With this position of the line it is easy to make a mark exactly by division.
New measuring instrument for many guys will appear Pocket Roulette With a measurement ribbon of 1 meter. The divisions on the roulette are the same as on a large-scale line, so the guys will learn quickly. Roulette is needed if you need to measure the length to one meter, because the usual line is calculated only by 35-40 centimeters. Roulette can be replaced by a folding meter or a so-called centimeter - measuring tape used during sewing work.
Members of the mug should learn to use Circular Not only for the drawing of circles, but also for measurements. Circle is convenient in cases where a line of some reason cannot be applied: for example, it does not fit inside the homemade. Circular legs are installed at two points, the distance between which they want to measure, then, without changing the solution of the circulation, apply the legs to the scale line and recognize the distance. Circle is also convenient to check the magnitude of several parts that should be the same.
The members of the circle will still be used by special tools for measuring the diameters of round rods or holes - caliper, a chute meter, a kroncyrcule, micrometer. It will be enough for them to measure the diameters with a ruler or circular. Auxiliary measurers when measuring round holes may also be coins:
the diameter of the 20-screw coin is equal to 22 millimeters, the diameter of the 15-screw coin is 20 millimeters, the diameter of the 10-screw coin is 17.5 millimeters, the diameter of the 5-poker coin is 25.5 millimeters.
Members are also useful to remember that the diameter of the ordinary pencil is 7 or 8 millimeters.
Sometimes in product descriptions indicates how diameter it is necessary to take the wire. The diameter of the thin wire is calculated as: on a round pencil is tight, the cooler to the turn, wound a piece of wire; The ruler is measured by the length of the resulting spiral and divide it to the number of turns. For example, if 40 turns of the wire were put at a distance of 2 centimeters, it means it is a diameter of 0.5 millimeters (20 mm: 40 \u003d 0.5 mm).
The length of any circumference is easy to measure with a lace or thread. Then the lace or thread stretch over the divisions of the scale line and recognize the length of the circle in centimeters.
For the preparation of the cooling agent and glue, as well as in other cases, the circle will sometimes be able to measure some amount of water and glue some kind of dry glue, flour, etc. The big accuracy of measurements in this case is not needed, so you can do the simplest means.
The amount and weight of the water is measured by a menzurka (1 cubic centimeter of water weighs 1 gram) or existing kitchenware. A faceted tea glass accommodates 200 grams (or cubic centimeters) of water, a smooth thin-walled glass - 250 grams, a tablespoon - from 12 to 15 grams, and a teaspoon - from 3 to 4 grams.
A small amount of dry substances can be weighed on homemade scales (look at them on page 149), and use coins as a multiplayer:
5-poker coin weighs 5 grams,
3-poker coin weighs 3 grams,
2-poker coin weighs 2 grams,
a cheap coin weighs 1 gram.
For accurate weighing, if it is necessary, with the permission of the teacher, you can use the scales available in the physical and chemical schools of the school.
Marking material
Materials are placed in all cases when it wants to cut some detail over the drawing or at least separate (cut off, sprink) a piece of the desired size. For members of the Mug "Skillful Hands", which still have no sufficient experience in working with tools, it is especially important to learn to cut and cut the material exactly on the conducted lines.
Paper, cardboard, fane, bars and boards are placed with a soft black pencil. Suitable for this purpose, for example, a pioneer school pencil or even softer. Pencil with solid graphite will leave the detached trace on the material, which is sometimes undesirable. The trail of the chemical pencil is difficult to consider it dissolves in liquids and stains the material. Therefore, the chemical pencil for marking never use. Uncomfortable and color pencils: they have thick chiffins that leave wide lines.
When translating drawings for drinking to Phaneur, on the contrary, it is better to take a solid pencil. It is easier to sharpen it, it is more convenient to circle thin patterns of the drawing, the track from the solid pencil on the copy paper is clear.
When marking a wooden bar or board (but not plywood), instead of a pencil, you can use a seboard.
The tin and other metals in the sheets are placed with a metal sweeper, which can be replaced with a sharp nail, a seboard, a knitting knitting knitting and another pointed rod. Any drain leaves a clear trail on the surface of the tin.
Straight lines are placed according to the ruler. First, the ruler is put on the material, the extreme points are noted with a pencil. Then the ruler is placed and spend the line between the intended dots. The pencil is pressed against the rib of the line and keep almost perpendicularly, with a very small slope. Also working and fucking.
A straight line on a long board can be outlined by the way carpenters use. Thin lace rub in chalk. One end is fixed on the board, for example, a seboard. The second end, stretching tightly, kept by hand. Following the other hand the cast is delayed with the lace up and now they are released. It strikes the board and leaves a clear chalk line on it. It is more convenient to make such a markup together, holding both the end of the cord in the hands. Instead of chalk, it can be grained by a piece of charcoal.
Conducting a marking line on a board, a sheet of paper or plywood, it is necessary to ensure that the line passes not to the space, but strictly parallel or perpendicular to one of the edges of the board or sheet. Check if the line lay down correctly, you can, measuring the distance to the parallel edge at both ends of the line.
If you need to cut a rectangle from any material, then one of the sides are performed according to the ruler - a vertical or horizontal line. Then, putting a triangle to this line with one of the cathets, according to the second cathelet, the perpendicular line is drawn. All straight corners of the markup must be checked by the coal. This is especially important when the sweep of a cardboard box or a geometric shape is placed. The slightest error will lead to the box.
Sharp and stupid angles are marked by Transportation.
According to the line, spend a straight line and mark the point on it, where they want to hold the oblique line to form an angle. The vehicle is superimposed so that the middle of the lower edge lay it on the outlined point. The upper arc transporter put a second point - in fission corresponding to the placed corner. After that, the vehicle is removed, and a straight line is carried out between the intended points, continuing it to the required length.
In the figure or drawing, the angle is sometimes not denoted by numbers. It can be measured by the same transporter.
Curves lines are carried out by curved slats. Thin rail bend down the drawing and in this form are slightly fixed by two and three nails or pins on the placed material. The rail is carried out with a pencil line.
You can place the curves of the line otherwise: on the grid to make the drawing on paper on paper and translate it through the copy paper on the tree - just as drawings for drinking are translated. To the same drawing then applied ready-made details for reconciliation.
Circular Circle. If you need to draw a large circle and the size of the circulation is insufficient, use the homemade circleise described on the page. In this case, in the hole of the circle instead of the knife insert the tip of the pencil or selo. There is an even easiest way to mark the larger circles on the plywood: in the center they clog the nail, they are tied to it (they do not tighten it tight), and to another end of it - a pencil. The length of the thread is taken equal to the radius of the circle. Thread stretch and draw a circle.
It is necessary to teach the guys to use the circulation and in other cases. For example, with a circulation, it is easy to divide in half, exactly in the middle, straight line. To do this, enough of the extreme points to spend two arcs of the same radius - more than half of the line. The intersection points of the arcs are connected by the line of the straight vertical line. It will take place perpendicular to the horizontal line and divide it into two equal parts.
Sometimes it is required to cut out of cardboard, plywood or fusing several identical figures. It is best to cut the pattern from the cardboard - the template is such a figure, and then apply it to the material and circuit with a pencil. All figures will turn out the same.
It is necessary to place all the material. It is necessary to save anywhere in order to get as little waste as possible and work facilitated. For example, cut off a small rectangle from the sheet of cardboard or plywood should be in the corner of this sheet, where it is enough to make two cuts, and not in the middle, where you need to do three or four cuts and unnecessary cardboard stripes can remain.
Each made detail must be checked: whether it corresponds to the drawing in shape and sizes, whether its corners are cut properly, it fits tightly to other details, etc. It is used to check the same measuring and marking tools: a ruler, coolers, a circulation.
Only after a thorough check of all parts they are connected together to make a planned thing.
Increase the drawing on the computer !!! Very simple!I have long wanted to know how to increase the drawing, make it a format more than A-4.
1. The Microsoft Office Excel 2007 software on the computer by clicking on the inscription 1 time with the cursor (left mouse button):
2. The program has closed, 1 time, press the cell allocated in the upper left corner - this will fix your image in the future at this point. 
3. When the "Insert" section and click 1 time, the same key: 
4. Select the "Figure" window in the opened window and click again 1 time: 
5. In the window that opens, in the usual way, select the drawing selected to zoom in, marked (1 time): 
6. Insert (1 time): 
7. We see that the drawing is located in the program on cells to increase: 
8. Surrender the cursor to the right lower (free) corner of the picture, click on the key-loss and not releasing, stretch the picture slightly - making sure that it is possible 
9. Now we need to make markup, choose the desired size of the picture, 1 time pushing to the "page markup": 
10. Click 1 time "Size" in the window that opens: 
11. Separate in the window that opens and click 1 time: 
12. The museum appeared on the field the grid of lines appeared - this is the markup of pages:
13.The item "8", taking into account the required image size:

14. Last step. The picture is enlarged, it remains to be previously viewed or simply saved or printed immediately. To do this, we need the Office button (labeled 1 time): 
15. If our goal is to simply get an increase, then when printing should not be forgotten in the "Properties" to put a "fast blacks". As a result, we get several A4 pages that need to be connected to get an enlarged pattern.
That's all!!! Try! Be sure to get!
 Enlarge the pictures allows any version of this program !!! There are only small nuances that are easy to master.
If you do not know how to draw, but I would like to learn, it is worth starting with simple - copy drawings. To begin with, this can be done using a tracing. This method is most simple in performance. Now let's more accurately study how to transfer the drawing with
Instruction
To postpone the picture, follow the following sequence of actions:
- We choose the image and, putting on it with a traction, with a dense pressure we supply all the lines using a black acrylic handle.
- Now turning the traction and put the front side of the paper sheet to be transferred to the image.
- Tightly press and pass through it a hot iron.
- Now we remove the cushion and additionally draw not enough clear lines.
- The image is ready.
This method is used for simple pictures that do not contain a large number of complex details. Now you know how to transfer the drawing from paper on paper in a simple way. Having tried it, you can proceed to others.
More complicated way

To transfer complex drawings, you can use the grid for copying. With it, it is possible to also reduce or increase the scale of the image itself.
- original drawing;
- transparencies;
- paper;
- duct tape;
- line;
- pencil.
Instruction
To master this method, follow the following steps:
- The original image is applied to the transparent film, which shows the squares of the same sizes.
- The same cage is applied to the blank sheet of paper if the picture is played in the original. How to transfer paper drawing when the image size needs to be changed? With an increase in the size of the squares make more when we reduce, respectively, less.
- Now everything you left is to move the image through the cells.
- When the picture with the help of a pencil is completely transferred, you can begin to decorate.
Now you know how to transfer the image from paper on paper. Consider other surfaces.
Body as a base

The tattoo is a highlight of appearance, but not everyone is solved to apply a drawing on the skin, realizing that this decision is made for life. For people who are afraid of such a act, however, they want to decorate their body with a beautiful image, the excellent solution is to learn how to transfer the paper on the skin to the skin, you need to explore the following information. The main stage is a clear drawing of the contours of the future image.
The picture can be applied to the body with help:
- ceing.
First method
For it, you need to perform the following actions:
- Selection of pattern, definition of its application, skin disinfection.
- Translation of image on a copy. To do this, put paper on the original and carefully supply all its contours.
- We make a copier with alcohol and apply to the body.
- So that the contours are well imprinted, circle them again through a copy of the movie, trying to leave it whole.
Second way
It is based on the use of tracing. Need to do the following steps:
- Draw a helium handle itself drawing.
- Disinfecting the skin and smear soap.
- We apply traction and supply contours with a sharp object.
- Now paint the drawing.
If you still decide to apply a permanent drawing on your body, go to this very carefully. The main thing is to choose a good salon, take a test for an allergic reaction and check that all intrinss are disinfected.
How to transfer a drawing with paper on the glass
To work, we take the image with good contours and a transfer roll to the transfer. You need to purchase a marker - a marker for glass, it fits well and easily washed off from the surface.

Instruction:
- We take a film. Its size should be slightly larger than the drawing itself. The film is attached to the surface, which prevents the picture to be knocked out.
- The image is placed on the film and will be drunk fine and very carefully.
- Now the film is neatly transferred to the front side for a previously prepared surface. Preparation lies in degreasing its face. Make sure that the film is completely adhered to the glass, get rid of folds and bubbles.
- For a clearer transfer again, by contour, we supply the image to any sharp object.
- It's time to get rid of polyethylene. It is done very carefully to not lubricate the drawing. If somewhere there is inaccuracies, now it's time to fix them.
- Now draw contour. This can be done with the help of acrylic paints and tassels.
- After everything dried, gently cotton wands, moistened in liquids, get rid of marker traces.
- Inside the image is filled in by any way. If the technique is stained, then everything is poured along the contour.
- After drying for a longer service, you can image bake or lacquer. It all depends on where this item will be used.
How to transfer a drawing with paper on a tree
In order to see your favorite image on a wooden basis, you just need to follow the steps outlined below.

To work will be required:
- figure, printed on a laser printer;
- wooden plank;
- acrylic gel medium;
- flat tool for moving pattern;
- paint and rag;
- soft paraffin or matte glue;
- 2 brushes.
Instruction:
- Select image. It should be a drawing that will look beautiful on a wooden basis. To give some similarities with a vintage style, it can be processed in special programs.
- The image is printed only on the laser printer, this is the main condition.
- A smooth wooden base is selected.
- Now we apply a uniform layer of a gel medium. It is he who will help the image to be transferred to the prepared surface.
- We have a drawing face to the base. At the time of the connection there are bubbles that, if possible, should be smoothed.
- Today, the work is completed, leave everything for the night, continue tomorrow.
- It is time to remove paper. To do this, it is necessary to wet it and linnet with your fingers. It is now that you witness a miracle - when removing paper, you can see how the image remains on the tree.
- Now you can use wood paint. Watch out for its number so that the image does not darke it.
- Now apply liquid paraffin. If necessary, the last two stages can be repeated after drying the first layer.
Other Fundamentals for Transferring Images
Metal - the base, also suitable for such "focus". For accurate and sufficiently accurate work, it draws two axial lines on it or marked the angles of the image. Now consider in more detail how to transfer the drawing from the paper to the metal.
The most common is to use for this copy paper. Since the metal is a very hard material, it is covered with blemal or bright paint. The transfer process starts after complete lacquer drying, which is applied to the very beginning of the main work.
Instruction

This method requires compliance with the following rules:
- The drawing is very tightly fixed on the product. To do this, you can use a soap solution.
- Many wizards for this work are used by a Changannik. With it, the image is very accurate - almost jewelry, which, however, takes a lot of time and requires some pre-training.
- Tools take three fingers, resting on the unnamed, which serves as a kind of spring. Checkan is located 2-3 mm from the picture, its light blows form a dotted line - the main contour of the image is drawn. The smaller the detail of the picture, the more dense it breaks through.
- When all lines are transferred, you can wash off the paint.
- The image can be covered with varnish.
Now you know how to transfer the drawing from paper on paper, on the skin, on the glass, on the tree and metal. Forward - for instruments, and good luck in your endeavors!
Imagine that the question of how was the question of how change the size of the picture without photoshop? You are on the Internet, and you need to trim a photo or picture for the questionnaire. You actually do if sitting at the computer, or with a tablet, or with a smartphone in your hands, go to the site.
After all, on this resource you can use the attachment application photo online. Please note that the application supports GIF, BMP, JPG, PNG formats. It is in the "Working with Images" block called "Printing Images".
And performing simple operations here, we change the size of the image. After all, as well as all other through the service, this application is very easy to use. It provides an opportunity to get a qualitative result very quickly.
We with it change the size of the photo. We cut it. And for this you need to load the desired image to be loaded, select the fragment you want to trim and press the Cut key, after receiving information about the size of the future picture. That is, the process provides percentage increase or decrease in the image. There is always the opportunity to see how you cut the photo, and then save it.
What other opportunities is provided by the application
When we change the size of the photo online, it does not mean that the whole process that takes a few seconds is to just trim the picture online.
The one who works with the image can still spend additionally (but literally read) seconds so that, if necessary, turn the photo or reflect it mirror. But this is not at all limited. You can also add beautiful effects or frame. And just need to do a few clicks.
There is nothing surprising in the fact that users of the site are people of various professions, age and even hobbies. All because some prefer not to look for the application you need on different Internet resources. And the specified online service is good for many that most different, but frequently used applications are concentrated.
And many of those who spend the mass of time in the world cobweb (including in order to change photos), comes to the site quite natural. Be he designer or webmaster, journalist or motorist. After all, many references on the Internet are conducted here, and the service is available to everyone without registration.
Service is also free. It can be used when preparing photos and music for blogs and sites. There is no need to download files, installing and subsequent updating programs.
This positively appreciates the one who is engaged in professional photography, and the one for whom to spend time with the camera is just a great passion. After all, the site has a suitable application for them. For example, for the one who is tormented by the question, how to resize image?
Why do such a function need
The reason why a particular Internet user is forced to search for a photo editor online can be different. But, as experience shows, it is usually caused by the need for quickly change the size of the photo.
And it usually happens. Suppose someone needs to download the editable image to the site. For example, as Avatar "VKontakte". As a rule, in most resources in the global network for images that are poured into service, limit on its dimensions. And this in a concrete case means you need to change the size of the photo online.
Without it, you can not do. However, the restriction is provided not only for dimensions. The restriction also applies to the weight of the image. That is, the problem requires such a solution when you need to reduce the photo. And it is very easy to do using the photo editor online.
But to the "Enlarge photo" functions, it is resorted when you need to increase the size of the image. As well as a decrease in the photo, this function finds use when someone often processes the image.
For a more detailed feature of the popular service, you should mention and about such a "chip", as the photo in the style of Instagram. That is, with this case, the service provides an opportunity not only resize, but also give the desired type of photos. And we talk about those cases when you have no mobile device and an instagram account with you.
We assure that on a personal computer to handle photos much more convenient and more pleasant. The function "Instagram's photo style" acts just like pruning photos online. This means the following: you need to upload a photo, impose effects and then save to your computer. So, in particular, you can make the effect of the old photo from the usual image.